标签:
1.首先我们编写一个生成4种模式的文件的程序案例:
(1)首先是activity_main.xml文件:
 1 <RelativeLayout xmlns:android="http://schemas.android.com/apk/res/android"
 2     xmlns:tools="http://schemas.android.com/tools"
 3     android:layout_width="match_parent"
 4     android:layout_height="match_parent"
 5     tools:context=".MainActivity" >
 6
 7     <Button
 8         android:onClick="click"
 9         android:layout_width="wrap_content"
10         android:layout_height="wrap_content"
11         android:layout_centerHorizontal="true"
12         android:layout_centerVertical="true"
13         android:text="生成文件" />
14
15     <RadioGroup
16         android:id="@+id/rg_mode"
17         android:layout_width="wrap_content"
18         android:layout_height="wrap_content" >
19
20         <RadioButton
21             android:id="@+id/rb_private"
22             android:layout_width="wrap_content"
23             android:layout_height="wrap_content"
24             android:checked="true"
25             android:text="私有 private" />
26
27         <RadioButton
28             android:id="@+id/rb_readble"
29             android:layout_width="wrap_content"
30             android:layout_height="wrap_content"
31             android:text="全局可读 world readable" />
32
33         <RadioButton
34             android:id="@+id/rb_writeable"
35             android:layout_width="wrap_content"
36             android:layout_height="wrap_content"
37             android:text="全局可写world writeable" />
38
39         <RadioButton
40             android:id="@+id/rb_public"
41             android:layout_width="wrap_content"
42             android:layout_height="wrap_content"
43             android:text="全局可读可写public" />
44     </RadioGroup>
45
46 </RelativeLayout>
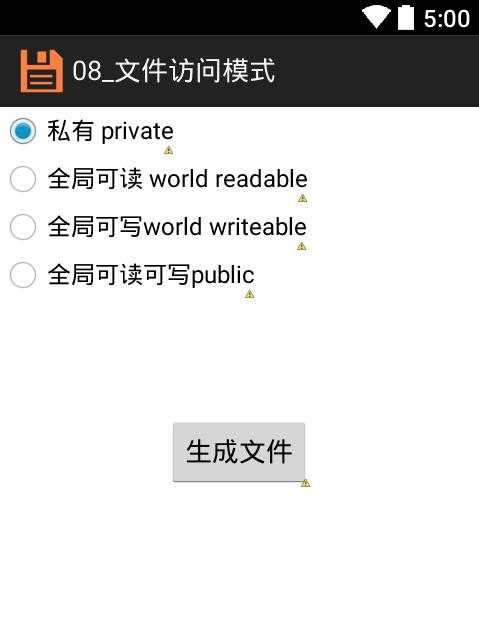
布局效果如下图:

(2)接下来是代码逻辑部分如下:MainActivity.java:
 1 package com.itheima.filemode;
 2
 3 import java.io.FileOutputStream;
 4
 5 import android.app.Activity;
 6 import android.os.Bundle;
 7 import android.view.View;
 8 import android.widget.RadioGroup;
 9
10 public class MainActivity extends Activity {
11     private RadioGroup rg_mode;
12
13     @Override
14     protected void onCreate(Bundle savedInstanceState) {
15         super.onCreate(savedInstanceState);
16         setContentView(R.layout.activity_main);
17         rg_mode = (RadioGroup) findViewById(R.id.rg_mode);
18     }
19
20     /**
21      * 按钮的点击事件
22      *
23      * @param view
24      */
25     public void click(View view) {
26         try {
27             int id = rg_mode.getCheckedRadioButtonId();
28             FileOutputStream fos = null;
29             switch (id) {
30             case R.id.rb_private:// 私有文件
31                 fos = openFileOutput("private.txt",  MODE_PRIVATE);
32                 break;
33             case R.id.rb_public:// 可读可写文件
34                 fos = openFileOutput("public.txt",  MODE_WORLD_READABLE+MODE_WORLD_WRITEABLE);
35                 break;
36             case R.id.rb_readble:// 全局可读文件
37                 fos = openFileOutput("readble.txt",  MODE_WORLD_READABLE);
38                 break;
39             case R.id.rb_writeable:// 全局可写文件
40                 fos = openFileOutput("/sdcard/files/writeable.txt",  MODE_WORLD_WRITEABLE);
41                 break;
42             }
43             fos.write("dfafda".getBytes());
44             fos.close();
45         } catch (Exception e) {
46             e.printStackTrace();
47         }
48     }
49 }
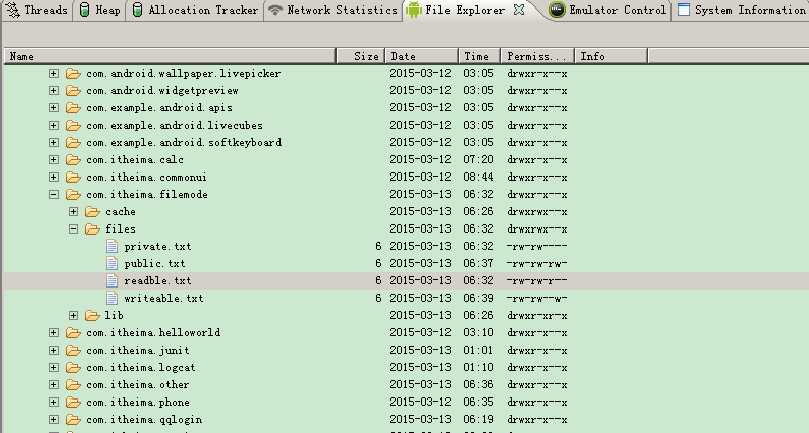
openFileOutput()方法的第一参数用于指定文件名称,不能包含路径分隔符“/” ,如果文件不存在,Android 会自动创建它。创建的文件保存在/data/data/<package name>/files目录,如: /data/data/cn.itcast.action/files/itcast.txt ,通过点击Eclipse菜单“Window”-“Show View”-“Other”,在对话窗口中展开android文件夹,选择下面的File Explorer视图,然后在File Explorer视图中展开/data/data/<package name>/files目录就可以看到该文件。
我们分别点击界面上不同的RadioButton,生成不同文件如下图:

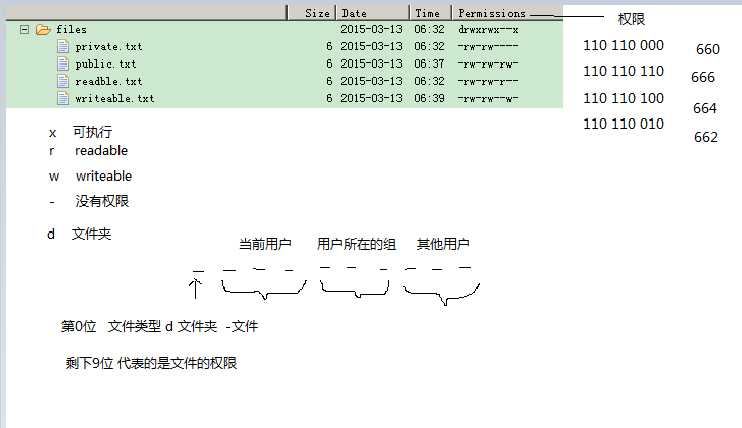
2.小结:android下文件访问的权限:
* 默认情况下所有的文件创建出来都是私有的。只有自己的应用程序可以访问里面的数据,别的应用程序是不可以访问数据的。
* 特殊情况利用api可以修改文件的权限。
openFileOutput("文件名","文件的访问模式"); 私有 只读 只写 可读可写
* 底层是通过Linux操作系统的文件模式来实现的。

Context.MODE_PRIVATE:为默认操作模式,代表该文件是私有数据,只能被应用本身访问,在该模式下,写入的内容会覆盖原文件的内容,如果想把新写入的内容追加到原文件中。可以使用Context.MODE_APPEND
Context.MODE_APPEND:模式会检查文件是否存在,存在就往文件追加内容,否则就创建新文件。
Context.MODE_WORLD_READABLE和Context.MODE_WORLD_WRITEABLE用来控制其他应用是否有权限读写该文件。
MODE_WORLD_READABLE:表示当前文件可以被其他应用读取;
MODE_WORLD_WRITEABLE:表示当前文件可以被其他应用写入。
Android(java)学习笔记184:生成4种模式的文件
标签:
原文地址:http://www.cnblogs.com/hebao0514/p/4746202.html