标签:
1、UITanleview有的两种风格
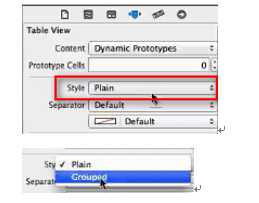
一种是Plain,一种是Grouped,可以从这里设置风格:

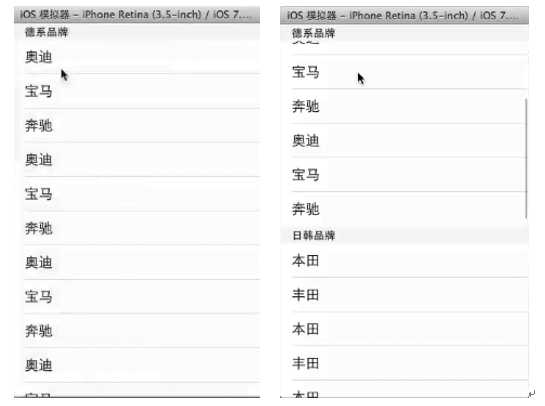
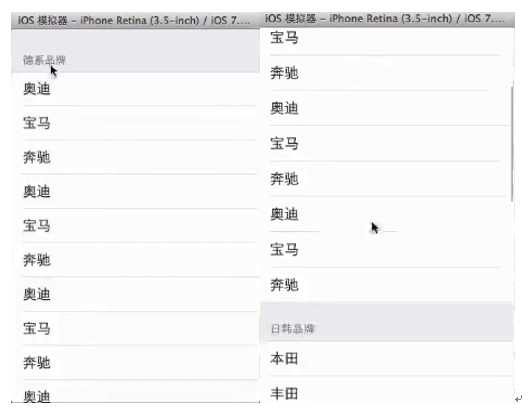
他们样式分别如下:
Plain:

Grouped:

2、tableView展示数据的过程:

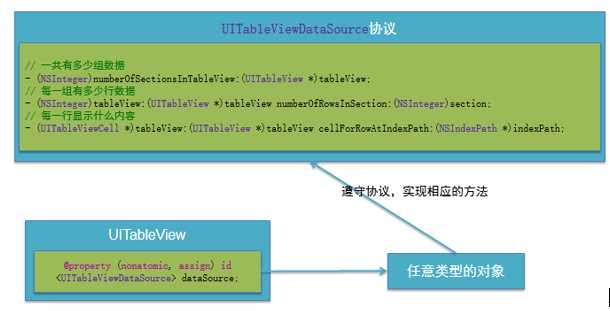
(1)首先,控制器要遵守UITableViewDataSource协议
@interface ViewController () <UITableViewDataSource>
(2)调用数据源的下面方法得知一共有多少组数据
- (NSInteger)numberOfSectionsInTableView:(UITableView *)tableView;
(3)调用数据源的下面方法得知每一组有多少行数据
- (NSInteger)tableView:(UITableView *)
tableView numberOfRowsInSection:(NSInteger)section;
(4)调用数据源的下面方法得知每一行显示什么内容
- (UITableViewCell *)tableView:(UITableView *)
tableView cellForRowAtIndexPath:(NSIndexPath *)indexPath;
(5)设置分组头部标题
- (NSString *)tableView:(UITableView *)
tableView titleForHeaderInSection:(NSInteger)section;
(6)设置分组尾部标题
- (NSString *)tableView:(UITableView *)
tableView titleForFooterInSection:(NSInteger)section;
(7)滑动删除
/**
* 如果实现了这个方法,就自动实现了滑动删除的功能
* 点击了删除按钮就会调用
* 提交了一个编辑操作就会调用(操作:删除\添加)
* @param editingStyle 编辑的行为
* @param indexPath 操作的行号
*/
- (void)tableView:(UITableView *)tableView commitEditingStyle:
(UITableViewCellEditingStyle)editingStyle forRowAtIndexPath:
(NSIndexPath *)indexPath
{
if (editingStyle == UITableViewCellEditingStyleDelete) { // 提交的是删除操作,默认就是传的删除
// 1.删除模型数据
[self.contacts removeObjectAtIndex:indexPath.row];
// 2.刷新表格
// 局部刷新某些行(使用前提:模型数据的行数不变)
[self.tableView deleteRowsAtIndexPaths:@[indexPath]
withRowAnimation:UITableViewRowAnimationTop];
// 3.归档
[NSKeyedArchiver archiveRootObject:self.contacts toFile:
MJContactsFilepath];
} else if (editingStyle == UITableViewCellEditingStyleInsert) {
// 1.修改模型数据
MJContact *contact = [[MJContact alloc] init];
contact.name = @"jack";
contact.phone = @"10086";
[self.contacts insertObject:contact atIndex:indexPath.row + 1];
// 2.刷新表格
NSIndexPath *nextPath =
[NSIndexPath indexPathForRow:indexPath.row + 1 inSection:0];
[self.tableView insertRowsAtIndexPaths:@[nextPath] withRowAnimation:UITableViewRowAnimationBottom];
// [self.tableView reloadData];
}
}
例如:
#import "ViewController.h"
@interface ViewController () <UITableViewDataSource>
@property (weak, nonatomic) IBOutlet UITableView *tableView;
@end
@implementation ViewController
- (void)viewDidLoad
{
[super viewDidLoad];
// 设置数据源
self.tableView.dataSource = self;
}
#pragma mark - 数据源方法
/**
* 一共有多少组数据
*/
- (NSInteger)numberOfSectionsInTableView:(UITableView *)tableView
{
return 2;
}
/**
* 第section组有多少行
*/
- (NSInteger)tableView:(UITableView *)
tableView numberOfRowsInSection:(NSInteger)section
{
if (section == 0) {
return 3;
} else {
return 4;
}
}
/**
* 每一行显示怎样的内容(cell)
*/
- (UITableViewCell *)tableView:(UITableView *)
tableView cellForRowAtIndexPath:(NSIndexPath *)indexPath
{
UITableViewCell *cell = [[UITableViewCell alloc]
initWithStyle:UITableViewCellStyleDefault reuseIdentifier:nil];
if (indexPath.section == 0) { // 家禽(第0组)
if (indexPath.row == 0) { // 第0组的第0行
cell.textLabel.text = @"鸡";
} else if (indexPath.row == 1) { // 第0组的第1行
cell.textLabel.text = @"鸭";
} else if (indexPath.row == 2) {
cell.textLabel.text = @"鹅";
}
} else if (indexPath.section == 1) { // 水果(第1组)
if (indexPath.row == 0) { // 第1组的第0行
cell.textLabel.text = @"苹果";
} else if (indexPath.row == 1) { // 第1组的第1行
cell.textLabel.text = @"橘子";
} else if (indexPath.row == 2) {
cell.textLabel.text = @"香蕉";
} else if (indexPath.row == 3) {
cell.textLabel.text = @"西瓜";
}
}
return cell;
}
/**
* 第section组显示怎样的头部标题
*/
- (NSString *)tableView:(UITableView *)
tableView titleForHeaderInSection:(NSInteger)section
{
if (section == 0) {
return @"家禽类";
} else if (section == 1) {
return @"水果类";
}
}
/**
* 第section组显示怎样的尾部标题
*/
- (NSString *)tableView:(UITableView *)
tableView titleForFooterInSection:(NSInteger)section
{
if (section == 0) {
return @"这是家禽类结尾";
} else if(section == 1) {
return @"这是水果类结尾";
}
}
@end
(7)设置行高的两种方法:
方法一:直接调用rowHeight方法
self.tableView.rowHeight = 60;
方法二,使用代理
首先通过连线或者用self.tableView.delegate = self;代码设置代理,然后使ViewController遵守UITableViewDelegate协议。之后调用下列方法直接返回行高即可:
-(CGFloat)tableView:(UITableView *)tableView heightForRowAtIndexPath:
(NSIndexPath *)indexPath
{
return 60;
}
3、Cell简介
UITableView的每一行都是一个UITableViewCell,通过dataSource的tableView:cellForRowAtIndexPath:方法来初始化每一行。
UITableViewCell内部有个默认的子视图:contentView,contentView是UITableViewCell所显示内容的父视图,可显示一些辅助指示视图。
辅助指示视图的作用是显示一个表示动作的图标,可以通过设置UITableViewCell的accessoryType来显示,默认是UITableViewCellAccessoryNone(不显示辅助指示视图),其他值如下:
还可以通过cell的accessoryView属性来自定义辅助指示视图(比如往右边放一个开关)
4、UITableViewCell的contentView
contentView下默认有3个子视图:
其中2个是UILabel(通过UITableViewCell的textLabel和detailTextLabel属性访问)
第3个是UIImageView(通过UITableViewCell的imageView属性访问)
UITableViewCell还有一个UITableViewCellStyle属性,用于决定使用contentView的哪些子视图,以及这些子视图在contentView中的位置
5、给UITableView设置背景
// 设置背景(背景view不用设置尺寸, backgroundView的优先级 > backgroundColor)
UIImageView *bgView = [[UIImageView alloc] init];
bgView.image = [UIImage imageNamed:@"buttondelete"];
cell.backgroundView = bgView;
//点击时的颜色
UIView *selectedbgView = [[UIView alloc] init];
selectedbgView.backgroundColor = [UIColor greenColor];
cell.selectedBackgroundView = selectedbgView;
6、设置UITableView分割线属性
注意apple里RGB值输入的是比例,而且是Float型,比如RGB(255,0,255)应按如下输入:
self.tableView.separatorColor = [UIColor colorWithRed:255/255.0 green:255/255.0 blue:0 alpha:255/255.0];
设置风格,比如无分割线:
self.tableView.separatorStyle = UITableViewCellSeparatorStyleNone;
7、在最顶部底部放置控件
表格的头部控件(直接显示表格的最顶部)
self.tableView.tableHeaderView =
[UIButton buttonWithType:UIButtonTypeContactAdd];
self.tableView.tableHeaderView = [[UISwitch alloc] init];//底部放置控件
self.tableView.tableFooterView = [[UISwitch alloc] init];//底部放置控件
8、Cell的重用原理
每次有新的一行进入屏幕,都会调用UITableViewCell *cell = [[UITableViewCell alloc] initWithStyle:UITableViewCellStyleDefault reuseIdentifier:nil]方法,新创建一这个新的行,当往回拖UITableView时,以前的行又会进入屏幕,这时又会再一次创建一个新的这一行并分配新的内存,但最后那些不用的行会最终被销毁,其实最消耗内存的其实是创建和销毁这个过程,创建、销毁速度太快会使内存飙升。
iOS设备的内存有限,如果用UITableView显示成千上万条数据,就需要成千上万个UITableViewCell对象的话,那将会耗尽iOS设备的内存。要解决该问题,需要重用UITableViewCell对象
重用原理:当滚动列表时,部分UITableViewCell会移出窗口,UITableView会将窗口外的UITableViewCell放入一个对象池中,等待重用。当UITableView要求dataSource返回UITableViewCell时,dataSource会先查看这个对象池,如果池中有未使用的UITableViewCell,dataSource会用新的数据配置这个UITableViewCell,然后返回给UITableView,重新显示到窗口中,从而避免创建新对象。
还有一个非常重要的问题:有时候需要自定义UITableViewCell(用一个子类继承UITableViewCell),而且每一行用的不一定是同一种UITableViewCell,所以一个UITableView可能拥有不同类型的UITableViewCell,对象池中也会有很多不同类型的UITableViewCell,那么UITableView在重用UITableViewCell时可能会得到错误类型的UITableViewCell
解决方案:UITableViewCell有个NSString *reuseIdentifier属性,可以在初始化UITableViewCell的时候传入一个特定的字符串标识来设置reuseIdentifier(一般用UITableViewCell的类名)。当UITableView要求dataSource返回UITableViewCell时,先通过一个字符串标识到对象池中查找对应类型的UITableViewCell对象,如果有,就重用,如果没有,就传入这个字符串标识来初始化一个UITableViewCell对象
Cell的重用示例代码:
- (UITableViewCell *)tableView:(UITableView *)tableView cellForRowAtIndexPath:(NSIndexPath *)indexPath
{
// 1.定义一个cell的标识
static NSString *ID = @"mjcell";
// 2.从缓存池中取出cell
UITableViewCell *cell =
[tableView dequeueReusableCellWithIdentifier:ID];
// 3.如果缓存池中没有cell
if (cell == nil) {
cell = [[UITableViewCell alloc]
initWithStyle:UITableViewCellStyleSubtitle reuseIdentifier:ID];
}
// 4.设置cell的属性...
return cell;
}
9、为 UITableView添加右侧索引条
- (NSArray *)sectionIndexTitlesForTableView:(UITableView *)tableView
{
return [self.groups valueForKeyPath:@"title"];
}
在其中返回一个数组,return [self.groups valueForKeyPath:@"title"];代表从self.groups中取“title”的值赋值给索引名称,点击索引,会根据索引顺序使UITableView跳到对应顺序section。
10、监听UITableView的选中
首先要把ViewController设置为UITableView的代理,并使ViewController遵守UITableViewDelegate协议。主要常用下面两个方法:
- (void)tableView:(UITableView *)tableView didSelectRowAtIndexPath:
(NSIndexPath *)indexPath;------选中行时调用
- (void)tableView:(UITableView *)tableView didDeselectRowAtIndexPath:
(NSIndexPath *)indexPath;------取消选中时候调用
11、UITableView数据刷新
全局刷新:
[self.tableView reloadData];
局部刷新:
NSIndexPath *path = [NSIndexPath indexPathForRow:row inSection:0];
[self.tableView reloadRowsAtIndexPaths:@[path] withRowAnimation:
UITableViewRowAnimationBottom];//刷新第0组的第row行
标签:
原文地址:http://www.cnblogs.com/lifengfneg/p/4773837.html