标签:
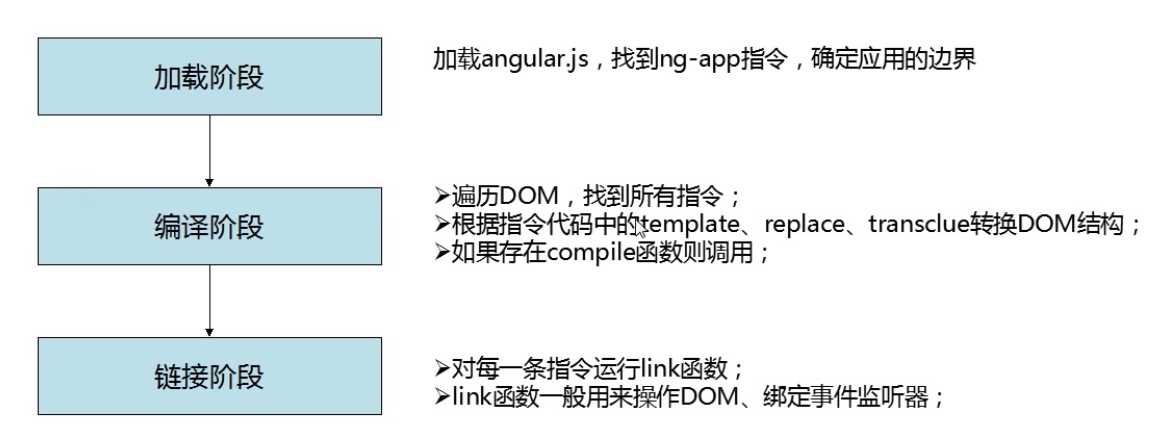
指令是什么? 指令是我们用来扩展浏览器能力的技术之一。在DOM编译期间,和HTML关联着的指令会被检测到,并且被执行。这使得指令可以为DOM指定行为,或者改变它。
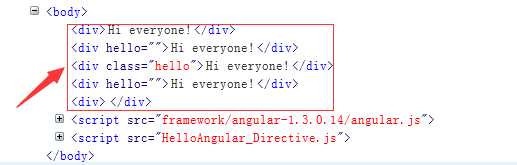
 1 <!doctype html>
 2 <html ng-app="MyModule">
 3     <head>
 4         <meta charset="utf-8">
 5     </head>
 6     <body>
 7         <hello></hello>
 8         <div hello></div>
 9         <div class="hello"></div>
10         <!-- directive:hello -->
11         <div></div>
12     </body>
13     <script src="framework/angular-1.3.0.14/angular.js"></script>
14     <script src="HelloAngular_Directive.js"></script>
15 </html>
1 var myModule = angular.module("MyModule", []);
2 myModule.directive("hello", function() {
3     return {
4         restrict: ‘AEMC‘,
5         template: ‘<div>Hi everyone!</div>‘,
6         replace: true
7     }
8 });

1 var myModule = angular.module("MyModule", []);
2 myModule.directive("hello", function() {
3     return {
4         restrict: ‘AECM‘,
5         templateUrl: ‘hello.html‘,
6         replace: true
7     }
8 });
 1 var myModule = angular.module("MyModule", []);
 2 //注射器加载完所有模块时,此方法执行一次
 3 myModule.run(function($templateCache){
 4     $templateCache.put("hello.html","<div>Hello everyone!!!!!!</div>");
 5 });
 6 myModule.directive("hello", function($templateCache) {
 7     return {
 8         restrict: ‘AECM‘,
 9         template: $templateCache.get("hello.html"),
10         replace: true
11     }
12 });
1 var myModule = angular.module("MyModule", []);
2 myModule.directive("hello", function() {
3     return {
4         restrict:"AE",
5         transclude:true,
6         template:"<div>Hello everyone!<div ng-transclude></div></div>"
7     }
8 });

 1 <!doctype html>
 2 <html ng-app="MyModule">
 3     <head>
 4         <meta charset="utf-8">
 5     </head>
 6     <body>
 7         <div ng-controller="MyCtrl">
 8             <loader howToLoad="loadData()">滑动加载</loader>
 9         </div>
10         <div ng-controller="MyCtrl2">
11             <loader howToLoad="loadData2()">滑动加载</loader>
12         </div>
13     </body>
14     <script src="framework/angular-1.3.0.14/angular.js"></script>
15     <script src="Directive&Controller.js"></script>
16 </html>
Directive&Controller.js :
 1 var myModule = angular.module("MyModule", []);
 2 myModule.controller(‘MyCtrl‘, [‘$scope‘, function($scope){
 3     $scope.loadData=function(){
 4         console.log("加载数据中...");
 5     }
 6 }]);
 7 myModule.controller(‘MyCtrl2‘, [‘$scope‘, function($scope){
 8     $scope.loadData2=function(){
 9         console.log("加载数据中...22222");
10     }
11 }]);
12 myModule.directive("loader", function() {
13     return {
14         restrict:"AE",
15         link:function(scope,element,attrs){
16             element.bind(‘mouseenter‘, function(event) {
17                 //(1)scope.loadData();
18                 //(2)scope.$apply("loadData()");
19                 // 注意这里的坑,howToLoad会被转换成小写的howtoload
20                 scope.$apply(attrs.howtoload);
21             });
22         }
23     }
24 });
现在我们想要实现的效果是当鼠标滑过div元素时,调用一个加载数据的方法。
 1 <!doctype html>
 2 <html ng-app="MyModule">
 3 <head>
 4     <meta charset="utf-8">
 5     <link rel="stylesheet" href="css/bootstrap-3.0.0/css/bootstrap.css">
 6     <script src="framework/angular-1.3.0.14/angular.js"></script>
 7     <script src="Directive&Directive.js"></script>
 8 </head>
 9 <body>
10     <div class="row">
11         <div class="col-md-3">
12             <superman strength>动感超人---力量</superman>
13         </div>
14     </div>
15     <div class="row">
16         <div class="col-md-3">
17             <superman strength speed>动感超人2---力量+敏捷</superman>
18         </div>
19     </div>
20     <div class="row">
21         <div class="col-md-3">
22             <superman strength speed light>动感超人3---力量+敏捷+发光</superman>
23         </div>
24     </div>
25 </body>
26 </html>
 1 var myModule = angular.module("MyModule", []);
 2 myModule.directive("superman", function() {
 3     return {
 4         scope: {},//独立作用域
 5         restrict: ‘AE‘,
 6         controller: function($scope) {
 7             $scope.abilities = [];
 8             this.addStrength = function() {
 9                 $scope.abilities.push("strength");
10             };
11             this.addSpeed = function() {
12                 $scope.abilities.push("speed");
13             };
14             this.addLight = function() {
15                 $scope.abilities.push("light");
16             };
17         },
18         link: function(scope, element, attrs) {
19             element.addClass(‘btn btn-primary‘);
20             element.bind("mouseenter", function() {
21                 console.log(scope.abilities);
22             });
23         }
24     }
25 });
26 myModule.directive("strength", function() {
27     return {
28         require: ‘^superman‘,
29         link: function(scope, element, attrs, supermanCtrl) {
30             supermanCtrl.addStrength();
31         }
32     }
33 });
34 myModule.directive("speed", function() {
35     return {
36         require: ‘^superman‘,
37         link: function(scope, element, attrs, supermanCtrl) {
38             supermanCtrl.addSpeed();
39         }
40     }
41 });
42 myModule.directive("light", function() {
43     return {
44         require: ‘^superman‘,
45         link: function(scope, element, attrs, supermanCtrl) {
46             supermanCtrl.addLight();
47         }
48     }
49 });
 1 <!doctype html>
 2 <html ng-app="MyModule">
 3     <head>
 4         <meta charset="utf-8">
 5         <link rel="stylesheet" href="css/bootstrap-3.0.0/css/bootstrap.css">
 6     </head>
 7     <body>
 8         <div ng-controller="MyCtrl">
 9             <drink flavor="{{ctrlFlavor}}"></drink>
10         </div>
11     </body>
12     <script src="framework/angular-1.3.0.14/angular.js"></script>
13     <script src="ScopeAt.js"></script>
14 </html>
ScopeAt.js :
 1 var myModule = angular.module("MyModule", []);
 2 myModule.controller(‘MyCtrl‘, [‘$scope‘, function($scope){
 3     $scope.ctrlFlavor="百威";
 4 }])
 5 myModule.directive("drink", function() {
 6     return {
 7         restrict:‘AE‘,
 8         scope:{
 9             flavor:‘@‘
10         },
11         template:"<div>{{flavor}}</div>"
12          //,
13          //link:function(scope,element,attrs){
14          //    scope.flavor=attrs.flavor;
15          //}
16     }
17 });
使用link进行指令和控制器两个作用域中数据的绑定。如果用scope中@的话,就不需要link这么麻烦了,angularJS会自动进行绑定。
1         <div ng-controller="MyCtrl">
2             Ctrl:
3             <br>
4             <input type="text" ng-model="ctrlFlavor">
5             <br>
6             Directive:
7             <br>
8             <drink flavor="ctrlFlavor"></drink>
9         </div>
 1 var myModule = angular.module("MyModule", []);
 2 myModule.controller(‘MyCtrl‘, [‘$scope‘, function($scope){
 3     $scope.ctrlFlavor="百威";
 4 }])
 5 myModule.directive("drink", function() {
 6     return {
 7         restrict:‘AE‘,
 8         scope:{
 9             flavor:‘=‘
10         },
11         template:‘<input type="text" ng-model="flavor"/>‘
12     }
13 });
这个例子中有两个输入框,第一个绑定了MyCtrl控制器中的scope对象的ctrlFlavor 属性。第二个绑定的是指令中的flavor属性。 但是在drink 指令中 scope对象的flavor 属性 用了 ”=“ ,与父scope中的属性进行双向数据绑定。所以两个值有一个改动,另一个属性值也会改动。
1     <body>
2         <div ng-controller="MyCtrl">
3             <greeting greet="sayHello(name)"></greeting>
4             <greeting greet="sayHello(name)"></greeting>
5             <greeting greet="sayHello(name)"></greeting>
6         </div>
7     </body>
 1 var myModule = angular.module("MyModule", []);
 2 myModule.controller(‘MyCtrl‘, [‘$scope‘, function($scope){
 3     $scope.sayHello=function(name){
 4         alert("Hello "+name);
 5     }
 6 }])
 7 myModule.directive("greeting", function() {
 8     return {
 9         restrict:‘AE‘,
10         scope:{
11             greet:‘&‘
12         },
13         template:‘<input type="text" ng-model="userName" /><br/>‘+
14                  ‘<button class="btn btn-default" ng-click="greet({name:userName})">Greeting</button><br/>‘
15     }
16 });
点击按钮 会调用greet()函数,在前面html中已经指定了greet要绑定sayHello()函数,函数的参数来绑定 ng-model 的 输入框。
标签:
原文地址:http://www.cnblogs.com/xinxingyu/p/4775004.html