标签:
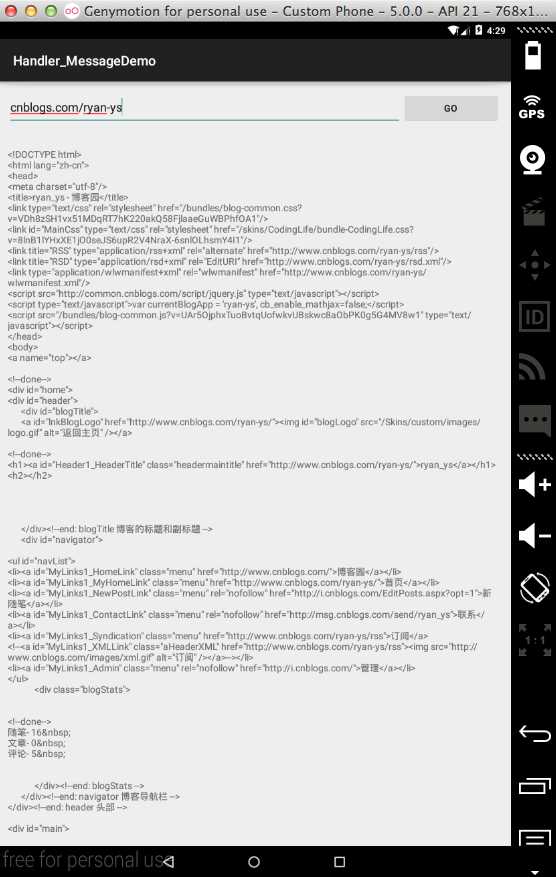
前段时间学习线程,想通过子线程获取网络图片,进而更新主UI界面的学习。发现大部分的Demo都是基于HttpClient的使用,但google似乎削弱了HttpClient,我甚至只能找到HttpURLConnection的相关类。没办法,只能寻找新的途径,这就是这篇译文的由来。
1.下载最新版本的OKHttp的Jar包,和Okio的Jar包。
2.在Android studio 中,导入Jar包。
最快捷的方式是:(但是我有时候我这样操作没用,不知道问什么,之后乖乖下载再导入Jar包)
compile ‘com.squareup.okhttp:okhttp:2.5.0‘
compile ‘com.squareup.okio:okio:1.6.0‘
<RelativeLayout xmlns:android="http://schemas.android.com/apk/res/android"
    xmlns:tools="http://schemas.android.com/tools"
    android:layout_width="match_parent"
    android:layout_height="match_parent"
    android:paddingBottom="@dimen/activity_vertical_margin"
    android:paddingLeft="@dimen/activity_horizontal_margin"
    android:paddingRight="@dimen/activity_horizontal_margin"
    android:paddingTop="@dimen/activity_vertical_margin"
    tools:context=".MainActivity">

    <LinearLayout
        android:id="@+id/linearLayout1"
        android:layout_width="match_parent"
        android:layout_height="wrap_content"
        android:layout_alignParentTop="true"
        android:layout_centerHorizontal="true"
        android:weightSum="1">

        <EditText
            android:id="@+id/editText1"
            android:layout_width="match_parent"
            android:layout_height="wrap_content"
            android:layout_weight=".2" />

        <Button
            android:id="@+id/button1"
            style="?android:attr/buttonStyleSmall"
            android:layout_width="match_parent"
            android:layout_height="wrap_content"
            android:layout_weight=".8"
            android:onClick="downloadUrl"
            android:text="Go" />
    </LinearLayout>


    <TextView
        android:id="@+id/textView1"
        android:layout_width="match_parent"
        android:layout_height="wrap_content"
        android:layout_below="@+id/linearLayout1"
        android:layout_centerHorizontal="true"
        android:layout_marginTop="35dp"
        android:text=""
        android:textAppearance="?android:attr/textAppearanceSmall" />

</RelativeLayout>
package com.ryan.handler_messagedemo;

import android.support.v7.app.AppCompatActivity;
import android.os.Bundle;
import android.view.View;
import android.widget.EditText;
import android.widget.TextView;

import com.squareup.okhttp.OkHttpClient;

import java.util.concurrent.ExecutionException;

public class MainActivity extends AppCompatActivity {

    private EditText edtText;
    private TextView outputText;

    @Override
    protected void onCreate(Bundle savedInstanceState) {
        super.onCreate(savedInstanceState);
        setContentView(R.layout.activity_main);
        edtText = (EditText) findViewById(R.id.editText1);
        outputText = (TextView) findViewById(R.id.textView1);

    }

    public void downloadUrl(View view) {

        String url = "http://" + edtText.getText().toString();
        OkHttpHandler handler = new OkHttpHandler();
        String result = null;
        try {
            result = (String) handler.execute(url).get();
        } catch (InterruptedException e) {
            // TODO Auto-generated catch block
            e.printStackTrace();
        } catch (ExecutionException e) {
            // TODO Auto-generated catch block
            e.printStackTrace();
        }
        outputText.append(result + "\n");
    }

}
package com.ryan.handler_messagedemo;

import android.os.AsyncTask;

import com.squareup.okhttp.OkHttpClient;
import com.squareup.okhttp.Request;
import com.squareup.okhttp.Response;

/**
 * Created by air on 15-9-1.
 */
public class OkHttpHandler extends AsyncTask {

    OkHttpClient client = new OkHttpClient();

    @Override
    protected Object doInBackground(Object[] params) {
        Request.Builder builder = new Request.Builder();
        builder.url((String) params[0]);

        Request request = builder.build();

        try {
            Response response = client.newCall(request).execute();
            return response.body().string();
        } catch (Exception e) {
        }

        return null;
    }
}
<?xml version="1.0" encoding="utf-8"?>
<manifest xmlns:android="http://schemas.android.com/apk/res/android"
    package="com.ryan.handler_messagedemo" >

    <uses-permission android:name="android.permission.INTERNET" />
    <uses-permission android:name="android.permission.ACCESS_NETWORK_STATE" />

    <application
        android:allowBackup="true"
        android:icon="@mipmap/ic_launcher"
        android:label="@string/app_name"
        android:theme="@style/AppTheme" >
        <activity
            android:name=".MainActivity"
            android:label="@string/app_name" >
            <intent-filter>
                <action android:name="android.intent.action.MAIN" />

                <category android:name="android.intent.category.LAUNCHER" />
            </intent-filter>
        </activity>
    </application>

</manifest>

<RelativeLayout xmlns:android="http://schemas.android.com/apk/res/android"
    xmlns:tools="http://schemas.android.com/tools"
    android:layout_width="match_parent"
    android:layout_height="match_parent"
    android:paddingBottom="@dimen/activity_vertical_margin"
    android:paddingLeft="@dimen/activity_horizontal_margin"
    android:paddingRight="@dimen/activity_horizontal_margin"
    android:paddingTop="@dimen/activity_vertical_margin"
    tools:context="com.skholingua.android.okhttp_getanimage.MainActivity" >

    <ImageView
        android:id="@+id/imageView1"
        android:layout_width="match_parent"
        android:layout_height="match_parent"
        android:layout_centerHorizontal="true"
        android:layout_centerVertical="true"
        android:visibility="invisible"
        android:src="@drawable/ic_launcher" />

    <Button
        android:id="@+id/button1"
        android:layout_width="wrap_content"
        android:layout_height="wrap_content"
        android:layout_centerHorizontal="true"
        android:layout_centerVertical="true"
        android:text="Download Image" />

</RelativeLayout>
package com.ryan.okhttp_getimagedemo01;

import android.graphics.Bitmap;
import android.graphics.BitmapFactory;
import android.support.v7.app.AppCompatActivity;
import android.os.Bundle;
import android.view.Menu;
import android.view.MenuItem;
import android.view.View;
import android.widget.Button;
import android.widget.ImageView;

public class MainActivity extends AppCompatActivity {

    Button downloadBtn;
    ImageView mImage;
    private final String URL = "http://pic.cnblogs.com/avatar/790633/20150727124352.png";

    @Override
    protected void onCreate(Bundle savedInstanceState) {
        super.onCreate(savedInstanceState);
        setContentView(R.layout.activity_main);

        downloadBtn = (Button) findViewById(R.id.button1);
        mImage = (ImageView) findViewById(R.id.imageView1);

        downloadBtn.setOnClickListener(new View.OnClickListener() {
            @Override
            public void onClick(View v) {
                downloadBtn.setVisibility(View.INVISIBLE);
                OkHttpHandler handler = new OkHttpHandler();
                byte[] image = new byte[0];

                try {
                    image = (byte[]) handler.execute(URL).get();

                    if (image != null && image.length > 0) {

                        Bitmap bitmap = BitmapFactory.decodeByteArray(image, 0,
                                image.length);
                        mImage.setImageBitmap(bitmap);
                        mImage.setVisibility(View.VISIBLE);
                    }

                } catch (Exception e) {
                }
            }
        });

    }

    @Override
    public boolean onCreateOptionsMenu(Menu menu) {
        // Inflate the menu; this adds items to the action bar if it is present.
        getMenuInflater().inflate(R.menu.menu_main, menu);
        return true;
    }

    @Override
    public boolean onOptionsItemSelected(MenuItem item) {
        // Handle action bar item clicks here. The action bar will
        // automatically handle clicks on the Home/Up button, so long
        // as you specify a parent activity in AndroidManifest.xml.
        int id = item.getItemId();

        //noinspection SimplifiableIfStatement
        if (id == R.id.action_settings) {
            return true;
        }

        return super.onOptionsItemSelected(item);
    }
}
package com.ryan.okhttp_getimagedemo01;

import android.os.AsyncTask;

import com.squareup.okhttp.OkHttpClient;
import com.squareup.okhttp.Request;
import com.squareup.okhttp.Response;

/**
 * Created by air on 15-9-1.
 */
public class OkHttpHandler extends AsyncTask {

    OkHttpClient client = new OkHttpClient();


    @Override
    protected Object doInBackground(Object[] params) {

        Request.Builder builder = new Request.Builder();
        builder.url((String) params[0]);

        Request request = builder.build();

        try {

            Response response = client.newCall(request).execute();
            return response.body().bytes();

        } catch (Exception e) {
        }

        return null;
    }
}
<?xml version="1.0" encoding="utf-8"?>
<manifest xmlns:android="http://schemas.android.com/apk/res/android"
    package="com.ryan.okhttp_getimagedemo01" >

    <uses-permission android:name="android.permission.INTERNET" />
    <uses-permission android:name="android.permission.ACCESS_NETWORK_STATE" />


    <application
        android:allowBackup="true"
        android:icon="@mipmap/ic_launcher"
        android:label="@string/app_name"
        android:theme="@style/AppTheme" >
        <activity
            android:name=".MainActivity"
            android:label="@string/app_name" >
            <intent-filter>
                <action android:name="android.intent.action.MAIN" />

                <category android:name="android.intent.category.LAUNCHER" />
            </intent-filter>
        </activity>
    </application>

</manifest>

至此,简单的使用已经完成,后续将具体的学习有关 OkHttp的内容和 线程的学习。
关于3. Post To Server 4. Authentication 现在还没有学习到,
更多内容可以查看我的译文来源:http://www.skholingua.com/android-basic/other-sdk-n-libs/okhttp#
标签:
原文地址:http://www.cnblogs.com/ryan-ys/p/4776265.html