标签:
使用注解的方式重构helloworld应用案例。
1. @RequestMapping注解应用
@RequestMapping可以用在类定义和方法定义上,它标明这个类或方法与哪一个客户请求对应。实例代码如下:

@RequestMapping("/day01")
public class HelloController {
    @RequestMapping("/hello.form")
    public String execute() throws Exception {
        return "hello";
    }
}
2. 开启@RequestMapping注解映射,需要在Spring的XML配置文件进行配置,配置代码如下:
<mvc:annotation-driven/>
3. @Controller注解应用
推荐使用@Controller注解声明Controller组件,这样可以使得Controller定义更加灵活,可以不用实现Controller接口,请求处理的方法也可以灵活定义。代码如下:
@Controller
@RequestMapping("/day01")
public class HelloController {
    @RequestMapping("/hello.form")
    public String execute() throws Exception {
        return "hello";
    }
}
4. 为了使@Controller注解生效,需要在Spring的XML配置文件中开启组件扫描定义,并指定Controller组件所在包,配置代码如下:
<context:component-scan base-package="com.souvc.controller"/>
使用的环境是eclipse ,jdk7.0 ,Tomcat 7.0,导入Spring依赖包。
步骤一: 新建一个新工程,工程名为SpringControler,如图下:
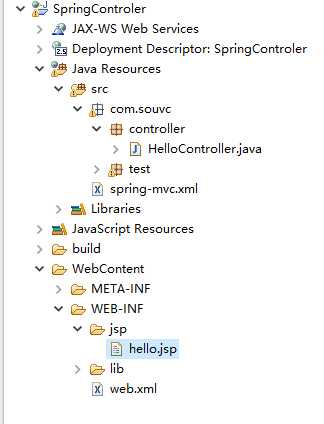
步骤二:增加HelloController类
使用注解的方式,修改HelloController类,代码如下所示:
package com.souvc.controller;

import org.springframework.stereotype.Controller;
import org.springframework.web.bind.annotation.RequestMapping;

@Controller
@RequestMapping("/day01")
public class HelloController {
    @RequestMapping("/hello.form")
    public String execute() throws Exception {
        return "hello";
    }
}
步骤三:spring-mvc.xml的配置
在spring-mvc.xml文件中,开启@RequestMapping注解映射以及组件扫描,代码如下所示:
<?xml version="1.0" encoding="UTF-8"?>
<beans xmlns="http://www.springframework.org/schema/beans" xmlns:xsi="http://www.w3.org/2001/XMLSchema-instance"
    xmlns:context="http://www.springframework.org/schema/context" xmlns:jdbc="http://www.springframework.org/schema/jdbc"
    xmlns:jee="http://www.springframework.org/schema/jee" xmlns:tx="http://www.springframework.org/schema/tx"
    xmlns:jpa="http://www.springframework.org/schema/data/jpa" xmlns:mvc="http://www.springframework.org/schema/mvc"
    xsi:schemaLocation="
        http://www.springframework.org/schema/beans http://www.springframework.org/schema/beans/spring-beans-3.2.xsd
        http://www.springframework.org/schema/context http://www.springframework.org/schema/context/spring-context-3.2.xsd
        http://www.springframework.org/schema/jdbc http://www.springframework.org/schema/jdbc/spring-jdbc-3.2.xsd
        http://www.springframework.org/schema/jee http://www.springframework.org/schema/jee/spring-jee-3.2.xsd
        http://www.springframework.org/schema/tx http://www.springframework.org/schema/tx/spring-tx-3.2.xsd
        http://www.springframework.org/schema/data/jpa http://www.springframework.org/schema/data/jpa/spring-jpa-1.3.xsd
        http://www.springframework.org/schema/mvc http://www.springframework.org/schema/mvc/spring-mvc-3.2.xsd">

    <context:component-scan base-package="com.souvc.controller"/>

    <mvc:annotation-driven/>

    <!-- 定义视图解析器ViewResolver -->
    <bean id="viewResolver"
        class="org.springframework.web.servlet.view.InternalResourceViewResolver">
        <property name="prefix" value="/WEB-INF/jsp/" />
        <property name="suffix" value=".jsp" />
    </bean>

</beans>
web.xml 文件如下:
<?xml version="1.0" encoding="UTF-8"?>
<web-app version="2.5" xmlns="http://java.sun.com/xml/ns/javaee"
    xmlns:xsi="http://www.w3.org/2001/XMLSchema-instance"
    xsi:schemaLocation="http://java.sun.com/xml/ns/javaee
    http://java.sun.com/xml/ns/javaee/web-app_2_5.xsd">
    <servlet>
        <servlet-name>springmvc</servlet-name>
        <servlet-class>
            org.springframework.web.servlet.DispatcherServlet
        </servlet-class>
        <!-- 指定Spring的配置文件 -->
        <init-param>
            <param-name>contextConfigLocation</param-name>
            <param-value>classpath:spring-mvc.xml</param-value>
        </init-param>
        <load-on-startup>1</load-on-startup>
    </servlet>
    <servlet-mapping>
        <servlet-name>springmvc</servlet-name>
        <url-pattern>*.form</url-pattern>
    </servlet-mapping>
    <welcome-file-list>
        <welcome-file>index.jsp</welcome-file>
    </welcome-file-list>
</web-app>
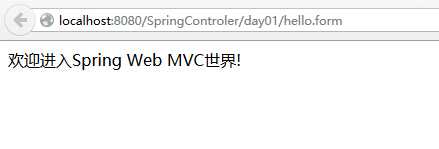
步骤四:测试
通过地址“http://localhost:8080/SpringControler/day01/hello.form”访问HelloController: