码迷,mamicode.com
首页 > Web开发 > 详细

ASP.NET Identity 身份验证和基于角色的授权

时间:2015-09-07 08:16:35      阅读:205      评论:0      收藏:0      [点我收藏+]

标签:

ASP.NET Identity 身份验证和基于角色的授权

前一篇文章中,我介绍了ASP.NET Identity 基本API的运用并创建了若干用户账号。那么在本篇文章中,我将继续ASP.NET Identity 之旅,向您展示如何运用ASP.NET Identity 进行身份验证(Authentication)以及联合ASP.NET MVC 基于角色的授权(Role-Based Authorization)。

本文的示例,你可以在此下载和预览:

点此进行预览

点此下载示例代码

探索身份验证与授权

在这一小节中,我将阐述和证明ASP.NET 身份验证和授权的工作原理和运行机制,然后介绍怎样使用Katana Middleware 和 ASP.NET Identity 进行身份验证。

1. 理解ASP.NET 表单身份验证与授权机制

谈到身份验证,我们接触的最多的可能就是表单身份验证(Form-based Authentication)。为了更好的去理解ASP.NET 表单身份验证与授权机制,我搬出几年前的一张旧图,表示HttpApplication 19个事件,它们分别在HttpModule 中被注册,这又被称为ASP.NET 管道(Pipeline)事件。通俗的讲,当请求到达服务器时,ASP.NET 运行时会依次触发这些事件:
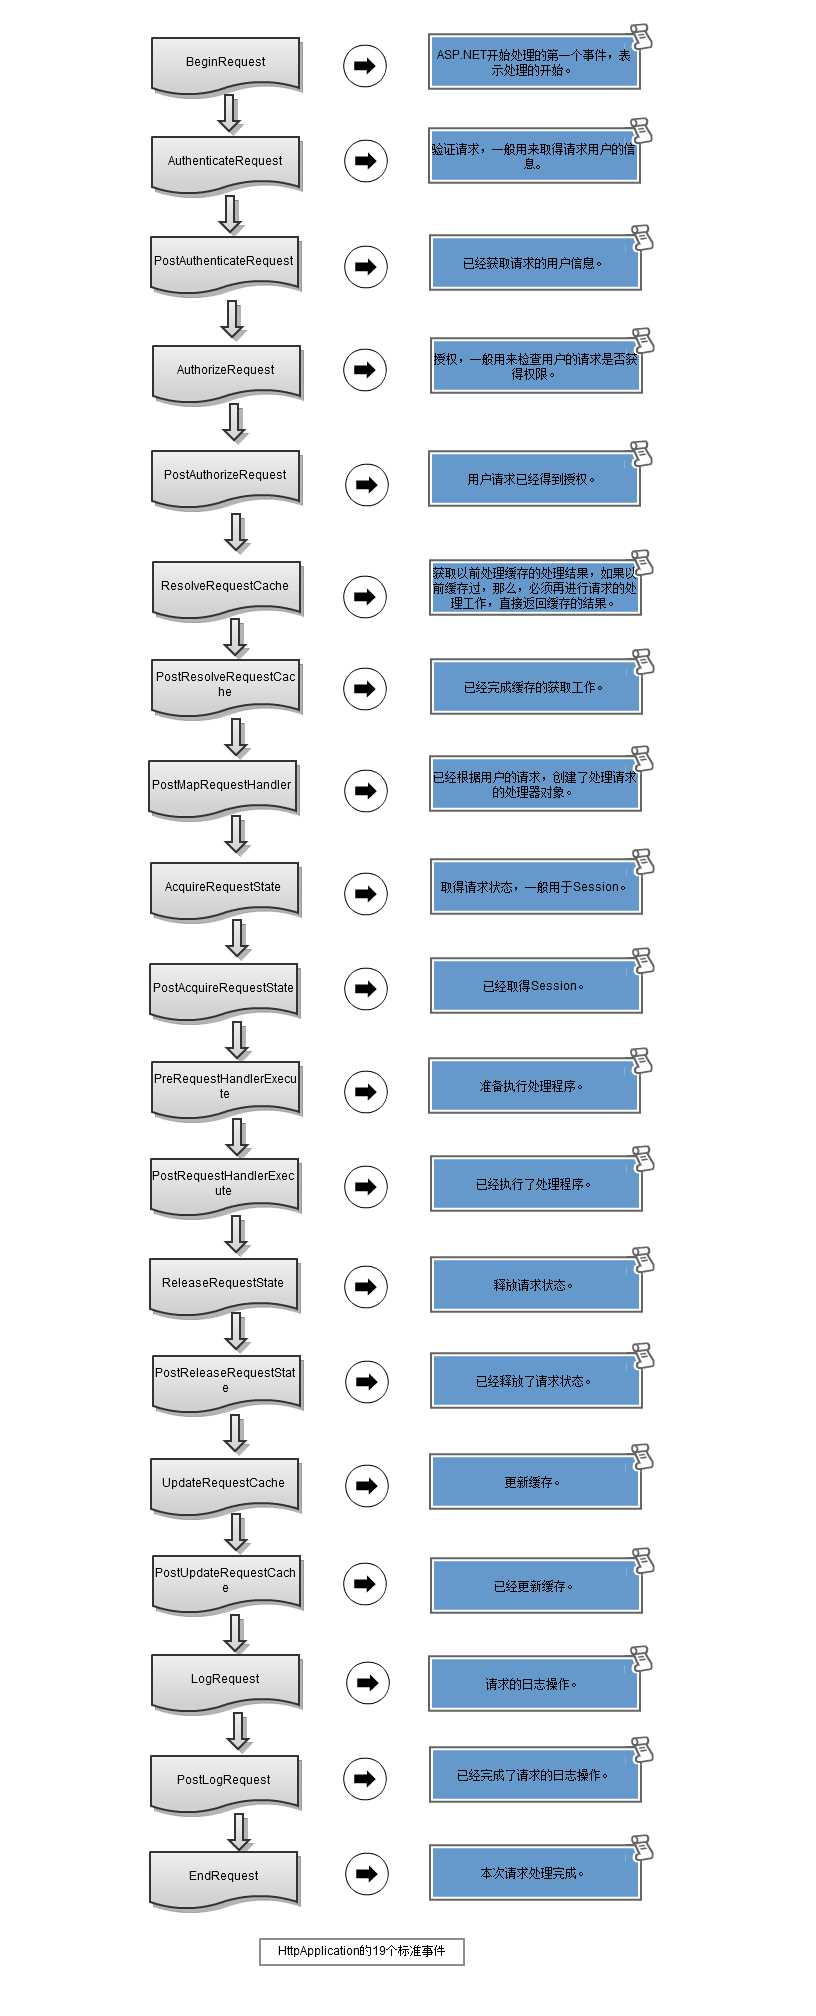
技术分享

身份验证故名思义,验证的是用户提供的凭据(Credentials)。一旦验证通过,将产生唯一的Cookie标识并输出到浏览器。来自浏览器的下一次请求将包含此Cookie,对于ASP.NET 应用程序,我们熟知的FormsAuthenticationModule会对HttpApplication 的管道(Pipeline)事件AuthenticateRequest 进行注册,当请求经过ASP.NET Pipeline时,由ASP.NET Runtime 触发它,在该事件中,它会验证并解析该Cookie为对应的用户对象,它是一个实现了 IPrincipal接口的对象。PostAuthenticateRequest 事件在AuthenticateRequest 事件之后触发,表示用户身份已经检查完成 ,检查后的用户可以通过HttpContextUser属性获取并且HttpContext.User.Identity.IsAuthenticated属性为True。

如果将身份验证看作是"开门"的话,主人邀请你进屋,但这并不意味着你可以进入到卧室或者书房,可能你的活动场所仅限书房——这就是授权。在PostAuthenticateRequest事件触发过后,会触发AuthorizeRequest 事件,它在UrlAuthorizationModule 中被注册(题外插一句:UrlAuthorizationModule 以及上面提到的FormsAuthenticationModule你可以在IIS 级别的.config文件中找到,这也是ASP.NET 和 IIS紧耦合关系的体现)。在该事件中,请求的URL会依据web.config中的authorization 配置节点进行授权,如下所示授予Kim以及所有Role为Administrator的成员具有访问权限,并且拒绝John以及匿名用户访问。

  1. <authorization>
  2.    <allow users="Kim"/>
  3.    <allow roles="Administrator"/>
  4.    <deny users="John"/>
  5.    <deny users="?"/>
  6. </authorization>

通过身份验证和授权,我们可以对应用程序敏感的区域进行受限访问,这确保了数据的安全性。

2.使用Katana进行身份验证

到目前为止,你可能已经对OWIN、Katana 、 Middleware 有了基本的了解,如果不清楚的话,请移步到浏览。

使用Katana,你可以选择几种不同类型的身份验证方式,我们可以通过Nuget来安装如下类型的身份验证:

  • 表单身份验证
  • 社交身份验证(Twitter、Facebook、Google、Microsoft Account…)
  • Windows Azure
  • Active Directory
  • OpenID

其中又以表单身份验证用的最为广泛,正如上面提到的那样,传统ASP.NET MVC 、Web Form 的表单身份验证实际由FormsAuthenticationModule 处理,而Katana重写了表单身份验证,所以有必要比较一下传统ASP.NET MVC & Web Form 下表单身份验证与OWIN下表单身份验证的区别:

Features

ASP.NET MVC & Web Form Form Authentication

OWIN Form Authentication

Cookie Authentication

Cookieless Authentication

×

Expiration

Sliding Expiration

Token Protection

Claims Support

×

Unauthorized Redirection


从上表对比可以看出,Katana几乎实现了传统表单身份验证所有的功能,那我们怎么去使用它呢?还是像传统那样在web.config中指定吗?

非也非也,Katana 完全抛弃了FormsAuthenticationModule,实际上是通过Middleware来实现身份验证。默认情况下,Middleware在HttpApplication的PreRequestHandlerExecute 事件触发时链式执行,当然我们也可以将它指定在特定的阶段执行,通过使用UseStageMarker方法,我们可以在AuthenticateRequest 阶段执行Middleware 进行身份验证。

那我们要怎样去实现呢?幸运的是,Katana已经帮助我们封装好了一个扩展方法,如下所示,

  1. app.UseCookieAuthentication(new CookieAuthenticationOptions
  2.  {
  3.            AuthenticationType = DefaultAuthenticationTypes.ApplicationCookie,
  4.            LoginPath = new PathString("/Account/Login")
  5.   });

app.UseCookieAuthentication 是一个扩展方法,它的内部帮我们做了如下几件事:

  • 使用app.Use(typeof(CookieAuthenticationMiddleware), app, options) 方法,将CookieAuthenticationMiddleware 中间件注册到OWIN Pipeline中
  • 通过app.UseStageMarker(PipelineStage.Authenticate)方法,将前面添加的CookieAuthenticationMiddleware指定在 ASP.NET 集成管道(ASP.NET integrated pipeline)的AuthenticateRequest阶段执行

当调用(Invoke)此Middleware时,将调用CreateHandler方法返回CookieAuthenticationHandler对象,它包含 AuthenticateCoreAsync方法,在这个方法中,读取并且验证Cookie,然后通过AddUserIdentity方法创建ClaimsPrincipal对象并添加到Owin环境字典中,可以通过OwinContext对象Request.User可以获取当前用户。

这是一个典型Middleware中间件使用场景,说白了就是去处理Http请求并将数据存储到OWIN环境字典中进行传递。而CookieAuthenticationMiddleware所做的事其实和FormsAuthenticationModule做的事类似。

那我们怎么产生Cookie呢?使用ASP.NET Identity 进行身份验证,如果验证通过,产生Cookie并输出到客户端浏览器, 这样一个闭环就形成了,我将在下一小节实施这一步骤。

3.使用Authorize特性进行授权

ASP.NET Identity已经集成到了ASP.NET Framework中,在ASP.NET MVC 中,我们可以使用Authorize 特性进行授权,如下代码所示:

  1. [Authorize]
  2. public ActionResult Index()
  3. {
  4.     return View();
  5. }

上述代码中,Index Action 已被设置了受限访问,只有身份验证通过才能访问它,如果验证不通过,返回401.0 – Unauthorized,然后请求在EndRequest 阶段被 OWIN Authentication Middleware 处理,302 重定向到/Account/Login 登录。
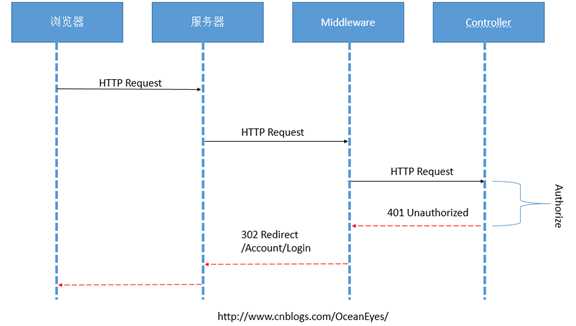
技术分享

使用ASP.NET Identity 身份验证

有了对身份验证和授权机制基本了解后,那么现在就该使用ASP.NET Identity 进行身份验证了。

1. 实现身份验证所需的准备工作

当我们匿名访问授权资源时,会被Redirect 到 /Account/Login 时,此时的URL结构如下:

http://localhost:60533/Account/Login?ReturnUrl=%2Fhome%2Findex

因为需要登陆,所以可以将Login 设置为允许匿名登陆,只需要在Action的上面添加 [AllowAnonymous] 特性标签,如下所示:

  1. [AllowAnonymous]
  2. public ActionResult Login(string returnUrl)
  3. {
  4.     //如果登录用户已经Authenticated,提示请勿重复登录
  5.     if (HttpContext.User.Identity.IsAuthenticated)
  6.     {
  7.         return View("Error", new string[] {"您已经登录!"});
  8.     }
  9.     ViewBag.returnUrl = returnUrl;
  10.     return View();
  11. }

注意,在这儿我将ReturnUrl 存储了起来,ReturnUrl 顾名思义,当登录成功后,重定向到最初的地址,这样提高了用户体验。

由于篇幅的限制,Login View 我不将代码贴出来了,事实上它也非常简单,包含如下内容:

  • 用户名文本框
  • 密码框
  • 存储ReturnUrl的隐藏域
  • @Html.AntiForgeryToken(),用来防止CSRF跨站请求伪造

2.添加用户并实现身份验证

当输入了凭据之后,POST Form 表单到/Account/Login 下,具体代码如下:

  1. [HttpPost]
  2. [AllowAnonymous]
  3. [ValidateAntiForgeryToken]
  4. public async Task<ActionResult> Login(LoginModel model,string returnUrl)
  5. {
  6.     if (ModelState.IsValid)
  7.     {
  8.         AppUser user = await UserManager.FindAsync(model.Name, model.Password);
  9.         if (user==null)
  10.         {
  11.             ModelState.AddModelError("","无效的用户名或密码");
  12.         }
  13.         else
  14.         {
  15.             var claimsIdentity =
  16.                 await UserManager.CreateIdentityAsync(user, DefaultAuthenticationTypes.ApplicationCookie);
  17.             AuthManager.SignOut();
  18.             AuthManager.SignIn(new AuthenticationProperties {IsPersistent = false}, claimsIdentity);
  19.             return Redirect(returnUrl);
  20.         }
  21.     }
  22.     ViewBag.returnUrl = returnUrl;
  23.  
  24.     return View(model);
  25. }

上述代码中,首先使用 ASP.NET Identity 来验证用户凭据,这是通过 AppUserManager 对象的FindAsync 方法来实现,如果你不了解ASP.NET Identity 基本API ,请参考我这篇文章

  1. AppUser user = await UserManager.FindAsync(model.Name, model.Password);

FindAsync 方法接受两个参数,分别是用户名和密码,如果查找到,则返回AppUser 对象,否则返回NULL。

如果FindAsync 方法返回AppUser 对象,那么接下来就是创建Cookie 并输出到客户端浏览器,这样浏览器的下一次请求就会带着这个Cookie,当请求经过AuthenticateRequest 阶段时,读取并解析Cookie。也就是说Cookie 就是我们的令牌, Cookie如本人,我们不必再进行用户名和密码的验证了。

使用ASP.NET Identity 产生Cookie 其实很简单,就3行代码,如下所示:

  1. var claimsIdentity =
  2.     await UserManager.CreateIdentityAsync(user, DefaultAuthenticationTypes.ApplicationCookie);
  3. AuthManager.SignOut();
  4. AuthManager.SignIn(new AuthenticationProperties {IsPersistent = false}, claimsIdentity);

对代码稍作分析,第一步创建了用来代表当前登录用户的ClaimsIdentity 对象,ClaimsIndentity 是 ASP.NET Identity 中的类,它实现了IIdentity 接口。

ClaimsIdentity 对象实际上由AppUserManager 对象的CreateIdentityAsync 方法创建,它需要接受一个AppUser 对象和身份验证类型,在这儿选择ApplicationCookie。

接下来,就是让已存在的Cookie 失效,并产生新Cookie。我预先定义了一个AuthManager 属性,它是IAuthenticationManager 类型的对象,用来做一些通用的身份验证操作。它 包含如下重要的操作:

  • SignIn(options,identity) 故名思意登录,用来产生身份验证过后的Cookie
  • SignOut() 故名思意登出,让已存在的Cookie 失效

SignIn 需要接受两个参数,AuthenticationProperties 对象和ClaimsIdentity 对象,AuthticationProperties 有众多属性,我在这儿只设置IsPersistent=true ,意味着Authentication Session 被持久化保存,当开启新Session 时,该用户不必重新验证了。

最后,重定向到ReturnUrl:

  1. return Redirect(returnUrl);

使用角色进行授权

在前一小节中,使用了Authorize 特性对指定区域进行受限访问,只有被身份验证通过后才能继续访问。在这一小节将更细粒度进行授权操作,在ASP.NET MVC Framework 中,Authorize 往往结合User 或者 Role 属性进行更小粒度的授权操作,正如如下代码所示:

  1. [Authorize(Roles = "Administrator")]
  2. public class RoleController : Controller
  3. {
  4. }

1.使用ASP.NET Identity 管理角色

对Authorize 有了基本的了解之后,将关注点转移到角色Role的管理上来。ASP.NET Identity 提供了一个名为RoleManager<T> 强类型基类用来访问和管理角色,其中T 实现了IRole 接口,IRole 接口包含了持久化Role 最基础的字段(Id和Name)。

Entity Framework 提供了名为IdentityRole 的类,它实现了IRole 接口,所以它不仅包含Id、Name属性,还增加了一个集合属性Users。IdentityRole重要的属性如下所示:

Id

定义了Role 唯一的Id

Name

定义了Role的名称

Users

返回隶属于Role的所有成员


我不想在应用程序中直接使用IdentityRole,因为我们还可能要去扩展其他字段,故定义一个名为AppRole的类,就像AppUser那样,它继承自IdentityRole:

  1. public class AppRole:IdentityRole
  2. {
  3.     public AppRole() : base() { }
  4.     public AppRole(string name) : base(name) { }
  5.     // 在此添加额外属性
  6. }

同时,再定义一个AppRoleManager 类,如同AppUserManager 一样,它继承RoleManager<T>,提供了检索和持久化Role的基本方法:

  1. public class AppRoleManager:RoleManager<AppRole>
  2. {
  3.     public AppRoleManager(RoleStore<AppRole> store):base(store)
  4.     {
  5.     }
  6.  
  7.     public static AppRoleManager Create(IdentityFactoryOptions<AppRoleManager> options, IOwinContext context)
  8.     {
  9.         return new AppRoleManager(new RoleStore<AppRole>(context.Get<AppIdentityDbContext>()));
  10.     }
  11. }

最后,别忘了在OWIN Startup类中初始化该实例,它将存储在OWIN上下文环境字典中,贯穿了每一次HTTP请求:

  1. app.CreatePerOwinContext(AppIdentityDbContext.Create);
  2. app.CreatePerOwinContext<AppUserManager>(AppUserManager.Create);
  3. app.CreatePerOwinContext<AppRoleManager>(AppRoleManager.Create);

2.创建和删除角色

使用ASP.NET Identity 创建和删除角色很简单,通过从OWIN 上下文中获取到AppRoleManager,然后Create 或者 Delete,如下所示:

  1. [HttpPost]
  2. public async Task<ActionResult> Create(string name)
  3. {
  4.     if (ModelState.IsValid)
  5.     {
  6.         IdentityResult result = await RoleManager.CreateAsync(new AppRole(name));
  7.         if (result.Succeeded)
  8.         {
  9.             return RedirectToAction("Index");
  10.         }
  11.         else
  12.         {
  13.             AddErrorsFromResult(result);
  14.         }
  15.     }
  16.     return View(name);
  17. }
  18.  
  19. [HttpPost]
  20. public async Task<ActionResult> Delete(string id)
  21. {
  22.     AppRole role = await RoleManager.FindByIdAsync(id);
  23.     if (role != null)
  24.     {
  25.         IdentityResult result = await RoleManager.DeleteAsync(role);
  26.         if (result.Succeeded)
  27.         {
  28.             return RedirectToAction("Index");
  29.         }
  30.         else
  31.         {
  32.             return View("Error", result.Errors);
  33.         }
  34.     }
  35.     else
  36.     {
  37.         return View("Error", new string[] { "无法找到该Role" });
  38.     }
  39. }

3.管理角色 MemberShip

要对用户授权,除了创建和删除角色之外,还需要对角色的MemberShip 进行管理,即通过Add /Remove 操作,可以向用户添加/删除角色。

为此,我添加了两个ViewModel,RoleEditModel和RoleModificationModel,分别代表编辑时展示字段和表单 Post时传递到后台的字段:

  1. public class RoleEditModel
  2. {
  3.     public AppRole Role { get; set; }
  4.     public IEnumerable<AppUser> Members { get; set; }
  5.     public IEnumerable<AppUser> NonMembers { get; set; }
  6. }
  7. public class RoleModificationModel
  8. {
  9.     public string RoleName { get; set; }
  10.     public string[] IDsToAdd { get; set; }
  11.     public string[] IDsToDelete { get; set; }
  12. }

在对角色进行编辑时,获取所有隶属于Role的成员和非隶属于Role的成员:

  1. /// <summary>
  2. /// 编辑操作,获取所有隶属于此Role的成员和非隶属于此Role的成员
  3. /// </summary>
  4. /// <param name="id"></param>
  5. /// <returns></returns>
  6. public async Task<ActionResult> Edit(string id)
  7. {
  8.     AppRole role = await RoleManager.FindByIdAsync(id);
  9.     string[] memberIDs = role.Users.Select(x => x.UserId).ToArray();
  10.     IEnumerable<AppUser> members = UserManager.Users.Where(x => memberIDs.Any(y => y == x.Id));
  11.     IEnumerable<AppUser> nonMembers = UserManager.Users.Except(members);
  12.     return View(new RoleEditModel()
  13.     {
  14.         Role = role,
  15.         Members = members,
  16.         NonMembers = nonMembers
  17.     });
  18. }

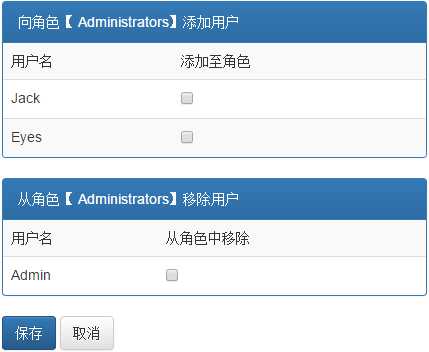
最终呈现的视图如下所示:

技术分享

当点击保存,提交表单时,通过模型绑定,将数据Post 到Edit Action,实现了对角色的MemberShip 进行管理,即通过Add /Remove 操作,可以向用户添加/删除角色。

,如下所示:

  1. [HttpPost]
  2. public async Task<ActionResult> Edit(RoleModificationModel model)
  3. {
  4.     IdentityResult result;
  5.     if (ModelState.IsValid)
  6.     {
  7.         foreach (string userId in model.IDsToAdd??new string[] {})
  8.         {
  9.             result = await UserManager.AddToRoleAsync(userId, model.RoleName);
  10.             if (!result.Succeeded)
  11.             {
  12.                 return View("Error", result.Errors);
  13.             }
  14.         }
  15.         foreach (var userId in model.IDsToDelete??new string[] {})
  16.         {
  17.             result = await UserManager.RemoveFromRoleAsync(userId, model.RoleName);
  18.             if (!result.Succeeded)
  19.             {
  20.                 return View("Error", result.Errors);
  21.             }
  22.         }
  23.         return RedirectToAction("Index");
  24.     }
  25.     return View("Error",new string[] {"无法找到此角色"});
  26. }

在上述代码中,你可能注意到了UserManager 类,它包含了若干与角色相关的操作方法:

AddToRoleAsync(string userId,string role)

添加用户到指定的角色中

GetRolesAsync(string userId)

获取User对应的角色列表

IsInRoleAsync(string userId,string role)

判断用户是否隶属于指定的角色

RemoveFromRoleAsync(string userId,string role)

将用户从指定角色中排除


初始化数据,Seeding 数据库

在上一小节中,通过Authorize 标签将Role 控制器受限访问,只有Role=Administrator的用户才能访问和操作。

  1. [Authorize(Roles = "Administrator")]
  2. public class RoleController : Controller
  3. {
  4. }

但当我们的应用程序部署到新环境时,是没有具体的用户数据的,这就导致我们无法访问Role Controller。这是一个典型的 "鸡生蛋还是蛋生鸡"问题。

要解决这个问题,我们一般是在数据库中内置一个管理员角色,这也是我们熟知的超级管理员角色。通过Entity Framework Seed,我们可以轻松实现数据的初始化:

  1. public class IdentityDbInit
  2.     : DropCreateDatabaseIfModelChanges<AppIdentityDbContext>
  3. {
  4.     protected override void Seed(AppIdentityDbContext context)
  5.     {
  6.         PerformInitialSetup(context);
  7.         base.Seed(context);
  8.     }
  9.  
  10.     public void PerformInitialSetup(AppIdentityDbContext context)
  11.     {
  12.         // 初始化
  13.         AppUserManager userMgr = new AppUserManager(new UserStore<AppUser>(context));
  14.         AppRoleManager roleMgr = new AppRoleManager(new RoleStore<AppRole>(context));
  15.  
  16.         string roleName = "Administrators";
  17.         string userName = "Admin";
  18.         string password = "Password2015";
  19.         string email = "admin@jkxy.com";
  20.  
  21.         if (!roleMgr.RoleExists(roleName))
  22.         {
  23.             roleMgr.Create(new AppRole(roleName));
  24.         }
  25.  
  26.         AppUser user = userMgr.FindByName(userName);
  27.         if (user == null)
  28.         {
  29.             userMgr.Create(new AppUser { UserName = userName, Email = email },
  30.                 password);
  31.             user = userMgr.FindByName(userName);
  32.         }
  33.  
  34.         if (!userMgr.IsInRole(user.Id, roleName))
  35.         {
  36.             userMgr.AddToRole(user.Id, roleName);
  37.         }
  38.     }
  39. }

在这儿实例化了AppUserManager和AppRoleManager实例,这是因为PerformInitialSetup 方法比OWIN 配置先执行。

小结

在这篇文章中,探索了使用ASP.NET Identity 进行身份验证以及联合ASP.NET MVC 基于角色的授权。最后实现了对角色的管理。在下一篇文章中,继续ASP.NET Identity之旅,探索ASP.NET Identity 的高级应用——基于声明的授权。

ASP.NET Identity 身份验证和基于角色的授权

标签:

原文地址:http://www.cnblogs.com/Leo_wl/p/4787852.html

(0)
(0)
   
举报
评论 一句话评论(0
登录后才能评论!
© 2014 mamicode.com 版权所有  联系我们:gaon5@hotmail.com
迷上了代码!