标签:
------>使用canvas元素
该元素专门用来绘制图形。但是它元素自身并不绘制图形,它只是相当于一张空画布,只是绘制图形的容器,必须使用JavaScript脚本来绘制图形。
为了向canvas画布上画图,必须经过如下的3个步骤:
1、获取canvas元素对应的DOM对象,这是一个Canvas对象。
2、调用Canvas对象的getContext()方法,该方法返回一个CanvasReaderingContext2D对象,该对象即可绘制图形。
3、调用CanvasReaderingContext2D对象的方法绘图。
<body>
<h2>绘图入门</h2>
<canvas id="mc" width="300" height="180" style="border:1px solid #000" />
<script type="text/javascript">
    //获取canvas元素对应的DOM对象
    var canvas = document.getElementById(‘mc‘);
    //获取在canvas上绘图的CanvasReaderingContent2D
    var ctx = canvas.getContext(‘2d‘);
    //设置填充颜色
    ctx.fillStyle = ‘#f00‘;
    //绘制矩形
    ctx.fillRect(30,40,80,100);
</script>
</body>
每个canvas元素对应于一个Canvas对象,Canvas对象的getContext(String contextID)方法将会返回一个绘图API,该方法需要一个字符串参数,目前该方法只支持“2d”字符串作为参数,该方法将会返回一个CanvasReadringContext2D对象。
只提供了两个方法来绘制几何图形:
<body>
<h2> 绘制矩形 </h2>
<canvas id="mc" width="400" height="280"
    style="border:1px solid black"></canvas>
<script type="text/javascript">
    // 获取canvas元素对应的DOM对象
    var canvas = document.getElementById(‘mc‘);
    // 获取在canvas上绘图的CanvasRenderingContext2D对象
    var ctx = canvas.getContext(‘2d‘);
    // 设置填充颜色
    ctx.fillStyle = ‘#f00‘;
    // 填充一个矩形
    ctx.fillRect(30 , 20 , 120 , 60);
    // 设置填充颜色
    ctx.fillStyle = ‘#ff0‘;
    // 填充一个矩形
    ctx.fillRect(80 , 60 , 120 , 60);
    // 设置线条颜色
    ctx.strokeStyle = "#00f";
    // 设置线条宽度
    ctx.lineWidth = 10;
    // 绘制一个矩形边框
    ctx.strokeRect(30 , 130 , 120 , 60);
    // 设置线条颜色
    ctx.strokeStyle = "#0ff";
    // 设置线条宽度
    ctx.lineJoin = "round";
    // 绘制一个矩形边框
    ctx.strokeRect(80 , 160 , 120 , 60);
    // 设置线条颜色
    ctx.strokeStyle = "#f0f";
    // 设置线条宽度
    ctx.lineJoin = "bevel";
    // 绘制一个矩形边框
    ctx.strokeRect(130 , 190 , 120 , 60);
</script>
</body>
为了设置绘制字符时所用的字体、字体对其方式,CanvasReadringCOntext2D还提供了如下两个属性: 
<body>
<h2> 绘制文字 </h2>
<canvas id="mc" width="600" height="280"
    style="border:1px solid black"></canvas>
<script type="text/javascript">
    // 获取canvas元素对应的DOM对象
    var canvas = document.getElementById(‘mc‘);
    // 获取在canvas上绘图的CanvasRenderingContext2D对象
    var ctx = canvas.getContext(‘2d‘);
    ctx.fillStyle = ‘#00f‘;
    ctx.font = ‘italic 50px 隶书‘;
    ctx.textBaseline = ‘top‘;
    // 填充字符串
    ctx.fillText(‘疯狂Java讲义‘, 0, 0);
    ctx.strokeStyle = ‘#f0f‘;
    ctx.font=‘bold 45px 宋体‘;
    // 绘制字符串的边框
    ctx.strokeText(‘轻量级Java EE企业应用实战‘, 0, 50);
</script>
</body>
<body>
<h2> 启用阴影 </h2>
<canvas id="mc" width="600" height="280"
    style="border:1px solid black"></canvas>
<script type="text/javascript">
    // 获取canvas元素对应的DOM对象
    var canvas = document.getElementById(‘mc‘);
    // 获取在canvas上绘图的CanvasRenderingContext2D对象
    var ctx = canvas.getContext(‘2d‘);
    // 设置阴影的模糊度
    ctx.shadowBlur = 5.6;
    // 设置阴影颜色
    ctx.shadowColor = "#222";
    // 设置阴影在X、Y方法上的偏移
    ctx.shadowOffsetX = 10;
    ctx.shadowOffsetY = -6;
    ctx.fillStyle = ‘#00f‘;
    ctx.font = ‘italic 50px 隶书‘;
    ctx.textBaseline = ‘top‘;
    // 填充字符串
    ctx.fillText(‘疯狂Java讲义‘, 0, 0);
    ctx.strokeStyle = ‘#f0f‘;
    ctx.font=‘bold 45px 宋体‘;
    // 绘制字符串的边框
    ctx.strokeText(‘轻量级Java EE企业应用实战‘, 0, 50);
    // 填充一个矩形区域
    ctx.fillRect(20 , 150 , 180 , 80);
    ctx.lineWidth = 8;
    // 绘制一个矩形边框
    ctx.strokeRect(300 , 150 , 180 , 80);
</script>
</body>
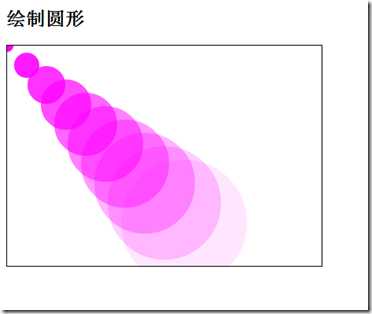
为了使用canvas对象绘制更复杂的几何图像,就要使用路径。
<body>
<h2> 绘制圆形 </h2>
<canvas id="mc" width="400" height="280"
    style="border:1px solid black"></canvas>
<script type="text/javascript">
    // 获取canvas元素对应的DOM对象
    var canvas = document.getElementById(‘mc‘);
    // 获取在canvas上绘图的CanvasRenderingContext2D对象
    var ctx = canvas.getContext(‘2d‘);
    for(var i = 0 ; i < 10 ; i++)
    {
        // 开始定义路径
        ctx.beginPath();
        // 添加一段圆弧
        ctx.arc(i * 25 , i * 25 , (i + 1) * 8 , 0 , Math.PI * 2 , true);
        // 关闭路径
        ctx.closePath();
        // 设置填充颜色
        ctx.fillStyle = ‘rgba(255 , 0 , 255 , ‘ + (10 - i) * 0.1 + ‘)‘;
        // 填充当前路径。
        ctx.fill();
    }
</script>
</body>

------>arcto(….)方法与arc(……)方法是有区别的:
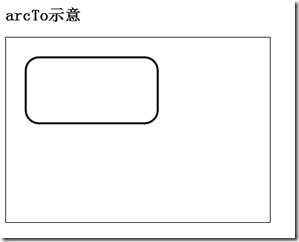
该方法也是绘制圆弧。假设从当前点到p1(x1,y1)绘制一条线条,再从p1(x1,y1)到p2(x2,y2)绘制一条线条,arcto方法则绘制一段同时与上面两条线条相切,且半径为radius的圆弧。
------>使用arcto()方法绘制图像:
<body>
<h2> arcTo示意 </h2>
<canvas id="mc" width="400" height="280"
    style="border:1px solid black"></canvas>
<script type="text/javascript">
    /*
        该方法负责绘制圆角矩形
        x1、y2:是圆角矩形左上角的座标。
        width、height:控制圆角举行的宽、高
        radius:控制圆角矩形的四个圆角的半径
    */
    function createRoundRect(context , x1 , y1 , width , height , radius)
    {
        // 移动到左上角
        ctx.moveTo(x1 + radius , y1);
        // 添加一条连接到右上角的线段
        ctx.lineTo(x1 + width - radius, y1);
        // 添加一段圆弧
        ctx.arcTo(x1 + width , y1, x1 + width, y1 + radius, radius);
        // 添加一条连接到右下角的线段
        ctx.lineTo(x1 + width, y1 + height - radius);
        // 添加一段圆弧
        ctx.arcTo(x1 + width, y1 + height , x1 + width - radius
            , y1 + height , radius);
        // 添加一条连接到左下角的线段
        ctx.lineTo(x1 + radius, y1 + height);
        // 添加一段圆弧
        ctx.arcTo(x1, y1 + height , x1 , y1 + height - radius , radius);
        // 添加一条连接到左上角的线段
        ctx.lineTo(x1 , y1 + radius);
        // 添加一段圆弧
        ctx.arcTo(x1 , y1 , x1 + radius , y1 , radius);
        ctx.closePath();
    }
    // 获取canvas元素对应的DOM对象
    var canvas = document.getElementById(‘mc‘);
    // 获取在canvas上绘图的CanvasRenderingContext2D对象
    var ctx = canvas.getContext(‘2d‘);
    ctx.lineWidth = 3;
    createRoundRect(ctx , 30 , 30 , 200 , 100 , 20);
    ctx.stroke();
</script>
</body>

------->绘制多角星
<body>
<h2> lineTo示意 </h2>
<canvas id="mc" width="420" height="280"
    style="border:1px solid black"></canvas>
<script type="text/javascript">
    /*
        该方法负责绘制多角星。
        n:该参数通常应设为奇数,控制绘制N角星。
        dx、dy:控制N角星的位置。
        size:控制N角星的大小
    */
    function createStar(context , n , dx , dy , size)
    {
        // 开始创建路径
        context.beginPath();
        var dig = Math.PI / n * 4;
        for(var i = 0; i < n ; i++)
        {
            var x = Math.sin(i * dig);
            var y = Math.cos(i * dig);
            context.lineTo(x * size + dx ,y * size + dy);
        }
        context.closePath();
    }
    // 获取canvas元素对应的DOM对象
    var canvas = document.getElementById(‘mc‘);
    // 获取在canvas上绘图的CanvasRenderingContext2D对象
    var ctx = canvas.getContext(‘2d‘);
    // 绘制3角星
    createStar(ctx , 3 , 60 , 60 , 50);
    ctx.fillStyle = "#f00";
    ctx.fill();
    // 绘制5角星
    createStar(ctx , 5 , 160 , 60 , 50);
    ctx.fillStyle = "#0f0";
    ctx.fill();
    // 绘制7角星
    createStar(ctx , 7 , 260 , 60 , 50);
    ctx.fillStyle = "#00f";
    ctx.fill();
    // 绘制9角星
    createStar(ctx , 9 , 360 , 60 , 50);
    ctx.fillStyle = "#f0f";
    ctx.fill();
</script>
</body>
CanvasReadringContext2D对象提供了bezierCurveTo()和quadraticCurveTo()两个方法向canvas的当前路径上添加曲线,这两个方法都用于添加曲线,前者用于添加贝济埃曲线,后者用于添加二次曲线。
确定一条贝济埃曲线需要四个点。
<body>
<h2> curveTo示意 </h2>
<canvas id="mc" width="420" height="280"
    style="border:1px solid black"></canvas>
<script type="text/javascript">
    /*
        该方法负责绘制花朵。
        n:该参数控制花朵的花瓣数。
        dx、dy:控制花朵的位置。
        size:控制花朵的大小
        length:控制花瓣的长度
    */
    function createFlower(context , n , dx , dy , size , length)
    {
        // 开始创建路径
        context.beginPath();
        context.moveTo(dx , dy + size);
        var dig = 2 * Math.PI / n;
        for(var i = 1; i < n + 1 ; i++)
        {
            // 结算控制点坐标
            var ctrlX = Math.sin((i - 0.5) * dig) * length + dx;
            var ctrlY= Math.cos((i - 0.5 ) * dig) * length + dy;
            // 结算结束点的坐标
            var x = Math.sin(i * dig) * size + dx;
            var y = Math.cos(i * dig) * size + dy;
            // 绘制二次曲线
            context.quadraticCurveTo(ctrlX , ctrlY , x , y);
        }
        context.closePath();
    }
    // 获取canvas元素对应的DOM对象
    var canvas = document.getElementById(‘mc‘);
    // 获取在canvas上绘图的CanvasRenderingContext2D对象
    var ctx = canvas.getContext(‘2d‘);
    // 绘制5瓣的花朵
    createFlower(ctx , 5 , 70 , 100 , 30 , 80);
    ctx.fillStyle = "#f00";
    ctx.fill();
    // 绘制6瓣的花朵
    createFlower(ctx , 6 , 200 , 100 , 30 , 80);
    ctx.fillStyle = "#ff0";
    ctx.fill();
    // 绘制7瓣的花朵
    createFlower(ctx , 7 , 330 , 100 , 30 , 80);
    ctx.fillStyle = "#f0f";
    ctx.fill();
</script>
</body>
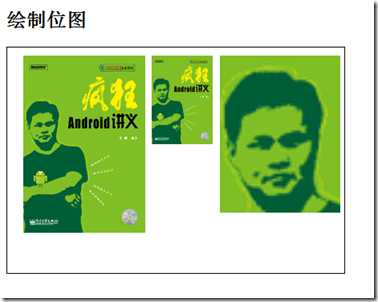
<body>
<h2> 绘制位图 </h2>
<canvas id="mc" width="420" height="280"
    style="border:1px solid black"></canvas>
<script type="text/javascript">
    // 获取canvas元素对应的DOM对象
    var canvas = document.getElementById(‘mc‘);
    // 获取在canvas上绘图的CanvasRenderingContext2D对象
    var ctx = canvas.getContext(‘2d‘);
    // 创建Image对象
    var image = new Image();
    // 指定Image对象装载图片
    image.src = "android.png";
    // 当图片装载完成时激发该函数
    image.onload = function()
    {
        // 保持原大小绘制图片
        ctx.drawImage(image , 20 , 10);
        // 绘制图片时进行缩放
        ctx.drawImage(image , 180 , 10 , 76 , 110);
        var sd = 50;
        var sh = 65
        // 从源位图中挖取一块、放大3倍后绘制在Canvas上
        ctx.drawImage(image , 2 , 50  , sd  ,  sh
            , 265 , 10 , sd * 3 , sh * 3);
    }
</script>
</body>

标签:
原文地址:http://www.cnblogs.com/dingchao823/p/4793748.html