标签:
-------------------------------------
一、前言
二、MySQL Cluster基本概念
三、环境
四、配置
1.LB-Master及LB-Backup配置
2.MGM配置
3.SQL节点(SQL1和SQL2)配置
4.数据节点(NDB1和NDB2)配置
五、查看状态
六、测试
-------------------------------------
一、前言
MySQL Cluster 是MySQL适合于分布式计算环境的高实用、高冗余版本。它采用了NDB Cluster存储引擎,允许在1个Cluster中运行多个MySQL服务器。在MyQL5.0 及以上的二进制版本中、以及与最新的Linux版本兼容的RPM中提供了该存储引擎。MySQL Cluster 是一种技术,该技术允许在无共享的系统中部署“内存中”数据库的 Cluster。通过无共享体系结构,系统能够使用廉价的硬件,而且对软硬件无特殊要求。此外,由于每个组件有自己的内存和磁盘,不存在单点故障。MySQL Cluster由一组计算机构成,每台计算机上均运行着多种进程,包括MySQL服务器,NDB Cluster的数据节点,管理服务器,以及(可能)专门的数据访问程序。
二、MySQL Cluster基本概念
NDB是一种“内存中”的存储引擎,它具有可用性高和数据一致性好的特点。MySQL Cluster能够使用多种故障切换和负载平衡选项配置NDB存储引擎,但在Cluster 级别上的存储引擎上做这个最简单。MySQL Cluster的NDB存储引擎包含完整的数据集,仅取决于Cluster本身内的其他数据。
目前,MySQL Cluster的Cluster部分可独立于MySQL服务器进行配置。在MySQL Cluster中,Cluster
的每个部分被视为1个节点。
管理(MGM)节点:这类节点的作用是管理MySQL Cluster内的其他节点,如提供配置数据、启动并停止节点、运行备份等。由于这类节点负责管理其他节点的配置,应在启动其他节点之前首先启动这类节点。MGM节点是用命令“ndb_mgmd”启动的。
数据(NDB)节点:这类节点用于保存Cluster的数据。数据节点的数目与副本的数目相关,是片段的倍数。例如,对于两个副本,每个副本有两个片段,那么就有4个数据节点。不过没有必要设置多个副本。数据节点是用命令“ndbd”启动的。
客户(SQL)节点:这是用来访问Cluster数据的节点。对于MySQL Cluster,客户端节点是使用NDB Cluster 存储引擎的传统MySQL服务器。通常,SQL节点是使用命令“mysqld -ndbcluster”启动的,或将“ndbcluster”添加到“my.cnf”后使用“mysqld”启动。
注释:在很多情况下,术语“节点”用于指计算机,但在讨论MySQL Cluster时,它表示的是进程。在单台计算机上可以有任意数目的节点,为此,我们采用术语“Cluster主机”。
管理服务器(MGM节点)负责管理Cluster配置文件和Cluster日志。Cluster中的每个节点从管理服务器检索配置数据,并请求确定管理服务器所在位置的方式。当数据节点内出现新的事件时,节点将关于这类事件的信息传输到管理服务器,然后将这类信息写入Cluster日志。
三、环境
系统:CentOS6.4 32位 9台
软件包(可以去mysql官网下载http://dev.mysql.com/downloads/cluster/):
MGM:
MySQL-Cluster-gpl-management-7.1.31-1.el6.i686.rpm
MySQL-Cluster-gpl-tools-7.1.31-1.el6.i686.rpm
SQL节点:
MySQL-Cluster-gpl-client-7.1.31-1.el6.i686.rpm
MySQL-Cluster-gpl-server-7.1.31-1.el6.i686.rpm
NDB节点:
MySQL-Cluster-gpl-storage-7.1.31-1.el6.i686.rpm
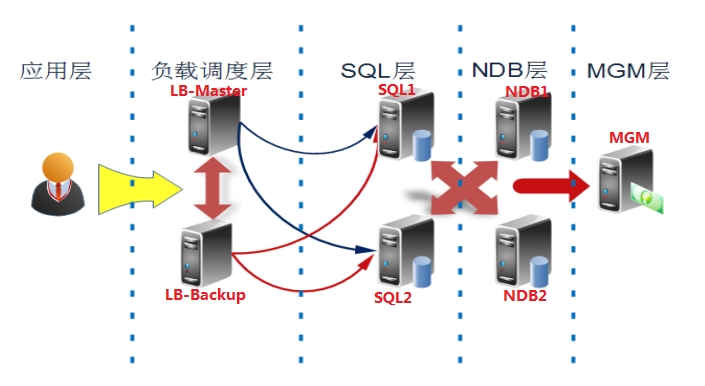
拓扑图:

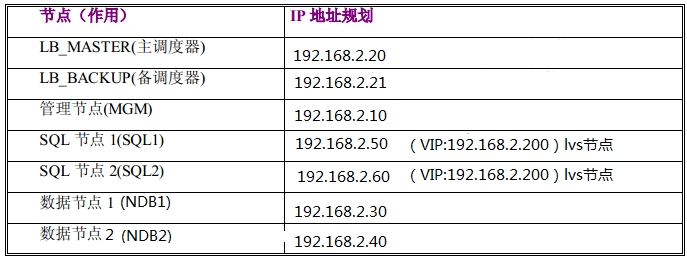
IP规划:

四、配置(请先卸载掉与mysql有关的所有RPM包)
1.LB-Master及LB-Backup配置
(1)LB-Master及LB-Backup安装keepalived和ipvsadm
|
1
2
3
4
5
6
7
8
9
10
11
12
13
14
15
16
17
18
19
20
21
22
23
24
25
26
27
28
29
30
31
32
33
34
|
# yum groupinstall "Additional Development" //安装开发工具# yum groupinstall "Development tools"# tar -zxvf keepalived-1.2.1.tar.gz -C /usr/local/src/# cd /usr/local/src/keepalived-1.2.1# ./cnfigureKeepalived configuration------------------------Keepalived version : 1.2.1Compiler : gccCompiler flags : -g -O2Extra Lib : -lpopt -lssl -lcrypto Use IPVS Framework : No //配置出现错误IPVS sync daemon support : NoUse VRRP Framework : YesUse Debug flags : No解决方法:# yum install kernel-devel ipvsadm# ln -s /usr/src/kernels/2.6.32-358.el6.i686/ /usr/src/linux# ./cnfigure //再次配置环境# make //编译# make install //安装 # cd /usr/local/etc //keepalived默认安装路径# lldrwxr-xr-x. 3 root root 4096 May 24 00:37 keepaliveddrwxr-xr-x. 3 root root 4096 May 24 00:29 rc.ddrwxr-xr-x. 2 root root 4096 May 24 00:29 sysconfig 配置以系统方式service启动# cp /usr/local/etc/rc.d/init.d/keepalived /etc/rc.d/init.d/ # cp /usr/local/etc/sysconfig/keepalived /etc/sysconfig/# mkdir /etc/keepalived# cp /usr/local/etc/keepalived/keepalived.conf /etc/keepalived/# cp /usr/local/sbin/keepalived /usr/sbin/ |
(2)LB-Master及LB-Backup的keepalived主配置文档
|
1
2
3
4
5
6
7
8
9
10
11
12
13
14
15
16
17
18
19
20
21
22
23
24
25
26
27
28
29
30
31
32
33
34
35
36
37
38
39
40
41
42
43
44
45
46
47
48
49
50
51
52
53
54
|
# cat /etc/keepalived/keepalived.conf#guration File for keepalived#global defineglobal_defs { router_id HaMySQL_1 }vrrp_sync_group VGM { group { VI_MYSQL }}vrrp_instance VI_MYSQL { state MASTER //LB-Backup设置为BACKUP interface eth0 lvs_sync_daemon_inteface eth0 virtual_router_id 55 priority 100 //LB-Backup设置为90 advert_int 5 authentication { auth_type PASS auth_pass 123456 } virtual_ipaddress { 192.168.2.200/24 dev eth0 }}########## LVS MySQL Start ###########virtual_server 192.168.2.200 3306 { delay_loop 6 lb_algo rr lb_kind DR persistence_timeout 6 protocol TCP real_server 192.168.2.50 3306 { weight 100 TCP_CHECK { connect_timeout 3 nb_get_retry 3 delay_before_retry 3 connect_port 3306 } } real_server 192.168.2.60 3306 { weight 100 TCP_CHECK { connect_timeout 3 nb_get_retry 3 delay_before_retry 3 connect_port 3306 } }}########## LVS MySQL END ############# |
2.MGM配置
(1)安装管理节点
|
1
2
3
|
# rpm -ivh MySQL-Cluster-gpl-management-7.1.31-1.el6.i686.rpm# rpm -ivh MySQL-Cluster-gpl-tools-7.1.31-1.el6.i686.rpm # mkdir /etc/mysql-cluster |
(2)配置管理节点
|
1
2
3
4
5
6
7
8
9
10
11
12
13
14
15
16
17
18
19
20
21
22
23
24
25
26
27
28
|
# vim /etc/mysql-cluster/config.ini //添加以下内容[ndbd default]NoOfReplicas=2DataMemory=80MIndexMemory=18M# TCP/IP options:[tcp default]portnumber=2202# Management process options:[ndb_mgmd]id=1hostname=192.168.2.10datadir=/var/lib/mysql-cluster# Options for data node[ndbd]id=2hostname=192.168.2.30datadir=/var/lib/mysql[ndbd]id=3hostname=192.168.2.40datadir=/var/lib/mysql[mysqld]id=4hostname=192.168.2.50[mysqld]id=5hostname=192.168.2.60 |
(3)启动管理节点
|
1
2
3
4
5
|
# mkdir /var/lib/mysql-cluster# ndb_mgmd -f /etc/mysql-cluster/config.ini MySQL Cluster Management Server mysql-5.1.73 ndb-7.1.31# netstat -tuplntcp 0 0 0.0.0.0:1186 0.0.0.0:* LISTEN 17629/ndb_mgmd |
3.数据节点(NDB1和NDB2)配置
(1)安装数据节点
|
1
2
|
# rpm -ivh MySQL-Cluster-gpl-storage-7.1.31-1.el6.i686.rpm# mkdir /var/lib/mysql |
(2)配置数据节点
|
1
2
3
4
5
6
7
8
9
10
11
12
13
14
|
# vim /etc/my.cnf[mysqld]datadir=/var/lib/mysqlsocket=/var/lib/mysql/mysql.sockuser=mysql# Disabling symbolic-links is recommended to prevent assorted security riskssymbolic-links=0[mysqld_safe]log-error=/var/log/mysqld.logpid-file=/var/run/mysqld/mysqld.pid[mysql_cluster]ndb-connectstring=192.168.2.10 |
(3)启动数据节点
|
1
2
3
4
5
6
|
# ndbd --initial //NDB12014-05-28 00:32:17 [ndbd] INFO -- Angel connected to ‘192.168.2.10:1186‘2014-05-28 00:32:17 [ndbd] INFO -- Angel allocated nodeid: 2# ndbd --initial //NDB22014-05-28 00:33:08 [ndbd] INFO -- Angel connected to ‘192.168.2.10:1186‘2014-05-28 00:33:08 [ndbd] INFO -- Angel allocated nodeid: 3 |
4.SQL节点(SQL1和SQL2)配置
网卡及屏蔽ARP设置
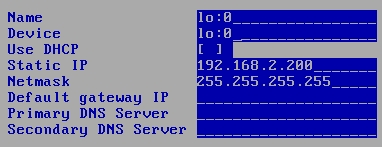
在现有网卡基础上添加一块lo:0网卡

|
1
2
3
4
|
# vim /etc/sysctl.conf //添加以下两行net.ipv4.conf.all.arp_announce = 2net.ipv4.conf.all.arp_ignore = 1# sysctl -p |
(1)安装SQL节点
|
1
2
|
# rpm -ivh MySQL-Cluster-gpl-client-7.1.31-1.el6.i686.rpm# rpm -ivh MySQL-Cluster-gpl-server-7.1.31-1.el6.i686.rpm //如出错,卸载与mysql有关的rpm包 |
(2)配置SQL节点
|
1
2
3
4
5
6
7
8
9
|
# The MySQL server [mysqld]port = 3306socket=/var/lib/mysql/mysql.sockndbclusterdefault-storage-engine=NDBCLUSTERskip-name-resolve[mysql_cluster]ndb-connectstring=192.168.2.10 |
(3)启动SQL节点
|
1
2
3
4
5
6
|
# service mysql start //SQL1Starting MySQL.. SUCCESS! # service mysql start //SQL2,如无法启动,执行pkill -9 mysql再启动Starting MySQL SUCCESS! # netstat -tupln |grep mysqltcp 0 0 0.0.0.0:3306 0.0.0.0:* LISTEN 3475/mysqld |
(4)配置远程连接(SQL1和SQL2配置一致)
|
1
2
3
|
# mysqlmysql> grant all on *.* to ‘nuo‘@‘%‘ identified by ‘123‘;mysql> flush privileges; |
启动顺序一定要遵循:MGM→NDB→SQL
五、查看状态
1.查看MGM状态
|
1
2
3
4
5
6
7
8
9
10
11
12
13
14
15
16
|
# ndb_mgm-- NDB Cluster -- Management Client --ndb_mgm> showConnected to Management Server at: localhost:1186Cluster Configuration---------------------[ndbd(NDB)] 2 node(s)id=2 @192.168.2.30 (mysql-5.1.73 ndb-7.1.31, Nodegroup: 0, *)id=3 @192.168.2.40 (mysql-5.1.73 ndb-7.1.31, Nodegroup: 0)[ndb_mgmd(MGM)] 1 node(s)id=1 @192.168.2.10 (mysql-5.1.73 ndb-7.1.31)[mysqld(API)] 2 node(s)id=4 @192.168.2.50 (mysql-5.1.73 ndb-7.1.31)id=5 @192.168.2.60 (mysql-5.1.73 ndb-7.1.31) |
2.查看LB-Master状态
|
1
2
3
4
5
6
7
8
9
10
11
12
13
14
15
16
17
18
19
20
21
|
# service keepalived startStarting keepalived: [ OK ]# ip addr1: lo: <LOOPBACK,UP,LOWER_UP> mtu 16436 qdisc noqueue state UNKNOWN link/loopback 00:00:00:00:00:00 brd 00:00:00:00:00:00 inet 127.0.0.1/8 scope host lo inet6 ::1/128 scope host valid_lft forever preferred_lft forever2: eth0: <BROADCAST,MULTICAST,UP,LOWER_UP> mtu 1500 qdisc pfifo_fast state UNKNOWN qlen 1000 link/ether 00:0c:29:22:3d:01 brd ff:ff:ff:ff:ff:ff inet 192.168.2.20/24 brd 192.168.2.255 scope global eth0 inet 192.168.2.200/24 scope global secondary eth0 inet6 fe80::20c:29ff:fe22:3d01/64 scope link valid_lft forever preferred_lft forever# ipvsadmIP Virtual Server version 1.2.1 (size=4096)Prot LocalAddress:Port Scheduler Flags -> RemoteAddress:Port Forward Weight ActiveConn InActConnTCP 192.168.2.200:mysql rr persistent 6 -> 192.168.2.50:mysql Route 100 0 0 -> 192.168.2.60:mysql Route 100 0 0 |
3.查看LB-Backup状态
|
1
2
3
4
5
6
7
8
9
10
11
12
13
14
15
16
17
18
19
20
|
# service keepalived startStarting keepalived: [ OK ]# ip addr1: lo: <LOOPBACK,UP,LOWER_UP> mtu 16436 qdisc noqueue state UNKNOWN link/loopback 00:00:00:00:00:00 brd 00:00:00:00:00:00 inet 127.0.0.1/8 scope host lo inet6 ::1/128 scope host valid_lft forever preferred_lft forever2: eth0: <BROADCAST,MULTICAST,UP,LOWER_UP> mtu 1500 qdisc pfifo_fast state UNKNOWN qlen 1000 link/ether 00:0c:29:27:e1:98 brd ff:ff:ff:ff:ff:ff inet 192.168.2.21/24 brd 192.168.2.255 scope global eth0 inet6 fe80::20c:29ff:fe27:e198/64 scope link valid_lft forever preferred_lft forever# ipvsadmIP Virtual Server version 1.2.1 (size=4096)Prot LocalAddress:Port Scheduler Flags -> RemoteAddress:Port Forward Weight ActiveConn InActConnTCP 192.168.2.200:mysql rr persistent 6 -> 192.168.2.50:mysql Route 100 0 0 -> 192.168.2.60:mysql Route 100 0 0 |
六、测试
客户端1(CentOS6.4 32位,IP:192.168.2.80/24)
|
1
2
3
4
5
6
7
8
9
10
11
12
13
14
15
16
17
|
# yum install mysql# mysql -h 192.168.2.200 -u nuo -pEnter password:mysql> show databases;+--------------------+| Database |+--------------------+| information_schema || mysql || ndbinfo || test |+--------------------+mysql> create database t;mysql> use t;mysql> create table t2(id int);mysql> insert into t2 values(10);mysql> insert into t2 values(20); |
2.LB-Master查看连接状态
|
1
2
3
4
5
6
7
8
9
10
11
12
|
# ipvsadmIP Virtual Server version 1.2.1 (size=4096)Prot LocalAddress:Port Scheduler Flags -> RemoteAddress:Port Forward Weight ActiveConn InActConnTCP 192.168.2.200:mysql rr persistent 6 -> 192.168.2.50:mysql Route 100 1 0 -> 192.168.2.60:mysql Route 100 0 0 # ipvsadm -lcnIPVS connection entriespro expire state source virtual destinationTCP 14:48 ESTABLISHED 192.168.2.80:49993 192.168.2.200:3306 192.168.2.50:3306TCP 00:54 NONE 192.168.2.80:0 192.168.2.200:3306 192.168.2.50:3306 |
3.客户端2(CentOS6.4 32位,IP:192.168.2.81/24)
|
1
2
3
4
5
6
7
8
9
10
11
12
13
14
15
16
17
18
19
20
21
|
# yum install mysql# mysql -h 192.168.2.200 -u nuo -pEnter password:mysql> show databases;+--------------------+| Database |+--------------------+| information_schema || mysql || ndbinfo || t || test |+--------------------+mysql> use t;mysql> select * from t2;+------+| id |+------+| 20 || 10 |+------+ |
4.LB-Master查看连接状态
|
1
2
3
4
5
|
# ipvsadm -lcnIPVS connection entriespro expire state source virtual destinationTCP 00:36 NONE 192.168.2.81:0 192.168.2.200:3306 192.168.2.60:3306TCP 14:18 ESTABLISHED 192.168.2.81:42435 192.168.2.200:3306 192.168.2.60:3306 |
总结:在客户端1上插入数据后,服务器显示客户端1连接的是SQL1(192.168.2.50),在客户端2上进行查询,能查询到客户端1输入的数据,服务器显示客户端2连接的是SQL2(192.168.2.60),所以,数据是同步的,并且是一致性的。
Lvs+Keepalived+MySQL Cluster架设高可用负载均衡Mysql集群
标签:
原文地址:http://www.cnblogs.com/wangjuneng/p/4794061.html