标签:
叨逼叨
好久没更新博客了,才几个月,发生了好多事情,处理了好多事情。不变的是写代码依然在继续。
做点啥子
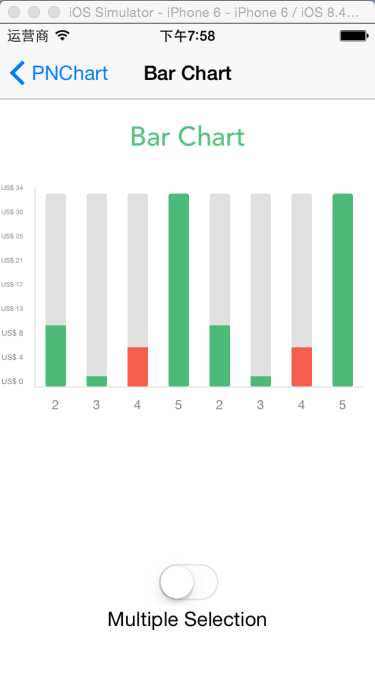
看看objective-c的书,学着写了个柱状图,只是练习的demo而已,iOS上的图表控件已经有非常好的解决方案了。
PNChart:https://github.com/kevinzhow/PNChart
这个控件是是挺不错了,喜欢的朋友可以看看,本文很多地方借鉴了PNChart,就当学习源码也可以
动手动手
先上图先上图,配色直接用PNChart的了,还蛮喜欢这种配色风格,一直不太喜欢把手机横过来,所以做了个竖版的,还有很多不完善,学的时间也短,大家别见笑哈~
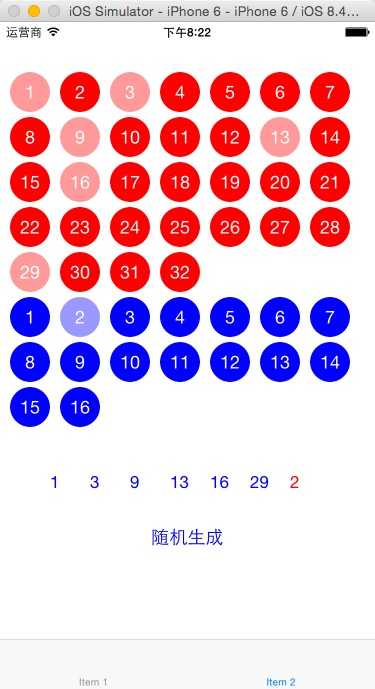
ps:附带赠送双色球号码一注,大家可以去买,万一中了呢,由于女朋友老爹热爱福利事业,就写一个给他老人家玩玩,具体实现有人需要在贴吧,哈哈,我就是这么骗回复的
相关知识点
毕竟是新手入门的东西,列一下相关的知识点,如果后面有时间再一个个展开吧
OC语法方面:
NSArray,NSString,@interface,@property,@nonatomic,@implementation,id,alloc等
iOS方面:
UIView,CAShapeLayer,UIBezierPath,CATextLayer,UIColor,CABasicAnimation
撸代码
言归正传,看看代码实现部分
首先需要定义LZBar.h,包含了基本的声明,当然还缺少了X轴的文字说明,大家可以自己扩展下:
 1 #import <UIKit/UIKit.h>
 2 #import <QuartzCore/QuartzCore.h>
 3
 4 @interface LZBar : UIView{
 5     CAShapeLayer *backgroundLayer; //背景层
 6     UIBezierPath *backgroundPath; //背景赛贝尔路径
 7     CAShapeLayer *barLayer; //柱状层
 8     UIBezierPath *barPath; //柱状赛贝尔路径
 9     CATextLayer *textLayer; //数值文字显示层
10     CATextLayer *tittleLayer; //标题文字说明层
11 }
12
13 @property (nonatomic) UIColor *backgroundColor;//背景色
14 @property (nonatomic) UIColor *barColor;//柱的颜色
15 @property (nonatomic) float barProgress;//柱子长度 0-1之间
16 @property (nonatomic) float barWidth;//柱子宽度
17 @property (nonatomic) NSString *barText;//数值
18 @property (nonatomic) NSString *barTittle;//标题
19
20 @end
  1 #import "LZBar.h"
  2
  3 @implementation LZBar
  4
  5 //初始化
  6 - (id)initWithFrame:(CGRect)frame
  7 {
  8     self = [super initWithFrame:frame];
  9     if (self)
 10     {
 11         backgroundLayer = [CAShapeLayer new];
 12         [self.layer addSublayer:backgroundLayer];
 13         backgroundLayer.strokeColor = LZGrey.CGColor;
 14         backgroundLayer.frame = self.bounds;
 15
 16         barLayer = [CAShapeLayer new];
 17         [self.layer addSublayer:barLayer];
 18         barLayer.strokeColor = LZGreen.CGColor;
 19         barLayer.lineCap = kCALineCapButt;
 20         barLayer.frame = self.bounds;
 21
 22         self.barWidth = self.bounds.size.width;
 23     }
 24     return self;
 25 }
 26
 27 //设置背景
 28 - (void)setBackground
 29 {
 30     backgroundPath = [UIBezierPath bezierPath];
 31     [backgroundPath moveToPoint:CGPointMake(self.bounds.origin.x, self.bounds.origin.y+self.bounds.origin.y+self.bounds.size.height/2)];
 32     [backgroundPath addLineToPoint:CGPointMake(self.bounds.size.width, self.bounds.origin.y+self.bounds.origin.y+self.bounds.size.height/2)];
 33     [backgroundPath setLineWidth:_barWidth];
 34     [backgroundPath setLineCapStyle:kCGLineCapSquare];
 35     backgroundLayer.path = backgroundPath.CGPath;
 36 }
 37
 38 //设置百分百(显示动画)
 39 - (void)setProgress
 40 {
 41     barPath = [UIBezierPath bezierPath];
 42     [barPath moveToPoint:CGPointMake(self.bounds.origin.x, self.bounds.origin.y+self.bounds.origin.y+self.bounds.size.height/2)];
 43     [barPath addLineToPoint:CGPointMake(self.bounds.size.width*_barProgress, self.bounds.origin.y+self.bounds.origin.y+self.bounds.size.height/2)];
 44     [barPath setLineWidth:_barWidth];
 45     [barPath setLineCapStyle:kCGLineCapSquare];
 46
 47     CABasicAnimation *pathAnimation = [CABasicAnimation animationWithKeyPath:@"strokeEnd"];
 48     pathAnimation.duration = 1.0;
 49     pathAnimation.timingFunction = [CAMediaTimingFunction functionWithName:kCAMediaTimingFunctionEaseInEaseOut];
 50     pathAnimation.fromValue = @0.0f;
 51     pathAnimation.toValue = @1.0f;
 52     [barLayer addAnimation:pathAnimation forKey:nil];
 53
 54     barLayer.strokeEnd = 1.0;
 55
 56     barLayer.path = barPath.CGPath;
 57 }
 58
 59 //设置柱子的宽度
 60 - (void)setBarWidth:(float)progressWidth
 61 {
 62     _barWidth = progressWidth;
 63     backgroundLayer.lineWidth = _barWidth;
 64     barLayer.lineWidth = _barWidth;
 65
 66     [self setBackground];
 67     [self setProgress];
 68 }
 69
 70 //设置背景色
 71 - (void)setBackgroundColor:(UIColor *)backgroundColor
 72 {
 73     backgroundLayer.strokeColor = backgroundColor.CGColor;
 74 }
 75
 76 //设置柱子颜色
 77 - (void)setBarColor:(UIColor *)barColor
 78 {
 79     barLayer.strokeColor = barColor.CGColor;
 80 }
 81
 82 //设置柱子进度
 83 - (void)setBarProgress:(float)progress
 84 {
 85     _barProgress = progress;
 86     [self setProgress];
 87 }
 88
 89 //设置数值
 90 - (void)setBarText:(NSString*)text{
 91     textLayer = [CATextLayer layer];
 92     textLayer.string = text;
 93     textLayer.foregroundColor = [[UIColor blackColor] CGColor];
 94     textLayer.fontSize = 16;
 95     textLayer.alignmentMode = kCAAlignmentLeft;
 96
 97     textLayer.bounds = barLayer.bounds;
 98     textLayer.position = CGPointMake(self.bounds.size.width*3/2 + 5 , self.bounds.size.height/2);
 99     CABasicAnimation *fade = [self fadeAnimation];
100     [textLayer addAnimation:fade forKey:nil];
101     [self.layer addSublayer:textLayer];
102 }
103
104 //设置标题
105 - (void)setBarTittle:(NSString*)tittle{
106     tittleLayer = [CATextLayer layer];
107     tittleLayer.string = tittle;
108     tittleLayer.foregroundColor = [[UIColor blackColor] CGColor];
109     tittleLayer.fontSize = 16;
110     tittleLayer.alignmentMode = kCAAlignmentRight;
111
112     tittleLayer.bounds = barLayer.bounds;
113     tittleLayer.position = CGPointMake(-self.bounds.size.width/2 - 5 , self.bounds.size.height/2);
114     CABasicAnimation *fade = [self fadeAnimation];
115     [tittleLayer addAnimation:fade forKey:nil];
116     [self.layer addSublayer:tittleLayer];
117 }
118
119 //渐变动画
120 -(CABasicAnimation*)fadeAnimation
121 {
122     CABasicAnimation* fadeAnimation = [CABasicAnimation animationWithKeyPath:@"opacity"];
123     fadeAnimation.fromValue = [NSNumber numberWithFloat:0.0];
124     fadeAnimation.toValue = [NSNumber numberWithFloat:1.0];
125     fadeAnimation.duration = 2.0;
126
127     return fadeAnimation;
128 }
129 @end
有了Bar之后问题就变的简单的多了,我们可以在构建一个Chart,方便我们直接使用,防止内容过长,看起来累,代码我就折叠了~

 1 #import <UIKit/UIKit.h>
 2
 3 @interface LZChart : UIView{
 4     CGSize size;//图表大小
 5 }
 6
 7 @property (nonatomic)NSArray *numLabels;//值
 8 @property (nonatomic)NSArray *nameLabels;//名称
 9 @property (nonatomic)float maxNum;//最大值
10
11 @property (nonatomic)NSInteger barSpacing;//两根柱状图的间距
12
13 @property (nonatomic) CGFloat chartMarginLeft;
14 @property (nonatomic) CGFloat chartMarginRight;
15 @property (nonatomic) CGFloat chartMarginTop;
16 @property (nonatomic) CGFloat chartMarginBottom;
17
18 - (void)show;//现实图标
19
20 @end
 1 #import "LZChart.h"
 2 #import "LZBar.h"
 3
 4 @implementation LZChart
 5
 6 -(id)initWithFrame:(CGRect)frame{
 7     self = [super initWithFrame:frame];
 8     if (self) {
 9         size = frame.size;
10         _chartMarginTop = 30.0;
11         _chartMarginBottom = 30.0;
12         _chartMarginLeft = 30.0;
13         _chartMarginRight = 30.0;
14         _barSpacing = 20;
15     }
16     return self;
17 }
18
19 -(void)show{
20     [self setMaxNum];
21
22     float barCount = [_numLabels count];
23     float barMaxWidth = size.width - _chartMarginLeft - _chartMarginRight ;
24     float barHeight = (size.height - _chartMarginTop - _chartMarginBottom) / barCount - _barSpacing;
25     //防止柱状图太粗
26     if(barHeight > 25){
27         barHeight = 25;
28     }
29     float barWidth = 0;
30
31     for(int i = 0;i<barCount;i++){
32         LZBar *bar = [[LZBar alloc] initWithFrame:CGRectMake(_chartMarginLeft, _chartMarginTop + i*(barHeight + _barSpacing), barMaxWidth, barHeight)];
33         barWidth = [_numLabels[i] floatValue];
34         bar.barProgress = barWidth/_maxNum;
35         bar.barWidth = barHeight;
36         bar.barText = [NSString stringWithFormat:@"%.1f",barWidth];
37         bar.barTittle = [NSString stringWithFormat:@"%@",_nameLabels[i]];
38         [self addSubview:bar];
39     }
40 }
41
42 -(void)setMaxNum{
43     _maxNum = 0;
44     for (id num in _numLabels) {
45         if ([num floatValue] > _maxNum) {
46             _maxNum = [num floatValue] ;
47         }
48     }
49 }
50 @end
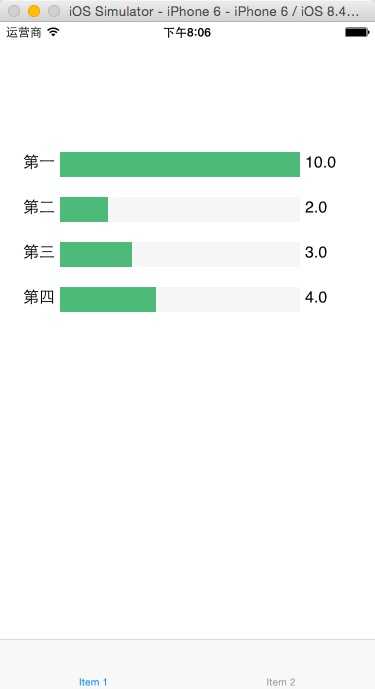
然后在需要添加的UIView直接调用,是不是很容易呢
1     LZChart *chart = [[LZChart alloc] initWithFrame:CGRectMake(30, 100, 300, 300)];
2     chart.numLabels = [NSArray arrayWithObjects:@10,@2,@3,@4, nil];
3     chart.nameLabels = [NSArray arrayWithObjects:@"第一",@"第二",@"第三",@"第四", nil];
4     [self.view addSubview:chart];
5     [chart show];
最终效果:
希望大家喜欢~
博客地址: http://www.cnblogs.com/nightcat/
博客版权: 本文以学习、研究和分享为主,欢迎转载,但必须在文章页面明显位置给出原文连接。
如文中有不妥或者错误的地方还望高手的指出,以免误人子弟。如果觉得本文对您有所帮助请【推荐】一下!如果你有更好的建议,不妨留言一起讨论,共同进步! 再次感谢您耐心的读完本篇文章。
标签:
原文地址:http://www.cnblogs.com/nightcat/p/ios_01.html
