标签:
架构图:

1.准备机器,IP分别设置为
192.168.1.201
192.168.1.202
192.168.1.203
2.在每个机器上下载mongodb
3.在每个机器上建立mongos.config,shard1,shard2.shard3五个文件夹
mongos:数据库集群请求的入口(生产环境应有多个)
config:配置服务器,存储所有数据库元信息(路由、分片)的配置(对应mongos)
shard1:分片1
shard2:分片2
shard3:分片3
(mongos 3个, config server 3个,数据分3片 shard server 3个,每个shard 有一个副本一个仲裁也就是 3 * 2 = 6 个,总共需要部署15个实例)
创建日志文件和数据文件(mongos文件不存数据)
#建立mongos目录
mkdir -p mongos/log
#建立config server数据文件存放目录和日志目录
mkdir -p congif/data
mkdir -p congif/log
#建立shard1数据文件存放目录和日志目录
mkdir -p shard1/data
mkdir -p shard1/log
#建立shard2数据文件存放目录和日志目录
mkdir -p shard2/data
mkdir -p shard2/log
#建立shard3数据文件存放目录和日志目录
mkdir -p shard3/data
mkdir -p shard3/log

4.端口设定(开启每个机器所对应端口防火墙:iptables -I INPUT -p tcp --dport 20000 -j ACCEPT)
mongos:20000
config:21000
shard1:22001
shard2:22002
shard3:22003
5.启动每一台服务器配置服务器
bin/mongod --configsvr --dbpath config/data --port 21000 --logpath config/log/mongod.log --fork

6.启动每一台服务器mongos服务器
bin/mongos --configdb 192.168.1.201:21000,192.168.1.202:21000,192.168.1.203:21000 --port 20000 --logpath mongos/log/mongos.log --fork
7.启动配置每个模块中的副本集
#在每个机器里分别设置分片1服务器及副本集shard1
bin/mongod --shardsvr --replSet shard1 --port 22001 --dbpath shard1/data  --logpath shard1/log/shard1.log --fork --nojournal  --oplogSize 10
#在每个机器里分别设置分片2服务器及副本集shard2
bin/mongod --shardsvr --replSet shard2 --port 22002 --dbpath shard2/data  --logpath shard2/log/shard2.log --fork --nojournal  --oplogSize 10
#在每个机器里分别设置分片3服务器及副本集shard3
bin/mongod --shardsvr --replSet shard3 --port 22003 --dbpath shard3/data  --logpath shard3/log/shard3.log --fork --nojournal  --oplogSize 10

8.分别对每个分片配置副本集
#任意一台机器

#设置第一个分片副本集、连接shard1
bin/mongo 192.168.1.201:22001

#使用admin数据库
use admin

#定义副本集配置

config = { _id:"shard1", members:[
                     {_id:0,host:"192.168.1.201:22001"},
                     {_id:1,host:"192.168.1.202:22001"},
                     {_id:2,host:"192.168.1.203:22001",arbiterOnly:true}
                ]
         }

#初始化副本及:
rs.initiate(config);

#设置第二个分片副本集、shard2
bin/mongo 192.168.1.201:22002

#使用admin数据库
use admin

#定义副本集配置

config = { _id:"shard2", members:[
                     {_id:0,host:"192.168.1.201:22002"},
                     {_id:1,host:"192.168.1.202:22002"},
                     {_id:2,host:"192.168.1.203:22002",arbiterOnly:true}
                ]
         }

#初始化副本及:

rs.initiate(config);
#设置第三个分片副本集、shard3
bin/mongo 192.168.1.201:22003

#使用admin数据库
use admin

#定义副本集配置

config = { _id:"shard3", members:[
                     {_id:0,host:"192.168.1.201:22003"},
                     {_id:1,host:"192.168.1.202:22003"},
                     {_id:2,host:"192.168.1.203:22003",arbiterOnly:true}
                ]
         }

#初始化副本及:
rs.initiate(config);
9.设置分片配置,让分片生效
#连接mongos
bin/mongo  192.168.1.201:20000

#使用admin数据库
use  admin

#串联路由服务器、分配副本集
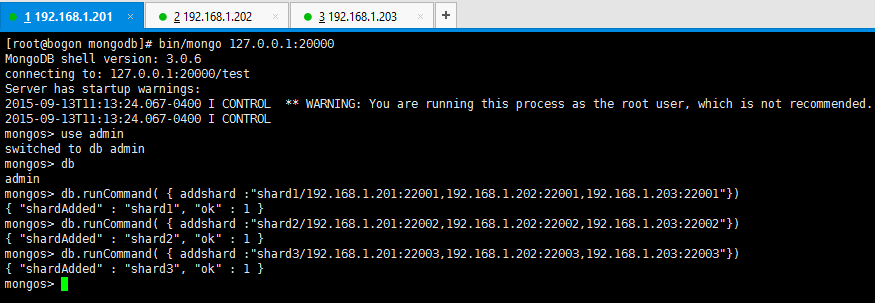
db.runCommand( { addshard :"shard1/192.168.1.201:22001,192.168.1.202:22001,192.168.1.203:22001"})
db.runCommand( { addshard :"shard2/192.168.1.201:22002,192.168.1.202:22002,192.168.1.203:22002"})
db.runCommand( { addshard :"shard3/192.168.1.201:22003,192.168.1.202:22003,192.168.1.203:22003"})

#查看分片服务器的配置
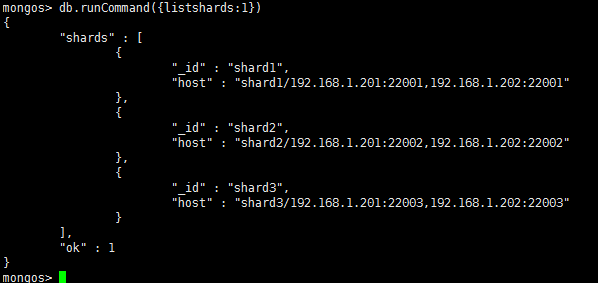
db.runCommand( { listshards : 1 } );

10.连接在mongos上,准备让指定的数据库、指定的集合分片生效
#指定testdb分片生效
db.runCommand( { enablesharding :"testdb"});
#指定数据库里需要分片的集合和片键
db.runCommand( { shardcollection : "testdb.person",key : {x: 1} } )

11.java程序与集群关联
List<ServerAddress> addresses = new ArrayList<ServerAddress>();
		addresses.add(new ServerAddress("192.168.1.201" , 20000));
		addresses.add(new ServerAddress("192.168.1.202" , 20000));
		addresses.add(new ServerAddress("192.168.1.203" , 20000));
		MongoClient client = new MongoClient(addresses);
		MongoDatabase db =  client.getDatabase( "testdb" );
        MongoCollection coll = db.getCollection( "person" );
        long start = System.currentTimeMillis();
        System.out.println("start:"+start);

         List<Document> add = new ArrayList<Document>();
        for(int i=1; i<400000; i++){
        	add.add(new Document().append("x", i).append("name", "daxiong"+i));
        }
        coll.insertMany(add);
       /* FindIterable<Document> findInterable = coll.find();
        for(Document d : findInterable){
        	System.out.println(d.toJson());
        }*/

        System.out.println("耗时:"+(System.currentTimeMillis() - start)/1000);
#查看分片状态命令
db.person.stats();
db.printShardingStatus()
12.重启服务器后,再次启动mongodb集群命令
#1.启动每个config service
bin/mongod --configsvr --dbpath config/data --port 21000 --logpath config/log/mongod.log --fork
#2.启动每个mongos(搭载所有config)
bin/mongos --configdb 192.168.1.201:21000,192.168.1.202:21000,192.168.1.203:21000  --port 20000   --logpath mongos/log/mongos.log --fork
#3.启动每个机器的每个分片、副本集群、仲裁
bin/mongod --shardsvr --replSet shard1 --port 22001 --dbpath shard1/data  --logpath shard1/log/shard1.log --fork --nojournal  --oplogSize 10

bin/mongod --shardsvr --replSet shard2 --port 22002 --dbpath shard2/data  --logpath shard1/log/shard2.log --fork --nojournal  --oplogSize 10

bin/mongod --shardsvr --replSet shard3 --port 22003 --dbpath shard3/data  --logpath shard1/log/shard3.log --fork --nojournal  --oplogSize 10

#4.连接任意mongos
参考:http://www.lanceyan.com/tech/arch/mongodb_shard1.html
标签:
原文地址:http://my.oschina.net/daxiong0615/blog/505822