标签:
容器是Spring框架的核心,Spring容器使用IOC管理所有组成应用系统的组件。Spring有两种不同的容器:BeanFactory提供最简单的容器,提供了最基础的依赖注入支持,ApplicationContext建立在BeanFactory的基础之上,提供了系统构架服务如从属性文件中读取文本信息,事件传递等。
在Spring容器中拼凑Bean叫做装配,装配Bean的时候,你是在告诉容器需要哪些Bean以及容器如何使用依赖注入将它们配合在一起。
BeanFactory采用工厂设计模式,它的实现类负责创建和分发各种类型的Bean。
Spring中有几种BeanFactory的实现,例如org.springframework.beans.factory.xml.XmlBeanFactory根据XML文件中的定义装载Bean。(现在已经不建议使用)
ClassPathXmlApplicationContext:一种上下文,它从类路径中载入上下文定义文件
FileSystemXmlApplicationContext:一种应用上下文,它从文件系统中载入上下文文件
XmlWebApplicationContext:一种基于Spring的web应用系统上下文,从web应用上下文中载入上下文定义文件
public class TestMain
{
    public static void main(String[] args)
    {
        //ApplicationContext ctx=new ClassPathXmlApplicationContext("applicationContext.xml");
        ClassPathResource res = new ClassPathResource("applicationContext.xml");
        BeanFactory factory=new XmlBeanFactory(res);//XmlBeanFactory现在已经不建议使用
        Demo2 t=(Demo2) factory.getBean("demo2");
        System.out.println(t.getPrice());
    }
}
Bean工厂从XML文件中读取Bean的定义信息,但是此时还没有实例化Bean,Bean是被延迟载入到Bean工厂中的。然后调用getBean方法,工厂就会实例化Bean并且使用依赖注入开始设置Bean的属性。
一个最基本的BeanFactory配置由一个或多个它所管理的Bean定义组成,在一个XmlBeanFactory中,根节点beans中包含一个或多个元素
<?xml version="1.0" encoding="UTF-8"?>
<!DOCTYPE beans PUBLIC "-//SPRING//DTD BEAN//EN" "http://www.springframework.org/dtd/spring-beans.dtd">
<beans>
  <bean id="..." class="...">
    ...
  </bean>
  <bean id="..." class="...">
    ...
  </bean>
  ...
</beans>
一个XmlBeanFactory中的Bean定义包括:
方向控制/依赖注入存在两种主要的形式:
1、基于setter的依赖注入:是在调用无参构造函数或无参的静态方法工厂方法实例化你的bean之后,通过调用你的bean上的setter方法实现的。Spring一般提倡使用基于setter方法的依赖注入。下面就这种方法距离:
构建Bean的实现类为Demo1.java:
public class Demo1
{
    private String name;
    private int age;
    public String getName()
    {
        return name;
    }
    public void setName(String name)
    {
        this.name = name;
    }
    public int getAge()
    {
        return age;
    }
    public void setAge(int age)
    {
        this.age = age;
    }
    public Demo1()
    {
        System.out.println("调用无参构造函数");
    }
}
applicationContext.xml中的配置为:
 <bean id="demo1" class="com.Demo1">
        <property name="name">
            <value>xujian</value>
        </property>
        <property name="age">
            <value>23</value>
        </property>
    </bean>
编写测试类:
public class TestMain
{
    public static void main(String[] args)
    {
        ApplicationContext factory=new ClassPathXmlApplicationContext("applicationContext.xml");
        Demo1 t=(Demo1) factory.getBean("demo1");
        System.out.println(t.getName());
    }
}
运行结果为:

可见,通过setter方法,先是执行了该类的无参构造函数,然后调用setXXX方法来设置属性。
2、基于构造函数的依赖注入:它是通过调用带有许多参数的构造方法来实现的,每个参数表示一个合作者或者属性,下面就这种方法举例
使用这种方法,需要在bean的实现类中添加有参构造函数
public class Demo2
{
    private String bookName;
    private int price;
    public String getBookName()
    {
        return bookName;
    }
    public void setBookName(String bookName)
    {
        this.bookName = bookName;
    }
    public int getPrice()
    {
        return price;
    }
    public void setPrice(int price)
    {
        this.price = price;
    }
    public Demo2(String bookName, int price)
    {
        System.out.println("执行有参构造函数!");
        this.bookName = bookName;
        this.price = price;
    }
}
对应applicationContext.xml的配置为:
 <bean id="demo2" class="com.Demo2" >
        <constructor-arg>
            <value>Java</value>
        </constructor-arg>
        <constructor-arg>
            <value>50</value>
        </constructor-arg>
    </bean>
编写测试类:
public class TestMain
{
    public static void main(String[] args)
    {
        ApplicationContext factory=new ClassPathXmlApplicationContext("applicationContext.xml");
        Demo2 t=(Demo2) factory.getBean("demo2");
        System.out.println(t.getBookName());
    }
}
执行结果为:

Spring在缺省情况下是单实例模式,在容器分配Bean的时候总是返回同一个实例。
测试如下:
public class TestMain
{
    public static void main(String[] args)
    {
        ApplicationContext factory=new ClassPathXmlApplicationContext("applicationContext.xml");
        Demo2 t1=(Demo2) factory.getBean("demo2");
        Demo2 t2=(Demo2) factory.getBean("demo2");
         System.out.println(t1==t2);
    }
}
执行结果为:

如果我们想每次向上下文请求一个Bean的时候总是得到一个不同的实例,则需要配置scope属性,在原配置文件中scope的默认值是singleton,现在将其设置为prototype
<bean id="demo2" class="com.Demo2" scope="prototype">
        <constructor-arg>
            <value>Java</value>
        </constructor-arg>
        <constructor-arg>
            <value>50</value>
        </constructor-arg>
    </bean>
再次执行上面的测试程序,结果如下:

当一个Bean实例化的时候,可能需要做一些初始化的工作,删除的时候需要做一些清理工作,在Bean的定义中设置自己的init-method和destroy-method并在xml文件中进行配置,这些方法就会在实例化创建或者销毁的时候被调用。示例如下:
在Demo2类的定义中添加两个函数
  public void initialize()
    {
        System.out.println("执行了初始化函数!");
    }
    public void close()
    {
        System.out.println("执行了销毁函数!");
    }
然后配置XMl文件
 <bean id="demo2" class="com.Demo2" init-method="initialize" destroy-method="close">
        <constructor-arg>
            <value>Java</value>
        </constructor-arg>
        <constructor-arg>
            <value>50</value>
        </constructor-arg>
    </bean>
运行测试程序
public class TestMain
{
    public static void main(String[] args)
    {
        ApplicationContext factory=new ClassPathXmlApplicationContext("applicationContext.xml");
        Demo2 t1=(Demo2) factory.getBean("demo2");
         System.out.println(t1.getBookName());
         t1.close();
    }
}
结果如下:

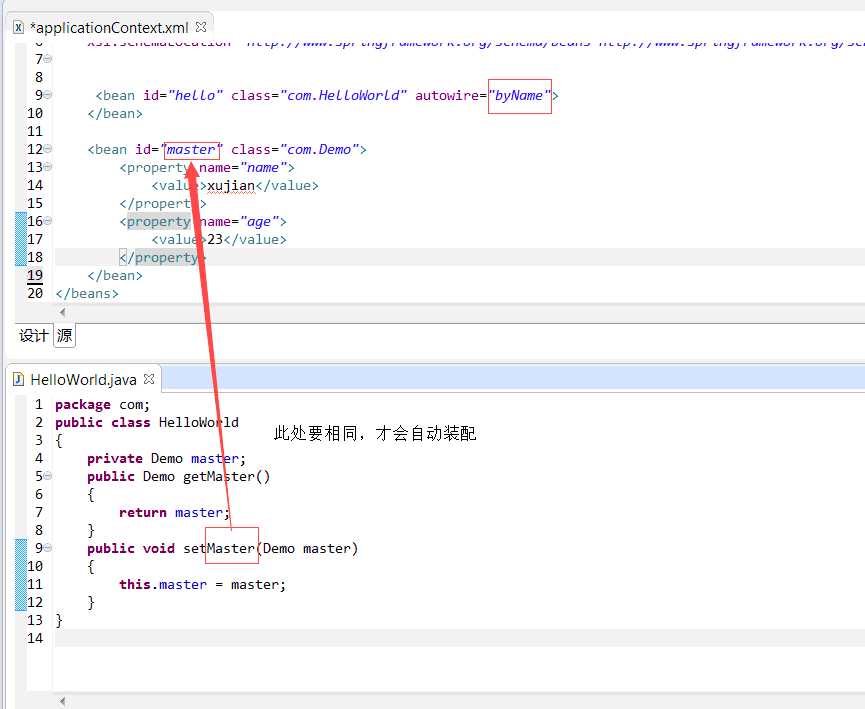
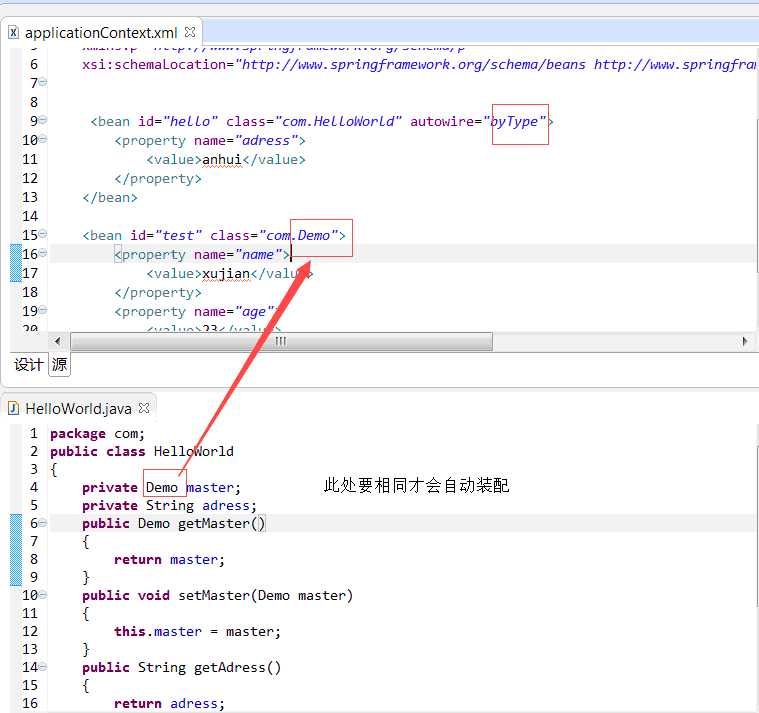
我们可以通过设置bean中的autowire属性来实现自动装配。有四种自动装配的类型:


标签:
原文地址:http://www.cnblogs.com/xujian2014/p/4832493.html