标签:
以我用的Ubuntu 14.04为例
1. 安装MongoDB
apt-get install mongodb
2. 创建MongoDB的数据库目录
mkdir -p /data/db
3. 查看MongoDB运行状态
mongod
发现有个错误 ERROR: Insufficient free space for journal files
按照这里设置以后我们就能访问mongod
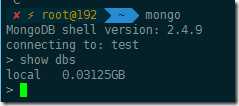
4. 访问mongod
mongo
在官方下载安装包安装完毕后,我们需要在C盘建立db目录
C:\data\db
然后在安装目录中运行 mongod 即可
1. mongo
MongoDB的客户端,是一个JavaScript Shell 
2. mongoimport
数据导入工具,JSON,CSV,TSV 
3. mongoexport
数据导出工具JSON,CSV 
4. mongodump
二进制导出 (备份) 
5. mongorestore
恢复一个二进制导出 
5. bsondump
把导出的二进制文件转为JSON 
6.mongostat
显示MongoDB 服务器当前状态概览 
7. BSON
JSON的二进制形式,支持了JSON没有的数据类型
http://bsonspec.org
8. Mongo DB 驱动
https://docs.mongodb.org/ecosystem/drivers/
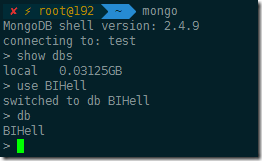
1. 创建数据库
在MongoDB中,使用use 命令,如果没有这个数据库,那么MongoDB会自动‘创建’

2. 显示目前存在的数据
db.links.count()
3. 插入文档
只要给JSON格式的文档即可(其中links是表名)
db.links.insert({ title: "BI HELL", url: "http://bihell.com", comment:"great blog", tags:["tutorials", "dev"], saved_on: new Date()});
4. 创建另外一个文档
> var doc = {};
> doc.title = "BI HELL";
BI HELL
> doc.url = ‘http://bihell.com‘
http://bihell.com
> doc.tags = ["BI", "SSIS"];
[ "BI", "SSIS" ]
> doc.saved_on = new Date
ISODate("2015-09-15T14:45:00.112Z")
> doc.meta ={}
{ }
> doc.meta.browser = "Internet Expolorer 11"
Internet Expolorer 11
> doc.meta.OS = "Windows 10"
Windows 10
> doc
{
"title" : "BI HELL",
"url" : "http://bihell.com",
"tags" : [
"BI",
"SSIS"
],
"saved_on" : ISODate("2015-09-15T14:45:00.112Z"),
"meta" : {
"browser" : "Internet Expolorer 11",
"OS" : "Windows 10"
}
}
> db.links.save(doc)
>
5. 查询数据
> db.links.find()
{ "_id" : ObjectId("55f82dbfbe4d5bc5bdb1c366"), "title" : "BI HELL", "url" : "http://bihell.com", "comment" : "great blog", "tags" : [ "tutorials", "dev" ], "saved_on" : ISODate("2015-09-15T14:39:59.445Z") }
{ "_id" : ObjectId("55f83002be4d5bc5bdb1c367"), "title" : "BI HELL", "url" : "http://bihell.com", "tags" : [ "BI", "SSIS" ], "saved_on" : ISODate("2015-09-15T14:45:00.112Z"), "meta" : { "browser" : "Internet Expolorer 11", "OS" : "Windows 10" } }
>
再来一些练习
> db.users.insert({ name: "Andrew"})
> var a =db.users.findOne({ name: "Andrew"});
> a
{ "_id" : ObjectId("55f97afaf6986758f851295e"), "name" : "Andrew" }
> a._id
ObjectId("55f97afaf6986758f851295e")
> db.links.insert({ title: "BIHell", url:"http://bihell.com",userId: a._id})
> db.links.find()
{ "_id" : ObjectId("55f97c23f6986758f8512960"), "title" : "BIHell", "url" : "http://bihell.com", "userId" : ObjectId("55f9783bf6986758f851295d") }
> link = db.links.find()[0]
> db.users.findOne({ _id: link.userId});
{ "_id" : ObjectId("55f9783bf6986758f851295d"), "name" : "Andrew" }
>
之前查询中的ObjectID("_id" : ObjectId("55f82dbfbe4d5bc5bdb1c366")) 是MongoDB默认生成的. 我们可以在插入的时候指定
> db.links.insert({ _id:3, name: "test"});
返回查询结果的第一条记录
> db.links.find()[0]
返回第一条记录的id
> db.links.find()[0]._id
获得记录的创建时间 (系统生成的ObjectID才有效)
db.links.find()[3]._id.getTimestamp()
当然也可以自己生成一个ObjectId
> new ObjectId
ObjectId("55f838989bf562500ae2a5fa")
之前已经接触过一些查询,现在来点复杂的.
下载bookmarks.js
https://searchcode.com/codesearch/view/93349316/
连接本机然后执行 bookmarks.js
mongo 127.0.0.1/bookmarks bookmarks.js
连接bookmarks数据库
mongo bookmarks
我们查看links表.里面有一些数据
> db.links.find()
上面只是把所有记录一行行罗列出来,如果要好看点,直接显示成Json样式,可以这样写
> db.users.find().forEach(printjson)
类似select的查询,查找email为‘johndoe@gmail.com’的记录
db.users.find({ email: ‘johndoe@gmail.com‘});
db.users.find({ passwordHash: ‘another_password_hash‘ }).forEach(printjson);
使用findOne,只返回一条记录
> db.links.findOne({favorites:100});
使用findOne 只显示email=‘johndoe@gmail.com‘ 的name
> db.users.findOne({ email: ‘johndoe@gmail.com‘}).name
设置需要显示的字段,例子中是title 和 url, 其中1和ture等价
> db.links.find({favorites:100},{title:1, url: true});
不显示tags字段
> db.links.find({favorites:100},{ tags: 0 }).forEach(printjson);
查询子对象
> db.users.findOne({ ‘name.first‘:‘John‘});
{
"_id" : ObjectId("55f983616ffe01d4461ef223"),
"name" : {
"first" : "John",
"last" : "Doe"
},
"age" : 30,
"email" : "johndoe@gmail.com",
"passwordHash" : "some_password_hash",
"logins" : [
{
"at" : ISODate("2012-04-03T21:06:07Z"),
"minutes" : 20
},
{
"at" : ISODate("2012-04-15T08:17:18Z"),
"minutes" : 18
},
{
"at" : ISODate("2012-04-30T18:03:04Z"),
"minutes" : 34
}
]
}
只显示name子对象中的last
> db.users.findOne({ ‘name.first‘:‘John‘},{‘name.last‘: 1});
{
"_id" : ObjectId("55f983616ffe01d4461ef223"),
"name" : {
"last" : "Doe"
}
}
操作符
找到favorites 大于50的记录并且只返回title 和favorites 列
> db.links.find({ favorites: { $gt:50}},{title:1, favorites:1,_id:0});
小于 $lt
> db.links.find({ favorites: { $lt:150}},{title:1, favorites:1,_id:0});
小于等于$lte
> db.links.find({ favorites: { $lte:150}},{title:1, favorites:1,_id:0});
大于等于$gte
> db.links.find({ favorites: { $gte:150}},{title:1, favorites:1,_id:0});
大于100小于300
> db.links.find({ favorites: { $gt:100, $lt:300}},{title:1, favorites:1,_id:0});
不等于
> db.links.find({ tags: { $ne: ‘code‘}},{ title:1,tags:1});
in
> db.users.find({‘name.first‘:{$in:[‘John‘,‘Jane‘]}},{‘name.first‘:1});
> db.links.find({ tags: { $in: [‘marketplace‘,‘code‘]}},{ title: 1,tags:1,_id:0})
$all 匹配所有结果
> db.links.find({ tags: {$all:[‘marketplace‘,‘code‘]}},{title:1,tags:1,_id:0})
or
> db.users.find({ $or:[{‘name.first‘:"John"},{‘name.last‘:"Wilson"}]},{name:1});
not or 找到‘name.first‘不为John 或者 ‘name.last‘ 不为 Wilson的记录
> db.users.find({$nor:[{‘name.first‘:"John"},{‘name.last‘:"Wilson"}]},{name:1});
and
> db.users.insert({name:{first:"John",last:"Jones"}});
> db.users.find({$and: [{‘name.first‘:"John"},{"name.last":"Jones"}]});
exist
> db.users.find({email:{$exists:true}},{name:1,_id:0});
not exist
> db.users.find({email:{$exists:false}},{name:1,_id:0});
取余 mod, 查找favorites 除5余0的记录
> db.links.find({favorites:{$mod:[5,0]}},{title:1,favorites:1,_id:0})
找到favorites除5不余0的记录
> db.links.find({favorites:{$not: {$mod:[5,0]}}},{title:1,favorites:1,_id:0})
查找logins字段里面 minutes=20的记录
> db.users.find({logins: {$elemMatch: { minutes:20}}});
查找logins字段中 at <2012-03-30的记录,(注意日期与MongoDB日期有差异的)
> db.users.find({logins: {$elemMatch: { at: { $lt: new Date(2012,03,14)}}}}).forEach(printjson);
使用$where (即使用js ,尽量少用,效率低)
db.users.find({$where:‘this.name.first==="John"‘})
db.users.find({$where:‘this.name.first==="John"‘,age:30})
如果只是用where ,你可以省略掉 $where
db.users.find(‘this.name.first==="John"‘)
使用函数
> var f = function(){ return this.name.first === "John"};
> db.users.find(f);
> db.users.find({$where: f});
去重
> db.links.distinct(‘favorites‘);
分组聚合
关于分组具体的解说可以看这里
> db.links.group({
... key: { userId: true},
... initial: {favCount:0},
... reduce: function (doc,o) { o.favCount += doc.favorites},
... finalize: function (o) { o.name = db.users.findOne({ _id: o.userId}).name ; } } );
正则
> db.links.find({ title: /tuts\+$/});
> db.links.find({ title: /tuts\+$/},{title: 1 } );
> db.links.find({ title: { $regex: /tuts\+$/}},{title: 1 } );
> db.links.find({ title: { $regex: /tuts\+$/, $ne: "Mobiletuts+"}},{title: 1 } );
计数
db.users.find({‘name.first‘: ‘John‘}).count();
db.users.count({ ‘name.first‘: ‘John‘});
db.users.count();
排序
sort里面 1为正序 -1为反序
db.links.find({},{title:1, _id:0}).sort({title:1});
> db.links.find({},{title:1,favorites :1 ,_id:0}).sort({ favorites : -1,title:1});
限定返回记录的数量
> db.links.find({},{title:1, favourites:1,_id:0}).sort({ favorites : -1 }).limit(1);
> db.links.find().limit(2).forEach(printjson);
分页
> db.links.find({},{title:1, _id:0}).skip(0*3).limit(3);
> db.links.find({},{title:1, _id:0}).skip(1*3).limit(3);
> db.links.find({},{title:1, _id:0}).skip(2*3).limit(3);
更新
找到name.first=John的记录,然后把job的值更新为developer
> db.users.update({‘name.first‘:‘John‘},{job:‘developer‘});
注意:只会更新匹配到的第一条记录,第四个参数设为ture就可以更新所有记录
> db.users.update({‘name.first‘:‘Jane‘},{$set:{job:"developer"}},false,true);
第三个参数设为ture的时候,如果找不到第一个参数的匹配记录,则直接插入参数2作为新纪录
> db.users.update({ name: "Kate Wills"},{ name:"Kate Wills",job:"LISP Developer"},true);
> db.users.find({ name:"Kate Wills"});
更新某值
> var n = {title:"Nettuts+"};
> db.links.find(n , {title: 1, favorites :1});
> db.links.update(n,{$inc: { favorites :5}}); --原值加5
> db.links.find(n , {title: 1, favorites :1});
SET
如果原先有字段则更新,没有则直接插入一个字段
> var q = { name: "Kate Wills" };
> db.users.find(q);
{ "_id" : ObjectId("5602bcd248c642324487d01f"), "name" : "Kate Wills", "job" : "LISP Developer" }
> db.users.update(q,{$set: {job:‘Web Developer‘}});
> db.users.find(q);
{ "_id" : ObjectId("5602bcd248c642324487d01f"), "job" : "Web Developer", "name" : "Kate Wills" }
> db.users.update(q,{$set:{email: ‘katewills@gmail.com‘}});
> db.users.find(q);
{ "_id" : ObjectId("5602bcd248c642324487d01f"), "email" : "katewills@gmail.com", "job" : "Web Developer", "name" : "Kate Wills" }
UNSET 去掉某个字段
> db.users.update(q,{$unset:{job:"Web Developer"}});
> db.users.find(q);
{ "_id" : ObjectId("5602bcd248c642324487d01f"), "email" : "katewills@gmail.com", "name" : "Kate Wills" }
SAVE
> var bob = db.users.findOne({‘name.first‘:‘Bob‘});
添加一个新的字段
> bob.job = "Server Admin"
保存记录
> db.users.save(bob)
findAndModify
其中 new设为true 返回更改后的值,设为false则返回更改前的值
> db.users.findAndModify({
... query:{name:"Kate Wills"},
... update:{$set:{age:20}},
... new:true});
{
"_id" : ObjectId("5602bcd248c642324487d01f"),
"age" : 20,
"email" : "katewills@gmail.com",
"name" : "Kate Wills"
}
$push增加item
db.links.update(n,{$push:{ tags: ‘blog’}});
$pushAll 增加多个item
db.links.update(n,{ $pushAll : { tags: [‘one’,’two’]}});
与上面不同,这会下面这个会增加子项
db.links.update(n,{$push : { tags:[‘one’ ,’two’] }});
$addToSet 如果增加的item已经存在,则不添加
db.links.update(n,{$addToSet:{tags:’code’}});
db.links.update(n,{$addToSet: {tags: {$each: [‘one’,’four’]}}});
$pull 移除item
db.links.update(n,{$pull: {tags:’four’}});
移除多个item
db.links.update(n,{$pullAll: {tags:[‘two’,’three’]}});
db.links.update(n,{$pull:{tags:[‘one’,’two’]}});
移除第一个item或者最后一个item
db.links.update(n,{$pop:{tags:-1}});
查找数组型子项需要用到$ 位置符
db.users.update({‘logins.minutes‘: 10},{$inc:{‘logins.$.minutes‘:1}})
db.users.update({‘logins.minutes‘: 20},{$inc:{‘logins.$.minutes‘:1}},false,true)
db.users.update({‘logins.minutes‘: 20},{$set:{random:true }},false,true)
db.users.update({‘logins.minutes‘: 20},{$set:{‘logins.$.location‘:‘unknown‘ }},false,true)
重命名字段
db.users.update({random:true},{$rename:{‘random‘:‘something_else‘}},false,true);
删除users表
> db.users.remove();
删除name.first = John的记录
> db.users.remove({ ‘name.first‘:"Bob"});
删掉记录并返回
> db.users.findAndModify({
... query:{‘name.first‘:/B/},
... remove:true});
删除一个collections
> db.other.insert({name:"Andrew"});
> show collections
> db.other.drop();
删除数据库
> use other
> db.test.insert({});
> show dbs
> db
> db.dropDatabase()
> db --此时还能看到other数据库,不过实际上已经删除了,这个只是内存中的
> show dbs
注意,MongoDB一个查询只能使用一个索引
显示查询记录
> db.links.find({title:‘Nettuts+‘ }).explain();
id列默认做了索引
> db.links.find({"_id" : ObjectId("55f983616ffe01d4461ef22b")}).explain();
创建一个索引
> db.links.ensureIndex({title:1});
查找索引
> db.system.indexes.find()
一些建立索引的参数
dropDups 表示如果有重复值,只记录第一条
> db.links.ensureIndex({title:1},{unique:true, dropDups:true});
sparse 如果文档中没有title字段则不包含在索引中
> db.links.ensureIndex({title:1},{unique:true, dropDups:true});
> db.links.ensureIndex({title:1},{sparse:true});
组合索引
> db.links.ensureIndex({title:1,url:1});
删除索引
> db.system.indexes.find()
> db.links.dropIndex("title_1")
1. MongoDB官方站点
www.mongodb.org
2. 10genEducation MongoDB开发的领导者,同事提供培训
education.10gen.com
3.几本书
MongoDB The Definitive Guide
MongoDB IN ACTION
MongoDB Developers
标签:
原文地址:http://www.cnblogs.com/haseo/p/learning_mongodb.html