一、指针与引用
一 概括
指针和引用,在C++的软件开发中非经常见,假设能恰当的使用它们可以极大的提 高整个软件的效率,可是非常多的C++学习者对它们的各种使用情况并非都了解,这就导致了实际的软件开发中经常会内存泄漏,异常抛出,程序崩溃等问题。对 于C和C++的刚開始学习的人。那更是被它们搞的迷迷糊糊。本篇作为[深入C++]系列的第一节,我们就带领大家把指针和引用这个基本功练好。
二 指针
指针,指针的定义是什么呢?好像要想给个直接的定义还是非常难的哦。所以我们这里用它的语法结合图来认识它。
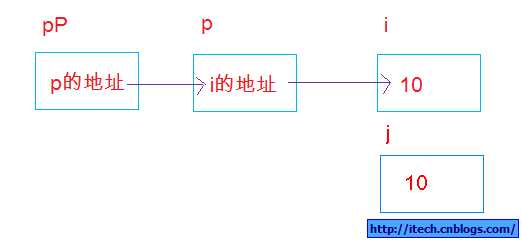
int i = 10;int *p = NULL;p = &i;int j = *p; int **pP = NULL; pP = &p;
在上面的几条语句中,&用来定义引用变量或对变量取其地址。*用来定义指针或得到指针所指向的变量,当中p为定义的指针变量,它指向int变量i。而pP为二级指针变量,它指向指针变量p。
对应的示意图例如以下:
C++是对C的扩展,我们首先来看指针在C中的使用。以下的经典实例来自林锐的 《高质量编程》。记住函数的默认參数传递方式为按值传递,即实參被传入函数内时进行了拷贝。函数内事实上是对拷贝对象的操作。还有当函数使用return返 回变量时,事实上返回的是原对象的一个拷贝。此时的实參和原对象有可能是一般变量也有可能是指针变量。
 Code
Code
#pragma once
#include <cstring>
#include <cstdio>
#include <cstdlib>
// -----------------------------------------------
void GetMemory1(char *p, int num)
{
p = (char*)malloc(num);
}
void Test1(void)
{
char *str = NULL;
GetMemory1(str, 100);
strcpy(str, "hello world");
printf(str);
}
// -----------------------------------------------
void GetMemory2(char **p, int num)
{
*p = (char*)malloc(num);
}
void Test2(void)
{
char * str = NULL;
GetMemory2(&str, 100);
strcpy(str, "hello world");
printf(str);
free(str);
}
// -----------------------------------------------
char* GetMemory3(void)
{
char p[] ="hello world";
return p;
}
void Test3(void)
{
char* str = NULL;
str = GetMemory3();
printf(str);
}
// -----------------------------------------------
char* GetMemory4(void)
{
char *p = "hello world";
return p;
}
void Test4()
{
char* str = NULL;
str = GetMemory4();
printf(str);
}
// -----------------------------------------------
char* GetMemory5(void)
{
char *p = (char*)malloc(100);
strcpy(p,"hello world");
return p;
}
void Test5()
{
char* str = NULL;
str = GetMemory5();
printf(str);
free(str);
}
// -----------------------------------------------
void Test6( void )
{
char * str = (char*)malloc(100);
strcpy(str, "hello");
free(str);
if (str != NULL)
{
strcpy(str, "world" );
printf(str);
}
}
// -----------------------------------------------
void TestPointerAndReference()
{
// -----------------------------------------------
// 请问执行Test1函数会有什么样的结果?
//
// 答:程序崩溃。同一时候有内存泄漏。
//
// 由于在GetMemory1函数的调用过程中。事实上是对实參指针p做了拷贝,拷贝为局部变量,
// 在函数内的操作是对局部变量的操作,局部变量与实參是两个不同的变量。相互不影响。
//
// 所以,当GetMemory1调用结束时。Test1函数中的 str一直都是 NULL。
// strcpy(str, "hello world");将使程序崩溃。
//
//Test1();
// -----------------------------------------------
// 请问执行Test2函数会有什么样的结果?
//
// 答:(1)可以输出hello world; (2)可是调用结束要对内存释放。否则内存泄漏;
//
Test2();
// -----------------------------------------------
// 请问执行Test3函数会有什么样的结果?
//
// 答:可能是乱码。
//
// 由于GetMemory3返回的是指向“栈内存”的指针,
// 该指针的地址不是 NULL,但其原现的内容已经被清除,新内容不可知。
//
Test3();
// -----------------------------------------------
// 请问执行Test4函数会有什么样的结果?
//
// 答:(1)可以输出hello world; (2) 此时的str指向了常量区。不须要程序猿释放。程序结束自己主动释放。
//
Test4();
// -----------------------------------------------
// 请问执行Test5函数会有什么样的结果?
//
// 答:(1)可以输出hello world; (2)可是调用结束要对内存释放,否则内存泄漏;
//
Test5();
// -----------------------------------------------
// 请问执行Test6函数会有什么样的结果?
//
// 答:篡修改态内存区的内容,后果难以预料,很危急。
//
// 由于free(str);之后,str成为野指针,
// if(str != NULL)语句不起作用。
//
Test6();
}
三 C++指针与引用
引用。事实上是变量的别名,与变量是同一个东东。比如 int i = 10; int &a = i; int &b = i; 这样 a。b为i的引用,即a。b为i的别名,还有 int * pi = new int(10); int *& pa = pi; int *& pb = pi; 此时pa。pb为pi的别名。
在C++中引入了引用概念后。我们不仅能够定义引用变量,对应的函数的传递方式也添加了按引用传递,当參数以引用方式传递 时,函数调用时不正确实參进行拷贝,传入函数内的变量与实參是同一个变量。
以下的实例演示了指针和引用在C++的使用。
Code
#pragma once
#include <iostream>
class Point
{
public:
Point(int x, int y)
{
_x = x;
_y = y;
}
void SetX(int x)
{
_x = x;
}
void SetY(int y)
{
_y = y;
}
void PrintPoint()
{
std::cout << "The Point is : "<< ‘(‘ << _x << ‘,‘ << _y << ‘)‘ << std::endl;
}
void PrintPointAdress()
{
std::cout << "The Point‘s adress is : " << this << std::endl;
}
private:
int _x;
int _y;
};
// 默认按值传递,当传入时对对像进行了拷贝,函数内仅仅是对所拷贝值的改动,所以实參没被改动。
void ChangeValue(Point pt, int x, int y)
{
pt.SetX(x);
pt.SetY(y);
}
// 按引用传递。函数内外同一值,所以改动了实參。
void ChangeValueByReference(Point& pt, int x, int y)
{
pt.SetX(x);
pt.SetY(y);
}
// 通过传递指针。尽管实參指针传入时也产生了拷贝,可是在函数内通过指针任然改动了指针所指的值。
void ChangeValueByPointer(Point *pt, int x, int y)
{
pt->SetX(x);
pt->SetY(y);
}
void TestChangeValue()
{
Point pt(10,10);
pt.PrintPoint();
ChangeValue(pt,100,100);
pt.PrintPoint();
ChangeValueByReference(pt,200,200);
pt.PrintPoint();
ChangeValueByPointer(&pt,300,300);
pt.PrintPoint();
}
// 按引用传递,所以指针能够被返回。
void ChangePointerByReference(Point *& pPt, int x, int y)
{
pPt = new Point(x, y);
}
// 对二级指针拷贝,可是二级指针指向的一级指针被返回。
void ChangePointerByTwoLevelPointer(Point **pPt, int x, int y)
{
*pPt = new Point(x, y);
}
void TestChangePointer()
{
Point *pPt = NULL;
ChangePointerByReference(pPt, 1000,1000);
pPt->PrintPoint();
pPt->PrintPointAdress();
delete pPt;
pPt = NULL;
int *p = new int(10);
//int *p2 = new int(10);
//int *p3 = new int(10);
ChangePointerByTwoLevelPointer(&pPt, 2000,2000);
pPt->PrintPoint();
pPt->PrintPointAdress();
delete pPt;
pPt = NULL;
}
void TestPointerAndReference2()
{
TestChangeValue();
TestChangePointer();
}
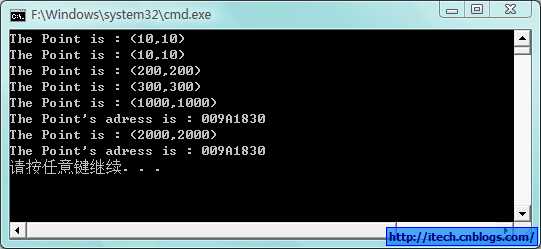
执行结果例如以下:
四 函数參数传递方式。函数中return语句和拷贝构造函数的关系
通过上面的2个实例,假设还有人对函数的參数传递方式和return有疑问的啊。能够对以下的代码亲自debug。
Code
#pragma once
#include <iostream>
class CopyAndAssign
{
public:
CopyAndAssign(int i)
{
x = i;
}
CopyAndAssign(const CopyAndAssign& ca)
{
std::cout << "拷贝构造!" << std::endl;
x = ca.x;
}
CopyAndAssign& operator=(const CopyAndAssign& ca)
{
std::cout << "赋值操作符" << std::endl;
x = ca.x;
return *this;
}
private:
int x;
};
CopyAndAssign ReturnCopyAndAssign()
{
CopyAndAssign temp(20); // 构造
return temp;
}
void CopyAndAssignAsParameter(CopyAndAssign ca)
{
}
CopyAndAssign& ReturnCopyAndAssignByReference()
{
CopyAndAssign temp(20); // 构造
return temp;
}
void CopyAndAssignAsParameterByReference(CopyAndAssign& ca)
{
}
void TestCopyAndAssign()
{
CopyAndAssign c1(10); // 构造
CopyAndAssignAsParameter(c1); // 拷贝构造
ReturnCopyAndAssign(); // 拷贝构造
CopyAndAssignAsParameterByReference(c1);
ReturnCopyAndAssignByReference();
}
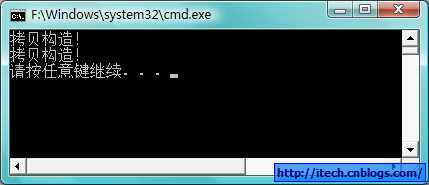
亲自debug,效果会更好。执行结果例如以下:
五 总结
1) 指针也是变量,它存储其它变量的地址。比如int *p = new int(10); p是指针变量,p实际是存储了一个int变量的地址。
2)引用事实上是一个别名。跟原对象是同一个东东。比如 std::string str = "hello"; std::string & strR = str;此时strR跟str事实上是同一个东东,strR能够看成是str的一个小名。
3) 函数默认的传參方式为按值传递,即当实參传入是事实上是做了拷贝,函数内事实上是对所拷贝对象的操作。比如 void Increase(int x) { x++; } 调用时 int i = 10; Increase(i); Increase函数内部事实上是对i的一个拷贝(我们如果为ii)进行++。
所以在函数调用结束后原来的i的值仍然保持不变。
4)函数的传參方式 能够显示的指定按引用来传递,按引用传递时,函数内即对实參的操作。没有拷贝操作,所以函数内对实參的改动。当然后调用结束后反映到实參上。比如void Increase(int & x) { x++;} 调用 int i = 10; Increase(i);此时Increase内部的++即是对i的操作,所以函数调用结束后i的值被改动。
5)函数中假设有return返回变量时,事实上所返回的也是一个拷贝。所以当使用return返回对象时一定要考虑所返回对象的拷贝构造函数是否可以满足要求。
六 使用注意
1) malloc/free一起使用。
2)new/delete一起使用。
3)对于new中有[]时,对应的必须使用delete[]来释放。
4)用free或delete释放了内存之后。马上将指针设置为NULL,防止产生“野指针”。
5)对指针的使用前,应该检查是否为空,空指针可能导致程序崩溃。
6)非内置类型的參数传递,使用const引用取代一般变量。
七 谢谢!
二 指针与数组
一 C指针操作函数
new和delete对C++的程序猿或许非常熟悉,可是malloc和free被用来在C代码中用来内存分配和释放,非常多C++开发人员并不能游刃有余的使用,以下实例解析malloc和free的使用。
|
malloc |
void *malloc(long NumBytes):该函数分配了NumBytes个字节,并返回了指向这块内存的指针。假设分配失败,则返回一个空指针(NULL)。 |
|
free |
void free(void *FirstByte): 该函数是将之前用malloc分配的空间还给程序或者是操作系统。也就是释放了这块内存,让它又一次得到自由。 |
实比例如以下:
Code
#pragma once
#include <string>
void TestMallocAndFree()
{
char *ptr = NULL;
ptr = (char*)malloc(100 * sizeof(char));
if (NULL == ptr)
{
return;
}
memcpy(ptr,"Hello!",strlen("Hello!"));
free(ptr);
ptr = NULL;
typedef struct data_type
{
int age;
char *name;
} data;
data *willy = NULL;
willy = (data*) malloc( sizeof(data) );
willy->age = 20;
willy->name = "jason"; // 此时的name指向了常量区,所以name指针不须要程序猿释放。
free( willy );
willy = NULL;
}
malloc/free 和new/delete的差别:
1)new/delete是保留字,不须要头文件支持. malloc/free须要头文件库函数支持. 使用malloc/free须要包括 #include<cstdlib> 或<stdlib>.
2) new 建立的是一个对象,new会依据对象计算大小。直接返回对象的指针,当使用完成后调用delete来释放,但malloc分配的是一块内存。须要用户制定 所要分配内存的大小,并且返回的均为void的指针,使用时须要对应的强制类型转化。使用结束后调用free来释放内存.
3)new/delete的使用除了分配内存和释放,还调用了类型的构造函数和析构函数。而malloc/free仅仅是简单的分配和释放内存。
二 数组与指针
C++的数组常常须要和指针来结合使用,以下来进行相关的强化训练。实比例如以下:
Code
#pragma once
#include <iostream>
using namespace std;
void PrintArray(double *p, int num)
{
for(int i = 0; i < num; ++i)
{
cout << " " << p[i] << " ";
}
cout << endl << "The array is end!" << endl;
}
void PrintArray(double arr[3])
{
for(int i = 0; i < 3; ++i)
{
cout << " " << *(arr+i)/*arr[i]*/ << " ";
}
cout << endl << "The array is end!" << endl;
}
void ChangeArray(double arr[3]) // 数组传參为传指针,所以函数内能够改动
{
for(int i = 0; i < 3; ++i)
{
arr[i] = 10;
}
}
void PrintArray(double arr[3][3])
{
for(int i = 0; i < 3; ++i)
for(int j = 0; j < 3; ++j)
cout << " " << arr[i][j] << " ";
cout << endl << "The array is end!" << endl;
}
int GetLength(){return 3;}
void TestArray()
{
// 数组的定义和初始化
short months[12] = {31,28,31,30,31,30,31,31,30,31,30,31};
double arr[3];
arr[0] = 1.0;
arr[1] = 2.0;
arr[2] = 3.0;
double arr2[] = {1.0,2.0,3.0};
//double arr3[3] = arr; // error
PrintArray(arr,3);
PrintArray(&arr[0],3);
PrintArray(arr2);
double matrix2 [2][2] = {1.0,0.0,0.0,1.0};
double matrix3 [3][3] = {{1.0,0.0,0.0},
{0.0,1.0,0.0},
{0.0,0.0,1.0}};
PrintArray(matrix3[0],3*3);
PrintArray(&matrix3[0][0],3*3);
//PrintArray(matrix3,3*3);
PrintArray(matrix3);
// 指针来模拟数组
double *p3 = new double[GetLength()];
p3[0] = 10.0;
p3[1] = 20.0;
p3[2] = 30.0;
PrintArray(p3,3);
PrintArray(p3);
delete []p3;
// 数组+指针实现二维变长数组
double *p4[2];
p4[0] = new double[2];
p4[1] = new double[4];
p4[0][0] = 10;
p4[0][1] = 20;
p4[1][0] = 30;
p4[1][1] = 40;
p4[1][2] = 50;
p4[1][3] = 60;
PrintArray(p4[0],2);
PrintArray(p4[1],4);
delete [] p4[0];
delete [] p4[1];
PrintArray(arr); // 数组传參为传指针,所以函数内能够改动
ChangeArray(arr);
PrintArray(arr);
}C++ 对象模型具体评论(特别easy理解力)
标签:
原文地址:http://www.cnblogs.com/mengfanrong/p/4852012.html