标签:
创建视图对象时,视图会自己创建一个层,视图在绘图(如drawRect:)时,会将内容画在自己的层上。当视图在层上完成绘图后,系统会将图层拷贝至屏幕。每个视图都有一个层,而每个图层又可以有多个子层。
提示:
1.Layer的设计目的不是为了取代视图,因此不能基于CALayer创建一个独立的可视化组件
2.Layer的设计目的是提供视图的基本可视内容,从而提高动画的执行效率
3.除提供可视内容外,Layer不负责视图的事件响应、内容绘制等工作,同时Layer不能参与到响应者链条中
三、CALayer的使用说明
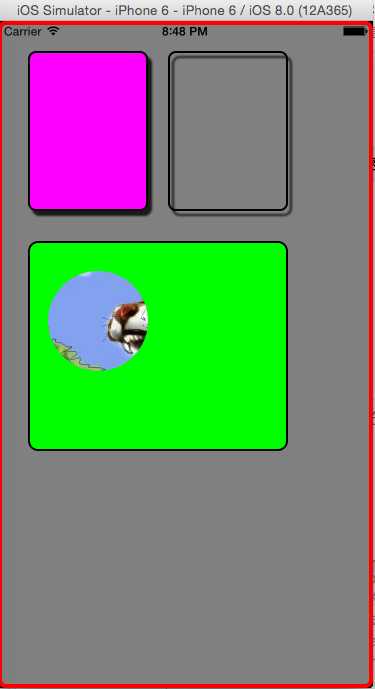
下面通过一个案例,来学会运用CALayer的常用属性:
#import "ViewController.h"

@interface ViewController ()

@end

@implementation ViewController

- (void)viewDidLoad {
    [super viewDidLoad];

    self.view.backgroundColor = [UIColor grayColor];
    //设置UIView上CALayer的圆角半径
    self.view.layer.cornerRadius = 8;
    self.view.layer.borderWidth = 4;
    self.view.layer.borderColor = [[UIColor redColor]CGColor];

    //创建子层
    CALayer *subLayer = [CALayer layer];
    subLayer.backgroundColor = [[UIColor  magentaColor]CGColor];
    //设置圆角半径
    subLayer.cornerRadius = 8;
    subLayer.borderWidth = 2;
    subLayer.borderColor = [[UIColor blackColor]CGColor];
    //阴影的偏移
    subLayer.shadowOffset = CGSizeMake(4, 5);
    //设置subLayer的阴影的模糊程度
    subLayer.shadowRadius = 1;
    subLayer.shadowColor = [[UIColor blackColor]CGColor];
    //设置阴影的透明度
    subLayer.shadowOpacity = 0.8;
    subLayer.frame = CGRectMake(30, 30, 120, 160);
    [self.view.layer addSublayer:subLayer];


    CALayer *subLayer2 = [CALayer layer];
    subLayer2.cornerRadius = 8;
    subLayer2.borderWidth = 2;
    subLayer2.borderColor = [[UIColor blackColor]CGColor];
    subLayer2.shadowOffset = CGSizeMake(4, 5);
    subLayer2.shadowRadius = 1;
    subLayer2.shadowColor = [[UIColor blackColor]CGColor];
    subLayer2.shadowOpacity = 0.8;
    subLayer2.frame = CGRectMake(170, 30, 120, 160);
    [self.view.layer addSublayer:subLayer2];

    CALayer *imageLayer = [CALayer layer];
    //imageLayer层显示的内容
    imageLayer.contents = (id)[UIImage imageNamed:@"5.jpg"];
    imageLayer.frame = subLayer2.bounds;
    [subLayer2 addSublayer:imageLayer];


    CALayer *customDrawn = [CALayer layer];
    customDrawn.delegate = self;
    customDrawn.backgroundColor = [[UIColor greenColor]CGColor];
    customDrawn.frame = CGRectMake(30, 220, 260, 210);
    customDrawn.shadowOffset = CGSizeMake(0, 3);
    customDrawn.shadowRadius = 5.0;
    customDrawn.shadowColor = [[UIColor blackColor]CGColor];
    customDrawn.shadowOpacity = 0.8;
    customDrawn.cornerRadius = 10.0;
    customDrawn.borderColor = [[UIColor blackColor]CGColor];
    customDrawn.borderWidth = 2.0;

    customDrawn.masksToBounds = YES;
    [self.view.layer addSublayer:customDrawn];
    [customDrawn setNeedsDisplay];
}
-(void)drawLayer:(CALayer *)layer inContext:(CGContextRef)ctx
{
    UIColor *bgColor = [UIColor colorWithPatternImage:[UIImage imageNamed:@"6.jpg"]];
    CGContextSetFillColorWithColor(ctx, [bgColor CGColor]);
    CGContextFillEllipseInRect(ctx, CGRectMake(20, 30, 100, 100));
    CGContextFillPath(ctx);
    CGContextSetRGBStrokeColor(ctx, 1, 1, 0, 1);
    CGContextStrokePath(ctx);

}
- (void)didReceiveMemoryWarning {
    [super didReceiveMemoryWarning];
    // Dispose of any resources that can be recreated.
}

@end
运行结果如下图:
四、CALayer的隐式动画属性
[CATransaction begin];//开启事务
[CATransaction setDisableActions:YES];//取消隐式动画
#import "ViewController.h"

@interface ViewController ()
@property(strong,nonatomic)CALayer *layer;
@end

@implementation ViewController

- (void)viewDidLoad {
    [super viewDidLoad];
    // 创建子层
   self.layer = [[CALayer alloc]init];
    //设置子层的bounds
    _layer.bounds = CGRectMake(0, 0, 100, 100);
    //设置背景颜色
    _layer.backgroundColor = [[UIColor blueColor]CGColor];
    //设置位置
    _layer.position = CGPointMake(100, 100);

    [self.view.layer addSublayer:_layer];
}
-(void)touchesBegan:(NSSet *)touches withEvent:(UIEvent *)event
{
    //事务开始
    [CATransaction begin];
//    //取消隐式动画
//    [CATransaction setDisableActions:YES];
    //设置隐式动画的时长(如果取消隐式动画,则不起作用)
    [CATransaction setAnimationDuration:1.0];

    UITouch *touch = [touches anyObject];
    CGPoint location = [touch locationInView:self.view];
    _layer.position = location;
    //视图提交
    [CATransaction commit];

}

@end
五、在CALayer上绘图
要在CALayer上绘图,有两种方法:
(1)创建一个CALayer的子类,然后覆盖drawInContext:方法,可以使用Quartz2D API在其中进行绘图
(2)设置CALayer的delegate,然后让delegate实现drawLayer:inContext:方法进行绘图
注意:
(1)不能再将UIView设置为这个CALayer的delegate,因为UIView对象已经是内部层的delegate,再次设置会出问题
(2)无论使用哪种方法,都必须向层发送setNeedsDisplay消息,以触发相应绘图方法的调用
#import "MyLayer.h"

@implementation MyLayer
-(void)drawInContext:(CGContextRef)ctx
{
    CGContextAddRect(ctx, CGRectMake(0, 0, 50, 50));
    CGContextSetRGBFillColor(ctx, 0, 1, 1, 1);
    CGContextDrawPath(ctx, kCGPathFillStroke);
}
@end
再看下实现文件的代码:
#import "ViewController.h"
#import "MyLayer.h"
@interface ViewController ()

@end

@implementation ViewController

- (void)viewDidLoad {
    [super viewDidLoad];
    // 创建子层
    MyLayer *subLayer = [[MyLayer alloc]init];
    //设置子层的背景颜色
    subLayer.backgroundColor = [[UIColor redColor]CGColor];
    //设置子层bounds
    subLayer.bounds = CGRectMake(0, 0, 100, 100);
    //设置子层的位置
    subLayer.position = CGPointMake(100, 100);
    //将子层添加到view层中
    [self.view.layer addSublayer:subLayer];
    //当重绘的时候会调用此方法
    [subLayer setNeedsDisplay];
}

@end
第二种:使用代理
#import "ViewController.h"

@interface ViewController ()

@end

@implementation ViewController

- (void)viewDidLoad {
    [super viewDidLoad];
    // 创建子层
    CALayer *subLayer = [[CALayer alloc]init];
    //设置bounds;
    subLayer.bounds = CGRectMake(0, 0, 100, 100);
    //设置位置
    subLayer.position = CGPointMake(100, 100);
    //设置锚点
    subLayer.anchorPoint = CGPointMake(0.5, 0.5);
    //设置背景色
    subLayer.backgroundColor = [[UIColor blueColor]CGColor];

    //将创建的子层,添加到view的子层中
    [self.view.layer addSublayer:subLayer];
    //设置代理
    subLayer.delegate = self;
    //重绘时调用此方法
    [subLayer setNeedsDisplay];

}
#pragma mark - CALayer的代理方法
-(void)drawLayer:(CALayer *)layer inContext:(CGContextRef)ctx
{
    //绘制图形
    CGContextAddRect(ctx, CGRectMake(0, 0, 50, 50));
    //设置图形的填充颜色
    CGContextSetRGBFillColor(ctx, 0, 1, 0, 1);
    CGContextDrawPath(ctx, kCGPathFillStroke);

    //绘制图片
    UIImage *image = [UIImage imageNamed:@"1.png"];
    //旋转图片
    CGContextScaleCTM(ctx, 1, -1);
    CGContextTranslateCTM(ctx, 0,-100);
    //绘制图片
    CGContextDrawImage(ctx, CGRectMake(0, 0, 100, 100),[image CGImage]);

}
@end
六、总结
1.CALayer、UIView以及上下文的之间的关系
(1)当UIView收到setNeedsDisplay消息时,CALayer会准备好一个CGContextRef,然后向它的delegate即UIView发送消息,并且传入已经准备好的CGContextRef对象。UIView在drawLayer:inContext:方法中会调用自己的drarRect:方法。
(2)平时在drawRect:中通过UIGraphicsGetCurrentContext()获取的就是有CALayer传入的CGContextRef对象,在drawRect:中完成的所有绘图都会填入CALayer的CGContextRef中,然后被拷贝至屏幕
(3)CALayer的CGContextRef用的是位图上下文(Bitmap Grahpics Context)。
标签:
原文地址:http://www.cnblogs.com/xjf125/p/4878862.html