标签:
推送功能简介
实现推送的流程如下:
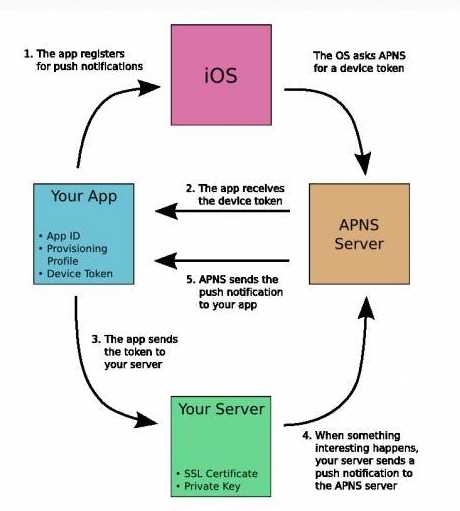
从APP注册推送功能,到APNS服务器发送推送消息给设备,有五个步骤。
一旦推送注册完成,应用自身的服务器以provider的身份提供推送。

APP端实现
在代码方面,推送的注册、监听和处理都集中在AppDelegate类里:
1.(BOOL)application:(UIApplication *)application didFinishLaunchingWithOptions:(NSDictionary *)launchOptions
在该方法体里主要实现两个功能:
一是完成推送功能的注册请求,即在程序启动时弹出是否使用推送功能;
二是实现的程序启动是通过推送消息窗口触发的,在这里可以处理推送内容;
1.
- (BOOL)application:(UIApplication *)application didFinishLaunchingWithOptions:(NSDictionary *)launchOptions
{
self.window = [[[UIWindow alloc] initWithFrame:[[UIScreen mainScreen] bounds]] autorelease];
// Override point for customization after application launch.
self.viewController = [[[ViewController alloc] init] autorelease];
self.window.rootViewController = self.viewController;
[self.window setBackgroundColor:[UIColor colorWithPatternImage:[UIImage imageNamed:@"background.png"]]];
[self.window makeKeyAndVisible];

[[UIApplication sharedApplication] registerForRemoteNotificationTypes:(UIRemoteNotificationTypeAlert | UIRemoteNotificationTypeBadge | UIRemoteNotificationTypeSound)];
//判断程序是不是由推送服务完成的,亦即通过用户点击推送通知完成的
if (launchOptions) {
NSDictionary* pushNotificationKey = [launchOptions objectForKey:UIApplicationLaunchOptionsRemoteNotificationKey];
if (pushNotificationKey) {
UIAlertView *alert = [[UIAlertView alloc]initWithTitle:@”推送通知”
message:@”这是通过推送窗口启动的程序,你可以在这里处理推送内容”
delegate:nil
cancelButtonTitle:@”知道了”
otherButtonTitles:nil, nil];
[alert show];
[alert release];
}
}
return YES;
}
2. 接收从苹果服务器返回的唯一的设备token,该token是推送服务器发送推送消息的依据,所以需要发送回推送服务器保存
- (void)application:(UIApplication *)app didRegisterForRemoteNotificationsWithDeviceToken:(NSData *)deviceToken {
NSString* token = [NSString stringWithFormat:@"%@",deviceToken];
NSLog(@”apns -> 生成的devToken:%@”, token);
//把deviceToken发送到我们的推送服务器
DeviceSender* sender = [[[DeviceSender alloc]initWithDelegate:self ]autorelease];
[sender sendDeviceToPushServer:token ];
}
3.接收注册推送通知功能时出现的错误,并做相关处理:
- (void)application:(UIApplication *)app didFailToRegisterForRemoteNotificationsWithError:(NSError *)err {
NSLog(@”apns -> 注册推送功能时发生错误, 错误信息:\n %@”, err);
}
4. 接收到推送消息,解析处理
- (void)application:(UIApplication *)application didReceiveRemoteNotification:(NSDictionary *)userInfo
{
NSLog(@”\napns -> didReceiveRemoteNotification,Receive Data:\n%@”, userInfo);
//把icon上的标记数字设置为0,
application.applicationIconBadgeNumber = 0;
if ([[userInfo objectForKey:@"aps"] objectForKey:@”alert”]!=NULL) {
UIAlertView* alert = [[UIAlertView alloc] initWithTitle:@”**推送消息**”
message:[[userInfo objectForKey:@"aps"] objectForKey:@”alert”]
delegate:self
cancelButtonTitle:@”关闭”
otherButtonTitles:@”处理推送内容”,nil];
alert.tag = alert_tag_push;
[alert show];
}
}
通过上面的代码,基本推送功能的开发已经完成了,需要推送服务器支持,请自行解决。
标签:
原文地址:http://www.cnblogs.com/xinchrome/p/4894409.html