标签:
1.说明
本章主要对ASP.NET5默认创建的项目结构及主要代码进行简单介绍。
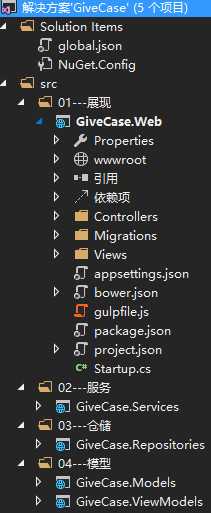
如下图,只是把GiveCase.Web项目中的Models,ViewModels,Services文件夹分离成单独的类库项目。
2.json文件配置
global.json
{
  "projects": [ "src", "test" ],
  "sdk": {
    "version": "1.0.0-beta8"
  }
}
projects:指定哪些文件夹包含源代码的解决方案。默认放置在 src 文件夹中。在磁盘目录:

sdk:指定的dnx版本。使用 VS2015打开解决方案时,它的设置在这里,而不是在 project.json,以统一解决方案中的不同项目针对不同版本的 SDK 的场景。
appsettings.json
{
  "Data": {
    "DefaultConnection": {
      "ConnectionString": "Server=(localdb)\\mssqllocaldb;Database=TestDB;Trusted_Connection=True;MultipleActiveResultSets=true"
    }
  }
}
配置数据库连接字符串文件。你也可以添加别的节点。类似传统的config.xml配置文件。
注:读写json文件的节点操作,需要引入:"Microsoft.Framework.Configuration.Json": "1.0.0-beta8"。
bower.json
{
  "name": "ASP.NET",
  "private": true,
  "dependencies": {
    "bootstrap": "3.0.0",
    "bootstrap-touch-carousel": "0.8.0",
    "hammer.js": "2.0.4",
    "jquery": "2.1.4",
    "jquery-validation": "1.11.1",
    "jquery-validation-unobtrusive": "3.2.2"
  }
}
它是基于npm中一种前端工具。通过配置dependencies后,保存bower.json文件,就可以自动下载安装包。
下载后成功后,会在这里显示:
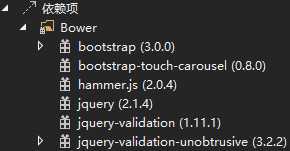
也默认安装到wwwroot/lib目录中。那么说,如何更改默认安装目录?
打开.bowerrc文件,修改即可:

同理通过配置也能自动卸载(删除)。总之是非常方便的js和css安装包管理工具。
package.json
{
  "name": "ASP.NET",
  "version": "0.0.0",
  "devDependencies": {
    "gulp": "3.8.11",
    "gulp-concat": "2.5.2",
    "gulp-cssmin": "0.1.7",
    "gulp-uglify": "1.2.0",
    "rimraf": "2.2.8"
  }
}
通过devDependencies配置,就安装一些npm插件工具到这里:
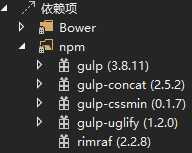
当然要使用这些工具,还有一个“任务运行程序资源管理器”要配置,右键gulpfile.js文件:
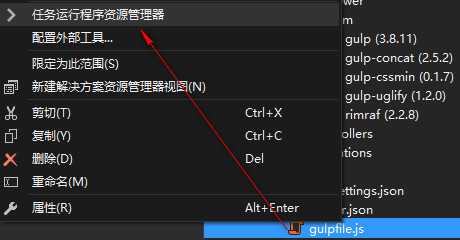
而gulpfile.js文件是配置这些工具的功能。
由于vs集成这些,使得使用npm工具学习成本太低了。给个赞吧!
另外,你也可能使用类似的grunt工具。添加:
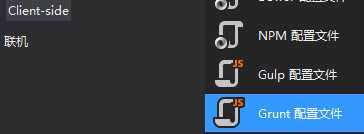
关于这些工具的js配置的功能:压缩,合并js和css文件,编译less,sass,也可以压缩html和转换图片等。后续另开文章再补充。
project.json
{
  "webroot": "wwwroot",
  "userSecretsId": "aspnet5-GiveCase.Web-d44a8944-aefb-4275-bd5b-3f2acfb7945f",
  "version": "1.0.0-*",

  "dependencies": {
    "GiveCase.Models": ""
     //......
  },

  "commands": {
    "web": "Microsoft.AspNet.Server.Kestrel",
    "ef": "EntityFramework.Commands"
  },

  "frameworks": {

    "dnxcore50": {
      "dependencies": {
        "EntityFramework.Commands": "7.0.0-beta8"
         //......
      }
    }
  },

  "exclude": [
    "wwwroot",
    "node_modules"
  ],
  "publishExclude": [
    "**.user",
    "**.vspscc"
  ],
  "scripts": {
    "prepublish": [ "npm install", "bower install", "gulp clean", "gulp min" ]
  }
}
dependencies:配置依赖项目,也可以放在"frameworks":{"dnxcore50":{""}}中。
commands:dnx执行配置,如这里 dnx web执行后,就自托管运行项目起来。
frameworks:配置使用那种clr,可以多种共存。会在这里显示:

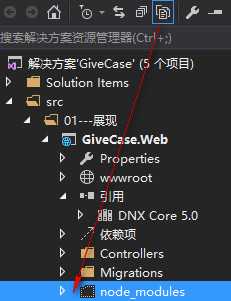
exclude:我也没明白啥意思。如果显示项目所有文件:
publishExclude:我也是不明白。
scripts:这个应该跟npm配置有关了。
3.文件夹
wwwroot:这个静态文件存放的地方,项目发布后也有的目录。IIS部署时,它也是网站的根目录。放置此目录以外的静态文件,是不能访问的。这是mvc机制啦。
Controllers:控制器
Views:视图
Models:模型,单独分离到Givecase.Models项目中
Models:视图模型,单独分离到Givecase.ViewModels项目中
Services: 服务(通常封装业务逻辑服务类),单独分离到Givecase.Services项目中
4.Startup.cs
粗略见代码中英文注释:
public class Startup
    {
        /// <summary>
        /// 构造函数
        /// </summary>
        /// <param name="env">提供对运行主机信息的访问接口</param>
        /// <param name="appEnv">提供对应用程序信息的访问接口</param>
        public Startup(IHostingEnvironment env, IApplicationEnvironment appEnv)
        {
            // Setup configuration sources.

            var builder = new ConfigurationBuilder()
                //设置获取到应用程序基目录
                .SetBasePath(appEnv.ApplicationBasePath)

                //将JSON配置提供程序的路径添加到configurationBuilder。
                .AddJsonFile("appsettings.json")

                //绝对路径或相对于IConfigurationBuilder.BasePath的configurationBuilder 的路径。
                //确定是否加载配置提供程序是可选的。
                .AddJsonFile($"appsettings.{env.EnvironmentName}.json", optional: true);

            //检查当前宿主环境的名称是开发环境
            if (env.IsDevelopment())
            {
                // This reads the configuration keys from the secret store.
                // For more details on using the user secret store see http://go.microsoft.com/fwlink/?LinkID=532709
                builder.AddUserSecrets();
            }

            builder.AddEnvironmentVariables();
            Configuration = builder.Build();
        }

        public IConfigurationRoot Configuration { get; set; }

        // This method gets called by the runtime. Use this method to add services to the container.

        /// <summary>
        /// 配置服务
        /// </summary>
        /// <param name="services">服务集合接口</param>
        public void ConfigureServices(IServiceCollection services)
        {
            // Add Entity Framework services to the services container.
            services.AddEntityFramework()
                .AddSqlServer()
                .AddDbContext<ApplicationDbContext>(options =>
                    options.UseSqlServer(Configuration["Data:DefaultConnection:ConnectionString"]));

            // Add Identity services to the services container.
            services.AddIdentity<ApplicationUser, IdentityRole>()
                .AddEntityFrameworkStores<ApplicationDbContext>()
                .AddDefaultTokenProviders();

            // Add MVC services to the services container.
            services.AddMvc();

            // Uncomment the following line to add Web API services which makes it easier to port Web API 2 controllers.
            // You will also need to add the Microsoft.AspNet.Mvc.WebApiCompatShim package to the ‘dependencies‘ section of project.json.
            // services.AddWebApiConventions();

            // Register application services.
            services.AddTransient<IEmailSender, AuthMessageSender>();
            services.AddTransient<ISmsSender, AuthMessageSender>();
        }

        // Configure is called after ConfigureServices is called.
        /// <summary>
        ///
        /// </summary>
        /// <param name="app"></param>
        /// <param name="env"></param>
        /// <param name="loggerFactory"></param>
        public void Configure(IApplicationBuilder app, IHostingEnvironment env, ILoggerFactory loggerFactory)
        {
            loggerFactory.MinimumLevel = LogLevel.Information;
            loggerFactory.AddConsole();
            loggerFactory.AddDebug();

            // Configure the HTTP request pipeline.

            // Add the following to the request pipeline only in development environment.
            if (env.IsDevelopment())
            {
                app.UseBrowserLink();
                app.UseDeveloperExceptionPage();
                app.UseDatabaseErrorPage(DatabaseErrorPageOptions.ShowAll);
            }
            else
            {
                // Add Error handling middleware which catches all application specific errors and
                // sends the request to the following path or controller action.
                app.UseExceptionHandler("/Home/Error");
            }

            // Add the platform handler to the request pipeline.
            app.UseIISPlatformHandler();

            // Add static files to the request pipeline.
            app.UseStaticFiles();

            // Add cookie-based authentication to the request pipeline.
            app.UseIdentity();

            // Add and configure the options for authentication middleware to the request pipeline.
            // You can add options for middleware as shown below.
            // For more information see http://go.microsoft.com/fwlink/?LinkID=532715
            //app.UseFacebookAuthentication(options =>
            //{
            //    options.AppId = Configuration["Authentication:Facebook:AppId"];
            //    options.AppSecret = Configuration["Authentication:Facebook:AppSecret"];
            //});
            //app.UseGoogleAuthentication(options =>
            //{
            //    options.ClientId = Configuration["Authentication:Google:ClientId"];
            //    options.ClientSecret = Configuration["Authentication:Google:ClientSecret"];
            //});
            //app.UseMicrosoftAccountAuthentication(options =>
            //{
            //    options.ClientId = Configuration["Authentication:MicrosoftAccount:ClientId"];
            //    options.ClientSecret = Configuration["Authentication:MicrosoftAccount:ClientSecret"];
            //});
            //app.UseTwitterAuthentication(options =>
            //{
            //    options.ConsumerKey = Configuration["Authentication:Twitter:ConsumerKey"];
            //    options.ConsumerSecret = Configuration["Authentication:Twitter:ConsumerSecret"];
            //});

            // Add MVC to the request pipeline.
            app.UseMvc(routes =>
            {
                routes.MapRoute(
                    name: "default",
                    template: "{controller=Home}/{action=Index}/{id?}");

                // Uncomment the following line to add a route for porting Web API 2 controllers.
                // routes.MapWebApiRoute("DefaultApi", "api/{controller}/{id?}");
            });
        }
    }
}
5.小结
目录结构简单了解到这里。我也是边学习边记笔记…… 文章主题已经标注为浅析,符合题目啦!
标签:
原文地址:http://www.cnblogs.com/givecase/p/4895366.html