标签:
一、关于View与布局,首先上图
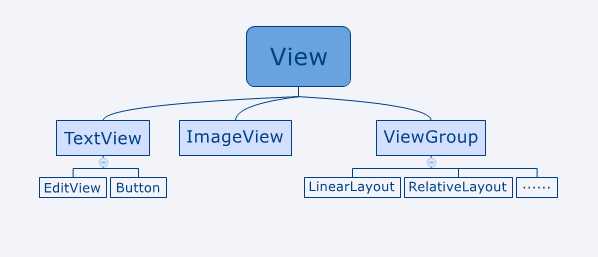
从图中可以看到:
二、定义自定义控件需要:
以自定义一个标题栏为例,效果如下图(请无视它的难看程度)

自定义布局文件:
<?xml version="1.0" encoding="utf-8"?>
<LinearLayout xmlns:android="http://schemas.android.com/apk/res/android"
    android:layout_width="match_parent"
    android:layout_height="wrap_content"
    android:background="#444"
    android:orientation="horizontal" >

    <Button
        android:id="@+id/btnBack"
        android:layout_width="33dip"
        android:layout_height="33dip"
        android:background="@drawable/icon_back" />

    <TextView
        android:id="@+id/tvTitle"
        android:layout_width="0dip"
        android:layout_height="33dip"
        android:layout_weight="1"
        android:background="#444"
        android:gravity="center"
        android:text="标题栏"
        android:textColor="#fff" />

    <Button
        android:id="@+id/btnEdit"
        android:layout_width="33dip"
        android:layout_height="33dip"
        android:background="@drawable/icon_edit" />

</LinearLayout>
自定义控件的类:
package com.matclone.CustomUIViewTest;

import android.app.Activity;
import android.content.Context;
import android.util.AttributeSet;
import android.view.LayoutInflater;
import android.view.View;
import android.widget.Button;
import android.widget.LinearLayout;
import android.widget.TextView;
import android.widget.Toast;

public class TitleBar extends LinearLayout {
    private Button btnBack = null;
    private TextView tvTitle = null;
    private Button btnEdit = null;

    public TitleBar(Context context, AttributeSet attrs) {
        super(context, attrs);
        // TODO Auto-generated constructor stub
        LayoutInflater.from(context).inflate(R.layout.title_bar, this);

        btnBack = (Button) this.findViewById(R.id.btnBack);
        tvTitle = (TextView) this.findViewById(R.id.tvTitle);
        btnEdit = (Button) this.findViewById(R.id.btnEdit);

        btnBack.setOnClickListener(new View.OnClickListener() {
            @Override
            public void onClick(View v) {
                // TODO Auto-generated method stub
                ((Activity)getContext()).finish();
            }
        });

        btnEdit.setOnClickListener(new View.OnClickListener() {
            @Override
            public void onClick(View v) {
                // TODO Auto-generated method stub
                Toast.makeText(getContext(), "你点击了EDIT按钮", Toast.LENGTH_SHORT).show();
            }
        });
    }

    public void setTitle(String title) {
        this.tvTitle.setText(title);
    }

}
三、使用自定义控件需要:
在其他的活动的布局文件中引入自定义控件:
<?xml version="1.0" encoding="utf-8"?>
<LinearLayout xmlns:android="http://schemas.android.com/apk/res/android"
    android:layout_width="match_parent"
    android:layout_height="match_parent"
    android:orientation="vertical" >

    <com.matclone.CustomUIViewTest.TitleBar
        android:id="@+id/titleBar"
        android:layout_width="match_parent"
        android:layout_height="wrap_content" >
    </com.matclone.CustomUIViewTest.TitleBar>

</LinearLayout>
《Android第一行代码》学习记录008 - 创建自定义控件
标签:
原文地址:http://www.cnblogs.com/matclone/p/4897794.html