标签:
制作简单画板
作为iOS初学者,在学习完UI的几个简单控件(UILable,UITextField,UIButton)之后,就可以制作一个简单的画图板demo,以下是具体制作流程(在MRC下),如有不足之处,还请各位大神们指教 0.0。
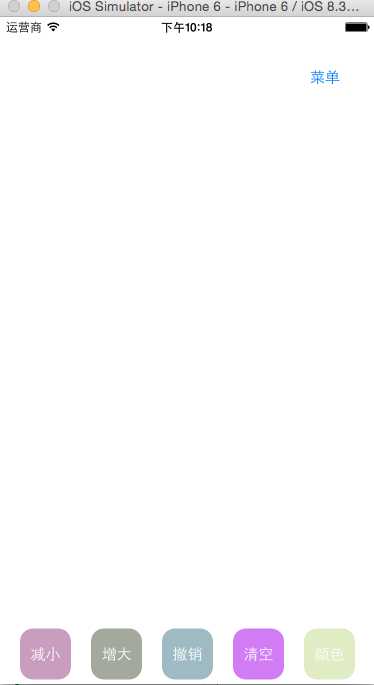
1.搭建界面,主要由UIButton,UITextField组成,底部的按钮是UITextField的一个自定义键盘(inputView)
。
- (void)viewDidLoad {
[super viewDidLoad];
//创建菜单按钮
UIButton *menuButton = [UIButton buttonWithType:UIButtonTypeSystem];
menuButton.frame = CGRectMake(CGRectGetWidth(self.view.bounds) - 80, 40, 60, 40);
[menuButton setTitle:@"菜单" forState:UIControlStateNormal];
[menuButton addTarget:self action:@selector(handleMenuButtonAction:) forControlEvents:UIControlEventTouchUpInside];
[self.view addSubview:menuButton];
//添加textField,但是不想让他显示出来,所以frame = CGRectZero
UITextField *textField = [[UITextField alloc]initWithFrame:CGRectZero];
textField.tag = 123;
[self.view addSubview:textField];
[textField release];
UIView *inputView = [[UIView alloc]initWithFrame:CGRectMake(0, 0, CGRectGetWidth(self.view.bounds), 60)];
inputView.backgroundColor = [UIColor whiteColor];
textField.inputView = inputView;
[inputView release];
NSArray *titles = @[@"减小",@"增大",@"撤销",@"清空",@"颜色"];
CGFloat width = (CGRectGetWidth(self.view.bounds) - 20 * 6) / 5;
CGFloat height = width;
CGFloat originY = (60 - height) / 2;
CGFloat originX = 20;
for (int i = 0 ; i < titles.count; i ++) {
UIButton *button = [UIButton buttonWithType:UIButtonTypeSystem];
button.tag = 100 + i;
button.frame = CGRectMake(originX + (width + originX) * i , originY, width, height);
[button setTitle:titles[i] forState:UIControlStateNormal];
button.backgroundColor = [UIColor colorWithRed:arc4random()%256/255.0 green:arc4random()%256/255.0 blue:arc4random()%256/255.0 alpha:0.6];
//将标题的颜色改成白色。
[button setTitleColor:[UIColor whiteColor] forState:UIControlStateNormal];
//设置按钮的角半径,为按钮宽带的一半
button.layer.cornerRadius = width / 4.0;
button.layer.masksToBounds = YES;//按指定的半径裁减视图。
[button addTarget:self action:@selector(handleButtonAction:) forControlEvents:UIControlEventTouchUpInside];
[inputView addSubview:button];
}
}
// 以下是菜单按钮的响应方法。
- (void)handleMenuButtonAction:(UIButton *)sender{
//获取textField
UITextField *textField = (UITextField *)[self.view viewWithTag:123];
//判断如果textField当前是第一响应者,则撤销其第一响应者权限,否则让其成为第一响应者。
if (textField.isFirstResponder) {
[textField resignFirstResponder];
}else{
[textField becomeFirstResponder];//成为第一响应者。
}
}
2.创建一个继承NSObject的类LineModel,用于记录线条。
#import <Foundation/Foundation.h>
#import <UIKit/UIKit.h>
//用于记录线条的三元素(轨迹path 颜色color 宽度width)
@interface LineModel : NSObject
@property (nonatomic, retain) UIBezierPath *path;//使用贝塞尔曲线纪录触摸轨迹。
@property (nonatomic, retain) UIColor *color;//线条颜色
@property (nonatomic, assign) CGFloat width;//线条宽度
@end
#import "LineModel.h"
@implementation LineModel
-(void)dealloc{
[_color release];
[_path release];
[super dealloc];
}
@end
3.创建一个继承UI View的子类PaintView,将上面的LineModel,具体实现画图板。
@interface PaintView : UIView
@property (nonatomic, retain) NSMutableArray *allLines;//用于保存画板上的所有线条对象。
@property (nonatomic, retain) UIColor *lineColor;//当前的线条颜色。
@property (nonatomic, assign) CGFloat lineWidth;//当前线条的宽
- (void)undoLastDrawing;//撤销上次绘制
- (void)allClean;//清空画板。
@end
#import "PaintView.h"
#import "LineModel.h"
@implementation PaintView
-(void)dealloc{
[_allLines release];
[_lineColor release];
[super dealloc];
}
-(NSMutableArray *)allLines{
if (!_allLines) {
self.allLines = [NSMutableArray array];
}
return _allLines;
}
- (void)touchesBegan:(NSSet *)touches withEvent:(UIEvent *)event{
UITouch *aTouch = touches.anyObject;
CGPoint startPoint = [aTouch locationInView:self.superview];
//创建贝塞尔曲线对象,并设置曲线的起始点。
UIBezierPath *bezierPath = [UIBezierPath bezierPath];
//设置起始点。
[bezierPath moveToPoint:startPoint];
//创建线条模型对象,并保存当前线条的三个数据
LineModel *line = [[[LineModel alloc]init]autorelease];
line.path = bezierPath;
line.color = self.lineColor;
line.width = self.lineWidth;
//添加到数组中等待使用
[self.allLines addObject:line];
}
- (void)touchesMoved:(NSSet *)touches withEvent:(UIEvent *)event{
UITouch *aTouch = touches.anyObject;
CGPoint cuttentPoint = [aTouch locationInView:self.superview];
//获取对应的线条模型(在触摸移动的过程中,数组的最后一个对象对应当前正在绘制的曲线)
LineModel *aLine = self.allLines.lastObject;
//在触摸轨迹上添加点。
[aLine.path addLineToPoint:cuttentPoint];
[self setNeedsDisplay];//调用此方法是通知视图,绘制界面,一旦调用此方法,系统就会自动调用drawRect:方法来绘制界面。
}
- (void)drawRect:(CGRect)rect{
for (LineModel *aLine in self.allLines) {
//设置填充颜色
[aLine.color setStroke];
//设置绘制时的线条宽度
[aLine.path setLineWidth:aLine.width];
//开始绘制曲线
[aLine.path stroke];
}
}
- (void)undoLastDrawing{
[self.allLines removeLastObject];
[self setNeedsDisplay];//移除数组中的最后一条曲线对象,并重绘界面。
}
- (void)allClean{
[self.allLines removeAllObjects];
[self setNeedsDisplay];//清除所有曲线。
}
@end
4.将PaintView引入视图控制器中,实现按钮的方法调用。
///重写loadView将PaintView作为视图控制器的视图
- (void)loadView{
PaintView *paintView = [[PaintView alloc]initWithFrame:[[UIScreen mainScreen]bounds]];
paintView.backgroundColor = [UIColor whiteColor];
self.view = paintView;
//设置默认的宽度和颜色。
paintView.lineWidth = 10;
paintView.lineColor = [UIColor blackColor];
[paintView release];
}
////每个按钮的实现方法。
- (void)handleButtonAction:(UIButton *)sender{
PaintView *paintView = (PaintView *)self.view;
switch (sender.tag) {
case 100:
if (paintView.lineWidth > 2) {
paintView.lineWidth -= 1;
}
break;
case 101:{
paintView.lineWidth += 1;
break;
}
case 102:{
[paintView undoLastDrawing];
break;
}
case 103:{
[paintView allClean];
break;
}
case 104:{
sender.backgroundColor = [UIColor colorWithRed:arc4random() % 256 / 255.0 green:arc4random() % 256 / 255.0 blue:arc4random() % 256 / 255.0 alpha:1];
//设置画笔颜色
paintView.lineColor = sender.backgroundColor;
break;
}
default:
break;
}
}
这样一个简单的涂鸦版就制作成了,里面肯定还有许多不足之处,小博第一次写博,刚接触经验不足,还请各位给点建议,我会继续改进。谢谢。
标签:
原文地址:http://www.cnblogs.com/king-peng/p/4907919.html