标签:
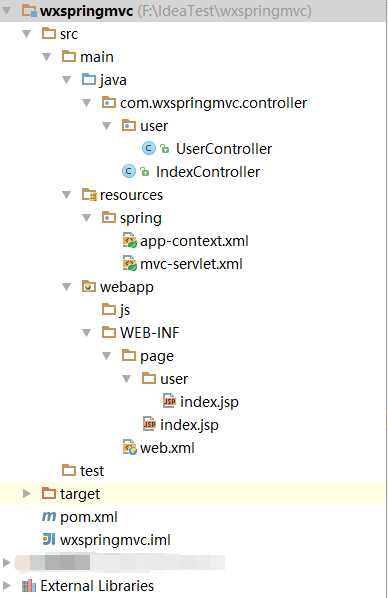
本项目旨在搭建一个简单的Spring MVC框架,了解Spring MVC的基础配置等内容。
<context-param>
    <param-name>contextConfigLocation</param-name>
    <param-value>classpath:spring/app-context.xml</param-value>
</context-param>
然后添加Spring监听器:

<listener>
    <listener-class>org.springframework.web.context.ContextLoaderListener</listener-class>
</listener>
<listener>
    <listener-class>org.springframework.web.context.request.RequestContextListener</listener-class>
</listener>
<listener>
    <listener-class>org.springframework.web.util.IntrospectorCleanupListener</listener-class>
</listener>
接下来配置Spring MVC的dispatherservlet,同时配置该servlet要拦截的URL。
<servlet>
    <servlet-name>springmvc</servlet-name>
    <servlet-class>org.springframework.web.servlet.DispatcherServlet</servlet-class>
    <init-param>
        <param-name>contextConfigLocation</param-name>
        <param-value>classpath:spring/mvc-servlet.xml</param-value>
    </init-param>
    <load-on-startup>1</load-on-startup>
</servlet>
<!-- 配置要拦截的URL -->
<servlet-mapping>
    <servlet-name>springmvc</servlet-name>
    <url-pattern>/</url-pattern>
</servlet-mapping>
最后,配置一个welcom-file-list。
<?xml version="1.0" encoding="UTF-8"?>
<web-appxmlns="http://java.sun.com/xml/ns/j2ee"xmlns:xsi="http://www.w3.org/2001/XMLSchema-instance"version="2.4"
xsi:schemaLocation="http://java.sun.com/xml/ns/j2ee http://java.sun.com/xml/ns/j2ee/web-app_2_4.xsd">
    <!-- spring context 配置文件 -->
    <context-param>
        <param-name>contextConfigLocation</param-name>
        <param-value>classpath:spring/app-context.xml</param-value>
    </context-param>
    <!-- spring 监听器配置 -->
    <listener>
        <listener-class>org.springframework.web.context.ContextLoaderListener</listener-class>
    </listener>
    <listener>
        <listener-class>org.springframework.web.context.request.RequestContextListener</listener-class>
    </listener>
    <!--spring 防内存溢出监听器 -->
    <listener>
        <listener-class>org.springframework.web.util.IntrospectorCleanupListener</listener-class>
    </listener>
    <!-- spring mvc servlet配置文件 -->
    <servlet>
        <servlet-name>springmvc</servlet-name>
        <servlet-class>org.springframework.web.servlet.DispatcherServlet</servlet-class>
    <init-param>
        <param-name>contextConfigLocation</param-name>
        <param-value>classpath:spring/mvc-servlet.xml</param-value>
    </init-param>
    <load-on-startup>1</load-on-startup>
    </servlet>
    <!-- 配置要拦截的URL -->
    <servlet-mapping>
        <servlet-name>springmvc</servlet-name>
        <url-pattern>/</url-pattern>
    </servlet-mapping>
    <welcome-file-list>
    <welcome-file></welcome-file>
    </welcome-file-list>
</web-app>
配置Spring MVC文件
<?xml version="1.0" encoding="UTF-8"?>
<beans xmlns="http://www.springframework.org/schema/beans"
       xmlns:xsi="http://www.w3.org/2001/XMLSchema-instance"
       xmlns:mvc="http://www.springframework.org/schema/mvc"
       xmlns:context="http://www.springframework.org/schema/context"
       xsi:schemaLocation="http://www.springframework.org/schema/beans http://www.springframework.org/schema/beans/spring-beans.xsd http://www.springframework.org/schema/mvc http://www.springframework.org/schema/mvc/spring-mvc.xsd http://www.springframework.org/schema/context http://www.springframework.org/schema/context/spring-context.xsd ">

    <mvc:resources location="/js/" mapping="/js/**"/>

    <bean class="org.springframework.beans.factory.annotation.AutowiredAnnotationBeanPostProcessor"/>
    <mvc:annotation-driven/>
    <context:annotation-config/>
    <mvc:default-servlet-handler/>

    <!--添加component扫描,使package下面的注解生效 -->
    <context:component-scan base-package="com.wxspringmvc.controller"/>

    <!--添加页面视图解析器-->
    <bean class="org.springframework.web.servlet.view.InternalResourceViewResolver">
        <property name="prefix" value="/WEB-INF/page/"/>
        <property name="suffix" value=".jsp"/>
        <property name="contentType" value="text/html;charset=UTF-8"/>
    </bean>
</beans>
配置applicationContext.xml
<%@ page contentType="text/html;charset=UTF-8" language="java" %>
<html>
<head>
    <title>请登录</title>
</head>
<body>
<h5>this is index.jsp</h5>
<form action="/user/index" method="post">
  <p>用户名:</p><input type="text" id="username" name="username">
  <p>密码:</p><input type="password" id="password" name="password">
  <p><input type="submit" value="提交"></p>
</form>
</body>
</html>
表单使用post的方式提交到/user/index路径。
@Controller
@RequestMapping(value = "/user")
public class UserController {
    @RequestMapping(value = "/index" ,method= RequestMethod.POST)
    public ModelAndView userIndex(String username,String password){
        ModelAndView mav = new ModelAndView("user/success");

        mav.addObject("username",username);
        mav.addObject("password",password);
        return mav;
    }

}
这里可以添加一个简单的校验,如果用户名和密码有一个为空,则不能提交:
@Controller
@RequestMapping(value = "/user")
public class UserController {
    @RequestMapping(value = "/index" ,method= RequestMethod.POST)
    public ModelAndView userIndex(String username,String password){
        ModelAndView mav = new ModelAndView("user/success");
        if(!matchParams( username, password)){
            return new ModelAndView("/index");
        }
        mav.addObject("username",username);
        mav.addObject("password",password);
        return mav;
    }

    private boolean matchParams(String username,String password){
        if(isEmpty(username)||isEmpty(password))
            return false;
        else
            return true;
    }

    private boolean isEmpty(String s){
        if(s==null || "".equals(s))
            return true;
        else
            return false;
    }
}
View:登录成功界面:success.jsp
<%@ page contentType="text/html;charset=UTF-8" language="java" %>
<html>
  <head>
    <title>用户首页</title>
  </head>
  <body>
<p>用户名:${username}</p>
<p>密码:${password}</p>
  </body>
</html>
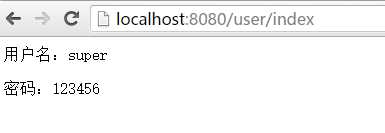
效果展示


标签:
原文地址:http://www.cnblogs.com/Leo_wl/p/4925254.html