标签:
Button:三种响应方式匿名内部类,实现onClickListener接口,xml方式响应单击事件
单个按钮时,可以使用匿名内部类:
 1 button=(Button)this.findViewById(R.id.button1);//获取对象
 2         button.setOnClickListener(new View.OnClickListener() {//绑定事件
 3
 4             @Override
 5             public void onClick(View v) {
 6                 // TODO Auto-generated method stub
 7                  Toast.makeText(MainActivity.this, "button1", 1).show();
 8             }
 9         });
10     }
多个按钮时,实现onClickListener接口:
 1 public class mainActivity extends Activity implements OnClickListener{
 2     protected void onCreate(Bundle savedInstanceState) {
 3         super.onCreate(savedInstanceState);
 4         setContentView(R.layout.main);
 5         findViewById(R.id.Button02).setOnClickListener(this);
 6         findViewById(R.id.Button03).setOnClickListener(this);
 7     }
 8     public void onClick(View view) {
 9         switch (v.getId()) {
10             case R.id.Button03:
11                 Intent intent = new Intent(mainActivity.this, fristActivity.class);
12                 intent.putExtra("data", "mainActivity");
13                 startActivity(intent);
14                 break;
15             case R.id.Button02:
16                 Intent intent = new Intent(mainActivity.this, loginActivity.class);
17                 intent.putExtra("data", "mainActivity");
18                 startActivity(intent);
19                 break;
20             default:
21                 break;
22         }
23     }
24     ……
25 }
xml方式响应单击事件:首先在xml中定义响应方法名,然后在窗口程序中实现该方法
1 <Button android:text="Button03"
2     android:id="@+id/Button03"
3     android:layout_width="wrap_content"
4     android:layout_height="wrap_content"
5     <span style="color:#FF0000;">
      android:onClick="BtnClick"
</span>>
6 </Button>
1 public void BtnClick(View view){
2     Intent intent = new Intent(mainActivity.this, fristActivity.class);
3     intent.putExtra("data", "mainActivity");
4     startActivity(intent);
5 }
TextField:
一 EditText
EditText:输入框,包含很多种类的输入框,这也是TextView组件比较多的原因,但是只需要了解一个即可。
属性:android:inputType=" "
android:hint="请输入姓名"
方法:getText(),setError("请输入正确的姓名"),
事件:setOnKeyListener editText.setOnKeyListener (new OnKeyListener(){........});
1 editText.setOnKeyListener (new OnKeyListener(){
2 public boolean onKey(View v, int keyCode, KeyEvent event) {
3 if(keyCode==keyEvent.KEYCODE.ENTER)
4 {Toast.makeText("MainActivity.this","按下回车键",1).show();
5 }
   return false;
6 }});
如何获取hint的提示内容?通过editText的getText()方法即可获取。
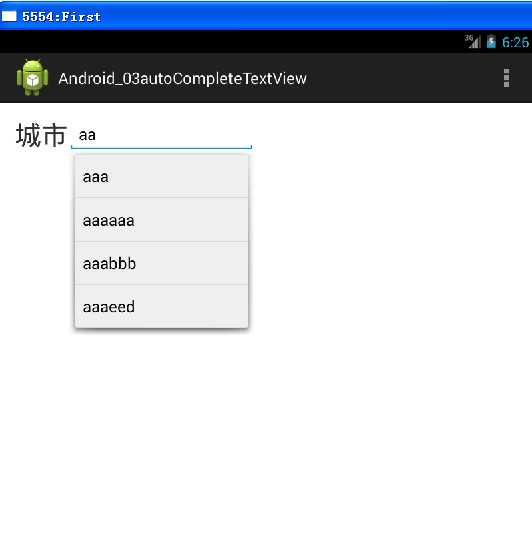
2、 AutoCompleteTextView控件
 1 public class MainActivity extends Activity {
 2
 3     private AutoCompleteTextView textView;
 4     private ArrayAdapter<String> adapter;//数组适配器
 5
 6     @Override
 7     protected void onCreate(Bundle savedInstanceState) {
 8         super.onCreate(savedInstanceState);
 9         setContentView(R.layout.activity_main);
10         textView=(AutoCompleteTextView)this.findViewById(R.id.autoCompleteTextView);
11         //String [] arr={"aa","aab","aac"};
12         /*adapter=new ArrayAdapter<String>(this, android.R.layout.simple_list_item_1, getDataSource());
13         textView.setAdapter(adapter);//将适配器的内容填充到textView
14 */
15         String [] city=getResources().getStringArray(R.array.city);
16         //adapter=ArrayAdapter.createFromResource(context, textArrayResId, textViewResId);
17         adapter=new ArrayAdapter<String>(this, android.R.layout.simple_list_item_1,city);
18         textView.setAdapter(adapter);
19         }
20
21     public List<String> getDataSource()
22     {
23         List<String> list=new ArrayList<String>();
24         list.add("aa");
25         list.add("aaab");
26         list.add("aaaa");
27         list.add("aac");
28         list.add("aaa");
29         list.add("aaabcd");
30         return list;
31     }
32
33     @Override
34     public boolean onCreateOptionsMenu(Menu menu) {
35         // Inflate the menu; this adds items to the action bar if it is present.
36         getMenuInflater().inflate(R.menu.main, menu);
37         return true;
38     }
39
40     @Override
41     public boolean onOptionsItemSelected(MenuItem item) {
42         // Handle action bar item clicks here. The action bar will
43         // automatically handle clicks on the Home/Up button, so long
44         // as you specify a parent activity in AndroidManifest.xml.
45         int id = item.getItemId();
46         if (id == R.id.action_settings) {
47             return true;
48         }
49         return super.onOptionsItemSelected(item);
50     }
51 }
checkbox:两种方式 内部类(OnCheckedChangeListener,OnClickListener,OnTouchListener),xml申明(推荐)
内部类
OnCheckedChangeListener
1 <CheckBox
2      android:id="@+id/cb"
3      android:layout_width="wrap_content"
4      android:layout_height="wrap_content"
5      android:checked="false"
6      android:text="已婚"
7      ></CheckBox>
 1 //获取CheckBox实例
 2 CheckBox cb = (CheckBox)this.findViewById(R.id.cb);
 3 //绑定监听器
 4 cb.setOnCheckedChangeListener(new OnCheckedChangeListener() {
 5
 6             @Override
 7             public void onCheckedChanged(CompoundButton arg0, boolean arg1) {
 8                 // TODO Auto-generated method stub
 9                 Toast.makeText(MyActivity.this,
10                         arg1?"选中了":"取消了选中"    , Toast.LENGTH_LONG).show();
11             }
12         });
OnClickListener
 1 <CheckBox
 2         android:id="@+id/checkbox3"
 3         android:layout_width="wrap_content"
 4         android:layout_height="wrap_content"
 5         android:layout_alignLeft="@+id/checkBox2"
 6         android:layout_below="@+id/checkBox2"
 7         android:text="同意" />
 8
 9     <Button
10         android:id="@+id/button1"
11         android:layout_width="wrap_content"
12         android:layout_height="wrap_content"
13         android:layout_below="@+id/checkBox2"
14         android:layout_marginLeft="26dp"
15         android:layout_toRightOf="@+id/checkBox2"
16         android:text="下一步" />
 1 public class MainActivity extends Activity {
 2
 3     private CheckBox checkbox3;
 4     private Button button1;
 5
 6     @Override
 7     protected void onCreate(Bundle savedInstanceState) {
 8         super.onCreate(savedInstanceState);
 9         setContentView(R.layout.activity_main);
10         checkbox3=(CheckBox) this.findViewById(R.id.checkbox3);
11         button1=(Button)this.findViewById(R.id.button1);
12         checkbox3.setChecked(false);
13         button1.setEnabled(false);
14         checkbox3.setOnClickListener(new View.OnClickListener() {
15
16             @Override
17             public void onClick(View v) {
18                 // TODO Auto-generated method stub
19                 if(checkbox3.isChecked())
20                 {
21                     button1.setEnabled(true);
22                 }
23                 else
24                     button1.setEnabled(false);
25             }
26         });
27
28     }
29  }
xml申明
onclick() 事件 :首先在xml控件中声明该事件 android:onClick="onCheckboxClicked" ;
 1  <TextView
 2         android:id="@+id/textView1"
 3         android:layout_width="wrap_content"
 4         android:layout_height="wrap_content"
 5         android:text="爱好" />
 6
 7     <CheckBox
 8         android:id="@+id/checkBox1"
 9         android:layout_width="wrap_content"
10         android:layout_height="wrap_content"
11         android:layout_alignLeft="@+id/textView1"
12         android:layout_below="@+id/textView1"
13         android:text="唱歌"
14         android:onClick="onCheckboxClicked"
15         />
16
17     <CheckBox
18         android:id="@+id/checkBox2"
19         android:layout_width="wrap_content"
20         android:layout_height="wrap_content"
21         android:layout_alignParentLeft="true"
22         android:layout_below="@+id/checkBox1"
23         android:text="书法"
24          android:onClick="onCheckboxClicked"/>
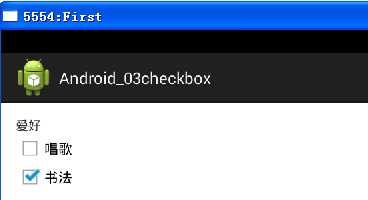
然后在程序中定义该事件 public void onCheckboxClicked(View view){}
 1 public class MainActivity extends Activity {
 2
 3     @Override
 4     protected void onCreate(Bundle savedInstanceState) {
 5         super.onCreate(savedInstanceState);
 6         setContentView(R.layout.activity_main);
 7     }
 8
 9     public void onCheckboxClicked(View view)
10     {
11         CheckBox checkbox=(CheckBox)view;
12         boolean isChecked=((CheckBox)view).isChecked();
13         switch (view.getId()) {
14         case R.id.checkBox1:
15             if(isChecked)
16                 Toast.makeText(this, checkbox.getText(), 1).show();
17             break;
18
19         case R.id.checkBox2:
20             if(isChecked)
21                 Toast.makeText(this, checkbox.getText(), 1).show();
22             break;
23         default:
24             break;
25         }
26     }
27     @Override
28
RadioButton:内部类(OnCheckedChangeListener),xml(推荐)
RadioButton和RadioGroup的关系:
1、RadioButton表示单个圆形单选框,而RadioGroup是可以容纳多个RadioButton的容器
2、每个RadioGroup中的RadioButton同时只能有一个被选中
3、不同的RadioGroup中的RadioButton互不相干,即如果组A中有一个选中了,组B中依然可以有一个被选中
4、大部分场合下,一个RadioGroup中至少有2个RadioButton
5、大部分场合下,一个RadioGroup中的RadioButton默认会有一个被选中,并建议您将它放在RadioGroup中的起始位置
xml申明:onclick() 事件 :
首先在xml控件中声明该事件 android:onClick="onRadioButtonClicked"
 1 <TextView
 2         android:id="@+id/textView1"
 3         android:layout_width="wrap_content"
 4         android:layout_height="wrap_content"
 5         android:text="选择您的性别" />
 6
 7     <RadioGroup
 8         android:id="@+id/radioGroup1"
 9         android:layout_width="wrap_content"
10         android:layout_height="wrap_content"
11         android:layout_below="@+id/textView1"
12         android:orientation="horizontal" >
13
14         <RadioButton
15             android:id="@+id/radio0"
16             android:layout_width="wrap_content"
17             android:layout_height="wrap_content"
18             android:checked="true"
19             android:text="男"
20             android:onClick="onRadioButtonClicked"
21              />
22
23         <RadioButton
24             android:id="@+id/radio1"
25             android:layout_width="wrap_content"
26             android:layout_height="wrap_content"
27             android:text="女"
28             android:onClick="onRadioButtonClicked"/>
29
30         <RadioButton
31             android:id="@+id/radio2"
32             android:layout_width="wrap_content"
33             android:layout_height="wrap_content"
34             android:text="保密"
35             android:onClick="onRadioButtonClicked"/>
36     </RadioGroup>
 1 public class MainActivity extends Activity {
 2
 3     @Override
 4     protected void onCreate(Bundle savedInstanceState) {
 5         super.onCreate(savedInstanceState);
 6         setContentView(R.layout.activity_main);
 7     }
 8
 9     public void onRadioButtonClicked(View view) {
10         RadioButton radioButton = (RadioButton) view;
11         boolean isChecked = radioButton.isChecked();
12         switch (view.getId()) {
13         case R.id.radio0:
14             if(isChecked)
15                 Toast.makeText(this, radioButton.getText(), 1).show();
16             break;
17         case R.id.radio1:
18             if(isChecked)
19                 Toast.makeText(this, radioButton.getText(), 1).show();
20             break;
21         case R.id.radio2:
22             if(isChecked)
23                 Toast.makeText(this, radioButton.getText(), 1).show();
24             break;
25
26         }
27     }
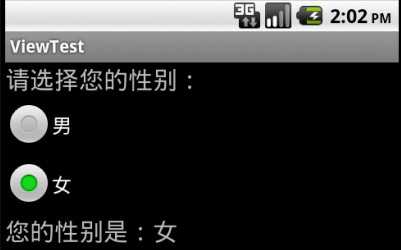
匿名内部类:
 1 <?xml version="1.0" encoding="utf-8"?>
 2  <LinearLayout xmlns:android="http://schemas.android.com/apk/res/android"
 3     android:orientation="vertical"
 4     android:layout_width="fill_parent"
 5     android:layout_height="fill_parent"
 6     >
 7  <TextView
 8     android:layout_width="fill_parent"
 9     android:layout_height="wrap_content"
10     android:text="请选择您的性别:"
11     android:textSize="9pt"
12     />
13  <RadioGroup android:id="@+id/radioGroup" android:contentDescription="性别" android:layout_width="wrap_content" android:layout_height="wrap_content">
14     <RadioButton android:layout_width="wrap_content" android:layout_height="wrap_content" android:id="@+id/radioMale" android:text="男" android:checked="true"></RadioButton>
15     <RadioButton android:layout_width="wrap_content" android:layout_height="wrap_content" android:id="@+id/radioFemale" android:text="女"></RadioButton>
16  </RadioGroup>
17 <TextView
18     android:id="@+id/tvSex"
19     android:layout_width="fill_parent"
20     android:layout_height="wrap_content"
21     android:text="您的性别是:男"
22     android:textSize="9pt"
23     />
24 </LinearLayout>
 1 TextView tv = null;//根据不同选项所要变更的文本控件
 2     @Override
 3     public void onCreate(Bundle savedInstanceState) {
 4         super.onCreate(savedInstanceState);
 5
 6         setContentView(R.layout.main);
 7
 8         //根据ID找到该文本控件
 9         tv = (TextView)this.findViewById(R.id.tvSex);
10         //根据ID找到RadioGroup实例
11         RadioGroup group = (RadioGroup)this.findViewById(R.id.radioGroup);
12         //绑定一个匿名监听器
13         group.setOnCheckedChangeListener(new OnCheckedChangeListener() {
14
15             @Override
16             public void onCheckedChanged(RadioGroup arg0, int arg1) {
17                 // TODO Auto-generated method stub
18                 //获取变更后的选中项的ID
19                 int radioButtonId = arg0.getCheckedRadioButtonId();
20                 //根据ID获取RadioButton的实例
21                 RadioButton rb = (RadioButton)MyActiviy.this.findViewById(radioButtonId);
22                 //更新文本内容,以符合选中项
23                 tv.setText("您的性别是:" + rb.getText());
24             }
25         });
26     }
ToggleButton/Switch 开关按钮:xml方式、内部类onCheckedChangedLisener事件
xml申明 onclick() 事件 :首先在xml控件中声明该事件 android:onClick="onToggleClicked"
 1  <Switch
 2         android:id="@+id/switch1"
 3         android:layout_width="wrap_content"
 4         android:layout_height="wrap_content"
 5         android:layout_alignLeft="@+id/radioGroup1"
 6         android:layout_below="@+id/radioGroup1"
 7         android:layout_marginTop="26dp"
 8         android:textOn="打开"
 9         android:textOff="关闭"
10         android:text="开关"
11         android:onClick="onToggleButtonClicked"
12          />
然后在程序中:
1 public void onToggleButtonClicked(View view){
2         boolean isChecked = ((Switch)view).isChecked();
3         if(isChecked){
4             Toast.makeText(this, "打开了", 1).show();
5         }
6         else
7             Toast.makeText(this, "关闭了", 1).show();
8     }
spinner
xml:
 1  <TextView
 2         android:id="@+id/textView1"
 3         android:layout_width="wrap_content"
 4         android:layout_height="wrap_content"
 5         android:text="所属城市"
 6         android:textSize="30sp"/>
 7
 8     <Spinner
 9         android:id="@+id/spinner1"
10         android:layout_width="wrap_content"
11         android:layout_height="wrap_content"
12         android:layout_alignLeft="@+id/textView1"
13         android:layout_below="@+id/textView1" />
程序中:

 1 public class MainActivity extends Activity implements OnItemSelectedListener{
 2
 3     private Spinner spinner;
 4     //private ArrayAdapter<String> adapter;//数组适配器
 5     private ArrayAdapter<CharSequence> adapter;//数组适配器
 6     @Override
 7     protected void onCreate(Bundle savedInstanceState) {
 8         super.onCreate(savedInstanceState);
 9         setContentView(R.layout.activity_main);
10         spinner = (Spinner)findViewById(R.id.spinner1);
11         //加载xml方式获取数据,1.声明时需CharSequence泛型;2. 需要实现OnItemSelectedListener接口
12         adapter=ArrayAdapter.createFromResource(this, R.array.city, android.R.layout.simple_spinner_dropdown_item);
13         adapter.setDropDownViewResource(android.R.layout.simple_spinner_dropdown_item);
14         spinner.setAdapter(adapter);
15         spinner.setOnItemSelectedListener(this);//注册监听器
16         //new方式手工构建数据
17         //adapter=new ArrayAdapter<String>(this,android.R.layout.simple_spinner_dropdown_item,getDataSource());
18         //spinner.setAdapter(adapter);
19     }
20     public List<String> getDataSource()
21     {
22         List<String> list=new ArrayList<String>();
23         list.add("北京");
24         list.add("上海");
25         list.add("广州");
26         list.add("深圳");
27         list.add("新乡");
28         list.add("获嘉");
29         return list;
30     }
31     @Override
32     public boolean onCreateOptionsMenu(Menu menu) {
33         // Inflate the menu; this adds items to the action bar if it is present.
34         getMenuInflater().inflate(R.menu.main, menu);
35         return true;
36     }
37
38     @Override
39     public boolean onOptionsItemSelected(MenuItem item) {
40         // Handle action bar item clicks here. The action bar will
41         // automatically handle clicks on the Home/Up button, so long
42         // as you specify a parent activity in AndroidManifest.xml.
43         int id = item.getItemId();
44         if (id == R.id.action_settings) {
45             return true;
46         }
47         return super.onOptionsItemSelected(item);
48     }
49     @Override
50     public void onItemSelected(AdapterView<?> parent, View view, int position,
51             long id) {
52         // TODO Auto-generated method stub
53         String item=spinner.getItemAtPosition(position).toString();
54         Toast.makeText(this, item, 1).show();
55     }
56     @Override
57     public void onNothingSelected(AdapterView<?> parent) {
58         // TODO Auto-generated method stub
59
60     }
61 }
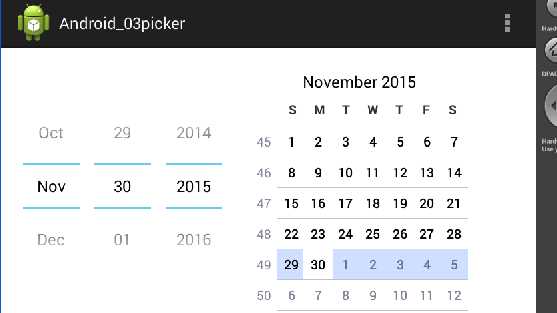
picker:datepicker,timepicker
datepicker:
1     <DatePicker
2         android:id="@+id/datePicker1"
3         android:layout_width="wrap_content"
4         android:layout_height="wrap_content"
5         android:layout_alignParentLeft="true"
6         android:layout_alignParentTop="true" />
 1 public class MainActivity extends Activity {
 2
 3     private DatePicker datePicker;
 4     private int year, monthOfYear, dayOfMonth;
 5
 6     @Override
 7     protected void onCreate(Bundle savedInstanceState) {
 8         super.onCreate(savedInstanceState);
 9         setContentView(R.layout.activity_main);
10         datePicker=(DatePicker)this.findViewById(R.id.datePicker1);
11         Calendar calendar=Calendar.getInstance();
12         year=calendar.get(calendar.YEAR);
13         monthOfYear=calendar.get(calendar.MONTH);
14         dayOfMonth=calendar.get(calendar.DAY_OF_MONTH);
15         datePicker.init(year, monthOfYear, dayOfMonth, new DatePicker.OnDateChangedListener() {
16
17             @Override
18             public void onDateChanged(DatePicker view, int year, int monthOfYear,
19                     int dayOfMonth) {
20                 // TODO Auto-generated method stub
21                 String value=year+"年-"+monthOfYear+1+"月-"+dayOfMonth+"日";
22                 Toast.makeText(MainActivity.this, value, 1).show();
23             }
24         });
25     }
timepicker:内部类setOnTimeChangedListener事件
 1 timePicker=(TimePicker)this.findViewById(R.id.timePicker1);
 2         timePicker.setOnTimeChangedListener(new TimePicker.OnTimeChangedListener() {
 3
 4             @Override
 5             public void onTimeChanged(TimePicker view, int hourOfDay, int minute) {
 6                 // TODO Auto-generated method stub
 7                 String value=hourOfDay+"时:"+minute+"分";
 8                 Toast.makeText(MainActivity.this, value, 1).show();
 9             }
10         });
progress bar:
 1 public class MainActivity extends Activity {
 2
 3     private Button button;
 4     private ProgressBar progressBar;
 5     @Override
 6     protected void onCreate(Bundle savedInstanceState) {
 7         super.onCreate(savedInstanceState);
 8         setContentView(R.layout.activity_main);
 9         button=(Button)this.findViewById(R.id.button1);
10         progressBar=(ProgressBar)this.findViewById(R.id.progressBar1);
11         progressBar.setMax(100);
12         button.setOnClickListener(new View.OnClickListener() {
13
14             @Override
15             public void onClick(View v) {
16                 // TODO Auto-generated method stub
17                 new myTask().execute();
18             }
19         });
20     }
21  class myTask extends AsyncTask<Void, Integer, Void>{
22
23     @Override
24     protected void onProgressUpdate(Integer... values) {
25         // TODO Auto-generated method stub
26         super.onProgressUpdate(values);
27         progressBar.setProgress(values[0]);
28     }
29
30     @Override
31     protected Void doInBackground(Void... params) {
32         // TODO Auto-generated method stub
33         int i=1;
34         while(i<100)
35         {
36             try {
37                 Thread.sleep(500);
38
39             } catch (Exception e) {
40                 // TODO: handle exception
41             }
42             publishProgress(i);
43             i++;
44         }
45         return null;
46     }
47
48  }
标签:
原文地址:http://www.cnblogs.com/mlj5288/p/4939156.html
