有时候,单独对一张图像进行处理是很难或者根本达不到我们想要的效果的。一个好的滤镜效果的诞生,往往要经过很多复杂步骤、细致微调、图片应用效果观察以及很多图层叠加。
我在JSWidget上发现了一些常用混合算法,对应着一些常用混合模式,通过这些blend modes,我们可以指定两张图像如何混合。
不过在此之前,我们需要纯颜色图像和渐变图像来做辅助:
- + (UIImage *)imageWithColor:(UIColor *)color size:(CGSize)size
- {
-
-
-
- UIGraphicsBeginImageContext(size);
- CGContextRef currentContext = UIGraphicsGetCurrentContext();
-
-
- CGRect fillRect = CGRectMake(0, 0, size.width, size.height);
-
-
- CGContextSetFillColorWithColor(currentContext, color.CGColor);
-
-
- CGContextFillRect(currentContext, fillRect);
-
-
- UIImage *colorImage = UIGraphicsGetImageFromCurrentImageContext();
- UIGraphicsEndImageContext();
-
- return colorImage;
- }
- + (UIImage *)imageWithGradient:(UIImage *)image startColor:(UIColor *)startColor endColor:(UIColor *)endColor
- {
- UIGraphicsBeginImageContextWithOptions(image.size, NO, image.scale);
- CGContextRef context = UIGraphicsGetCurrentContext();
- CGContextTranslateCTM(context, 0, image.size.height);
- CGContextScaleCTM(context, 1.0, -1.0);
-
- CGContextSetBlendMode(context, kCGBlendModeNormal);
- CGRect rect = CGRectMake(0, 0, image.size.width, image.size.height);
- CGContextDrawImage(context, rect, image.CGImage);
-
-
- NSArray *colors = [NSArray arrayWithObjects:(id)endColor.CGColor, (id)startColor.CGColor, nil];
- CGColorSpaceRef space = CGColorSpaceCreateDeviceRGB();
- CGGradientRef gradient = CGGradientCreateWithColors(space, (CFArrayRef)colors, NULL);
-
-
- CGContextClipToMask(context, rect, image.CGImage);
- CGContextDrawLinearGradient(context, gradient, CGPointMake(0,0), CGPointMake(0, image.size.height), 0);
- UIImage *gradientImage = UIGraphicsGetImageFromCurrentImageContext();
- UIGraphicsEndImageContext();
-
- CGGradientRelease(gradient);
- CGColorSpaceRelease(space);
-
- return gradientImage;
- }
而且在第一篇文章中提到的透明度滤镜(作用域像素的alpha值上)是没效果的,可以通过Quartz 2D来实现:
- - (UIImage *)setAlpha:(CGFloat)alpha
- {
-
-
- UIGraphicsBeginImageContextWithOptions(self.size, NO, 0.0f);
-
- CGContextRef ctx = UIGraphicsGetCurrentContext();
- CGRect area = CGRectMake(0, 0, self.size.width, self.size.height);
-
- CGContextScaleCTM(ctx, 1, -1);
- CGContextTranslateCTM(ctx, 0, -area.size.height);
-
- CGContextSetBlendMode(ctx, kCGBlendModeMultiply);
-
- CGContextSetAlpha(ctx, alpha);
-
- CGContextDrawImage(ctx, area, self.CGImage);
-
- UIImage *newImage = UIGraphicsGetImageFromCurrentImageContext();
-
- UIGraphicsEndImageContext();
-
- return newImage;
- }
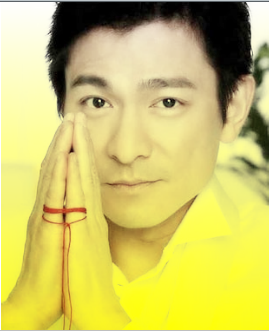
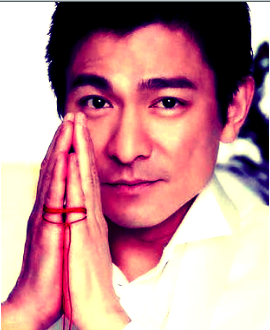
在此基础上,通过下面四行代码,可以分别得到四种不同效果:
- return [[UIImage imageWithColor:[UIColor purpleColor] size:originImage.size] changeOpacityByFactor:0.5];;
- return [UIImage imageWithGradient:originImage startColor:[UIColor whiteColor] endColor:[UIColor yellowColor]];
- return [[originImage tintWithMaxRGBA:(RGBA){190, 190, 230} minRGBA:(RGBA){50, 35, 10}] overlayWithImage:[[UIImage imageWithColor:[UIColor purpleColor] size:originImage.size] changeOpacityByFactor:0.3]];
- return [originImage softlightWithImage:[[UIImage imageWithColor:[UIColor yellowColor] size:originImage.size] changeOpacityByFactor:0.8]];


其中,overlay算法如下:
- double calcOverlay(float b, float t)
- {
- return (b > 128.0f) ? 255.0f - 2.0f * (255.0f - t) * (255.0f - b) / 255.0f: (b * t * 2.0f) / 255.0f;
- }
-
- void filterOverlay(UInt8 *pixelBuf, UInt8 *pixedBlendBuf, UInt32 offset, void *context)
- {
- int r = offset;
- int g = offset+1;
- int b = offset+2;
-
- int red = pixelBuf[r];
- int green = pixelBuf[g];
- int blue = pixelBuf[b];
-
- int blendRed = pixedBlendBuf[r];
- int blendGreen = pixedBlendBuf[g];
- int blendBlue = pixedBlendBuf[b];
-
- pixelBuf[r] = SAFECOLOR(calcOverlay(red, blendRed));
- pixelBuf[g] = SAFECOLOR(calcOverlay(green, blendGreen));
- pixelBuf[b] = SAFECOLOR(calcOverlay(blue, blendBlue));
- }
版权声明:本文为博主原创文章,未经博主允许不得转载。