标签:
原文:《Programming WPF》翻译 第8章 3.StoryboardStoryboard是动画的集合。如果你使用了标记,所有的动画必须要被定义在一个Storyboard中。(在代码中创建隔离的动画对象,这是可能的,参见本章后面部分。)一个动画的结构通常是不同于设置了动画的UI的结构上。例如,你可能想要来两个单独的用户界面元素在同一时间被设置动画。因为Storyboard将动画从有动画效果的对象中隔离出来,Storyboard是自由地反射这样的连接,即使这些元素被设置了对象,可能被定义在完全不同的文件部分中。
示例8-15显示了包含了两个椭圆的用户界面的标记。
示例8-15
这些椭圆是互不邻近的,但是它们的宽度都以异步的方式设置了动画。这种异步被反射在 <Window Text="Two Animations" Width="420" Height="150"
xmlns="http://schemas.microsoft.com/winfx/avalon/2005"
xmlns:x="http://schemas.microsoft.com/winfx/xaml/2005">
<Window.Storyboards>
<ParallelTimeline>
<SetterTimeline TargetName="myEllipse" Path="(Ellipse.Width)">
<DoubleAnimation From="10" To="300" Duration="0:0:5"
RepeatBehavior="Forever" />
</SetterTimeline>
<SetterTimeline TargetName="myOtherEllipse" Path="(Ellipse.Width)">
<DoubleAnimation From="300" To="10" Duration="0:0:5"
RepeatBehavior="Forever" />
</SetterTimeline>
</ParallelTimeline>
</Window.Storyboards>
<StackPanel Orientation="Horizontal">
<Ellipse x:Name="myEllipse" Height="100" Fill="Red" />
<TextBlock>This is some text</TextBlock>
<Ellipse x:Name="myOtherEllipse" Height="100" Fill="Blue" />
</StackPanel>
</Window>
Storyboard必须运行以三种位置中的一种。它们可以放置在Style中、ContentTemplate中、或者顶级元素中。顶级元素是Window和Page,或者派生于此的类。
所有的用户界面元素都有一个Storyboard属性,继承于基类型FrameworkElement。你可能想这意味着你可以添加一个Storyboard到任意一个元素。这于当前是不被支持的。Storyboard只会工作于:Style中、ContentTemplate中、或者顶级元素中。
把动画放入样式的Storyboard中的能力,使你通过样式系统应用动画。这可是很有用的——如果你想使用同样的动画在很多地方。通过把动画放入样式,而不是一个Window或Page,你要避免复制和排除次要矛盾的可能性。示例8-16显示了带有Storyboard的一个样式。
示例8-16
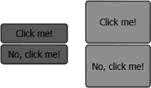
这些动画并没有做什么显著不寻常的事情。它们只是改变了一对按钮的大小和颜色,正如图<Window Text="StyleAnimations" Width="220" Height="200"
xmlns="http://schemas.microsoft.com/winfx/avalon/2005"
xmlns:x="http://schemas.microsoft.com/winfx/xaml/2005">
<Window.Resources>
<Style TargetType="{x:Type Button}">
<Setter Property="Height" Value="25" />
<Setter Property="Background" Value="Green" />
<Style.Storyboards>
<SetterTimeline
Path="(Button.Background).(SolidColorBrush.Color)">
<ColorAnimation To="LimeGreen" Duration="0:0:0.3"
AutoReverse="True" RepeatBehavior="Forever" />
</SetterTimeline>
<ParallelTimeline RepeatBehavior="Forever" Duration="0:0:2">
<SetterTimeline Path="(Button.Width)">
<DoubleAnimation From="80" To="90" Duration="0:0:0.1"
AutoReverse="True" />
</SetterTimeline>
<SetterTimeline Path="(Button.Height)"
BeginTime="0:0:0.4">
<DoubleAnimation By="30" Duration="0:0:0.5"
AutoReverse="True"/>
</SetterTimeline>
</ParallelTimeline>
</Style.Storyboards>
</Style>
</Window.Resources>
<StackPanel Orientation="Vertical">
<Button HorizontalAlignment="Center">Click me!</Button>
<Button HorizontalAlignment="Center">No, click me!</Button>
</StackPanel>
</Window>
图8-8
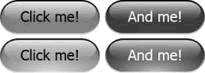
如果你为控件定义了一个模板,它可能包含了——没有直接响应到元素可你又想设置动画的属性——的样式,例如,图8-9显示了两对按钮。在顶行,这些按钮显示为自定义的可视化——带有圆形的静态外观。底部按钮是相似的,但是一个放射性的填充被添加到按钮中,并含有一个内部的光源。我们可能想为这个光源设置动画,使这个按钮逐渐地跳动。
图8-9
这个按钮的类型并没有提供我们用来表示光源颜色的属性,因此为了给这个光源设置动画,这个动画需要为控件模板中详细指定的元素设置目标。在这种情形中,我们可以把动画放入模板的Storyboard中,而不是样式的Storyboard中。如果你设置了x:Name属性在模板中相应的元素上,你可以接着在动画中用TargetName引用它。示例8-17显示了图8-9的标记。
示例8-17
大多数模板是静态的,但是光源被设置了动画。注意到<Window xmlns="http://schemas.microsoft.com/winfx/avalon/2005"
xmlns:x="http://schemas.microsoft.com/winfx/xaml/2005"
Text="Style VisualTree Animation" Width="400" Height="150"
>
<Window.Resources>
<Style TargetType="{x:Type Button}">
<Setter Property="Background" Value="CornflowerBlue" />
<Setter Property="Height" Value="26" />
<Setter Property="Template">
<Setter.Value>
<ControlTemplate TargetType="{x:Type Button}">
<Grid Height="{TemplateBinding Height}">
<RowDefinition Height="1.8*" />
<RowDefinition Height="*" />
<Rectangle Grid.RowSpan="2" RadiusX="13" RadiusY="13"
Fill="{TemplateBinding Background}"
Stroke="VerticalGradient Black LightGray" />
<!-- Glow -->
<Rectangle Grid.RowSpan="2" RadiusX="13" RadiusY="13"
x:Name="glow">
<Rectangle.Fill>
<RadialGradientBrush Center="0.5, 1"
RadiusX="0.7" RadiusY="0.8">
<RadialGradientBrush.GradientStops>
<GradientStop Offset="0"
Color="White" />
<GradientStop Offset="1"
Color="Transparent" />
</RadialGradientBrush.GradientStops>
</RadialGradientBrush>
</Rectangle.Fill>
</Rectangle>
<Rectangle Margin="3,1.1" RadiusX="11" RadiusY="12"
Fill="VerticalGradient #dfff #0fff" />
<ContentPresenter Grid.RowSpan="3" Margin="13,2,13,4"
HorizontalAlignment="Center"
VerticalAlignment="Center" />
</Grid>
<ControlTemplate.Storyboards>
<SetterTimeline TargetName="glow"
Path="(Rectangle.Fill).(LinearGradientBrush.GradientStops)[0].(GradientStop.Color)">
<ColorAnimation From="#1fff" To="#cfff"
Duration="0:0:1"
AutoReverse="True" RepeatBehavior="Forever"
AccelerationRatio="0.4"
DecelerationRatio="0.6"/>
</SetterTimeline>
</ControlTemplate.Storyboards>
</ControlTemplate>
</Setter.Value>
</Setter>
</Style>
</Window.Resources>
<StackPanel VerticalAlignment="Center"
Orientation="Horizontal">
<Button Margin="4,0">Click me!</Button>
<Button Background="DarkRed" Foreground="White">And me!</Button>
</StackPanel>
</Window>
这个特定的Path引进了一个我们之前没有看到过的新样式:[0]。这个[index]语法用于指出一个项在集合的一个特定的偏移位置。
正如我们在第五章看到的,样式和模板都可以定义触发器以允许属性被设置为自动依照某一个刺激。例如,你可以触发任何Storyboard中的动画——当一个特定的事件发生时。
示例8-18为一个按钮显示了一个样式,带有一个简单的模板——仅绘制了一个矩形在按钮内容的周围。这个模板的Storyboard包含了两个动画。第一个退变颜色到PeachPuff,然会再返回来,另一个则在矩形轮廓的厚度上振荡。注意到,这两个按钮都有一个设置为{x:Null}的BeginTime。这防止了在应用程序开始的时候这些按钮会自动运行动画。
示例8-18
这个动画被模板中的<Style TargetType="{x:Type Button}">
<Setter Property="Template">
<Setter.Value>
<ControlTemplate TargetType="{x:Type Button}">
<Grid>
<Rectangle x:Name="mainRect" Fill="Aqua" Stroke="Blue" />
<ContentPresenter
HorizontalAlignment=
"{TemplateBinding HorizontalContentAlignment}"
VerticalAlignment=
"{TemplateBinding VerticalContentAlignment}" />
</Grid>
<ControlTemplate.Storyboards>
<!-- Click animation -->
<SetterTimeline x:Name="clickTimeline" BeginTime="{x:Null}"
TargetName="mainRect"
Path="(Rectangle.Fill).(SolidColorBrush.Color)">
<ColorAnimation To="PeachPuff" Duration="0:0:0.2"
AutoReverse="True" />
</SetterTimeline>
<!-- Mouse over animation -->
<SetterTimeline x:Name="enterTimeline" BeginTime="{x:Null}"
TargetName="mainRect" Duration="1"
Path="(Rectangle.StrokeThickness)" >
<DoubleAnimation To="3" Duration="0:0:0.2"
AutoReverse="True"
RepeatBehavior="Forever" />
</SetterTimeline>
</ControlTemplate.Storyboards>
<ControlTemplate.Triggers>
<EventTrigger RoutedEvent="ButtonBase.Click">
<EventTrigger.Actions>
<BeginAction TargetName="clickTimeline" />
</EventTrigger.Actions>
</EventTrigger>
<EventTrigger RoutedEvent="Mouse.MouseEnter">
<EventTrigger.Actions>
<BeginAction TargetName="enterTimeline" />
</EventTrigger.Actions>
</EventTrigger>
<EventTrigger RoutedEvent="Mouse.MouseLeave">
<EventTrigger.Actions>
<StopAction TargetName="enterTimeline" />
</EventTrigger.Actions>
</EventTrigger>
</ControlTemplate.Triggers>
</ControlTemplate>
</Setter.Value>
</Setter>
</Style>
另一个动画有两个Eventtrigger元素,一个用于当鼠标进入控件的时候,另一个用于当鼠标离开控件的时候。这是因为线条宽度的动画会永远重复,如果这只有一个触发器,开始动画在鼠标进入控件的时候,这个动画将会开始而不会停止,由于这是一个顶级的timeline。因此我们需要1秒钟的Eventtrigger,响应到MouseLeave事件——使用StopAction来停止这个动画。
这个示例的鼠标事件命名为Mouse.MouseEnter和Mouse.MouseLeave。这是有一点不寻常的,当事件被命名为定义它们的元素。这些事件是继承于UIElement基类,因此你可以希望它们被命名为UIElement.MouseEnter和UIElement.MouseLeave。可是,这些由UIElement提供的事件只是底层的附属事件外面的包装。底层的事件由System.Windows.Input命名空间的Mouse类定义,这是为什么事件名以Mouse.UIElement开始,简单而便利的包装了这些附属事件作为标准.NET事件。
每个Eventtrigger可以有你想要的任何事件,因此你可以一次性开始或废弃一些动画。
这通常是非常便利的使WPF自动开始和停止你的动画——在事件发生时。这就意味着你不需要写任何代码。可是,这并不总是一个适当的事件来用作触发器,因此在程序上开始一个动画,有时是很有用的。
8.3.1 使用代码加载动画
为了从代码上开始一个动画,理解timeline和时钟之间的不同是必要的。正如我们已经看到的,一个timeline层次是在一段延伸的时间内发生的一个或更多事情的描述——但这只是一个描述。timeline层次的存在,带有一个SetterTimeline和一个DoubleAnimation,并不是足够引起动画的发生。表现这个动画的工作由一个或多个时钟完成。
时钟是一个在运行期创建的对象,对timeline中的当前位置保持跟踪,执行timeline定义的无论什么动作。如果你回想到timeline图表,如图8-7,时钟就是知道我们在时间的那个位置的图表上端。
timeline和时钟的关系并不像代码和多线程的关系。可执行代码定义了要表现什么操作,但是一个线程被要求执行代码。同样的,一个timeline描述了在一段特定的时间长度发生了什么,但是一个时钟被要求运行这个timeline。
WPF自动创建时钟。在创建一个用户界面的时候,它顺便访问相应的Stroyboard属性和为每个timeline创建时钟。如果一个带有storyboard的样式或模板被使用在多个地方,每个实例都有它自己的一组时钟——支持动画独立地运行。这是无妨的,否则,如果你有一个动画在鼠标进入按钮的时候运行,它会为屏幕上所有的按钮同时运行,这将不会是十分有用的。
通常,顶级timeline的时钟是自动开始的,基于他们的BeginTime。可是,如果你详细指定BeginTime为{x:Null},这个时钟将不会开始,因此这个动画不会运行。我们在前面的章节看到,如何使用触发器来加载动画。触发器中的BeginAction只是告诉WPF在触发器发生时,开始相应的timeline的时钟。你也可以编写代码来开始动画。
为了亲自开始一个动画,我们需要得到它的时钟。这些代码需要找到timeline的时钟,看上去有点不同的,取决于你是否处理timeline在一个Style、一个模板、还是一个顶级元素中。
示例8-19
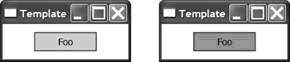
这个动画将按钮的颜色改变为红色,而且还要返回。由于这个动画的<Window x:Class="StartAnimationWithCode.Window1"
xmlns="http://schemas.microsoft.com/winfx/avalon/2005"
xmlns:x="http://schemas.microsoft.com/winfx/xaml/2005"
Text="Code" Width="150" Height="100">
<Window.Storyboards>
<SetterTimeline BeginTime="{x:Null}" TargetName="myButton"
x:Name="clickTimeline"
Path="(Button.Background).(SolidColorBrush.Color)">
<ColorAnimation To="Red" Duration="0:0:0.2" AutoReverse="True" />
</SetterTimeline>
</Window.Storyboards>
<StackPanel HorizontalAlignment="Left" VerticalAlignment="Top">
<Button x:Name="myButton" Background="Aqua">Foo</Button>
</StackPanel>
</Window>
示例8-20
这个句柄获取了动画的using System;
using System.Windows;
using System.Windows.Media.Animation;
namespace StartAnimationWithCode
 {
{
 public partial class Window1 : Window
 {
{
public Window1( ) : base( )
{
InitializeComponent( );
myButton.Click += ButtonClick;
 }
}
private void ButtonClick(object sender, RoutedEventArgs e)
{
Clock clock;
Timeline clickTimeline = FindName("clickTimeline") as Timeline;
clock = this.FindStoryboardClock(clickTimeline);
clock.ClockController.Begin( );
}
}
 }
}
图8-10

如果这个动画存在于一个样式中,这段代码工作得有点不同。示例8-21显示了带有动画的一个样式。(这个动画有和前一个示例同样的效果;它只是以一种不同的方式被应用。)
示例8-21
这个<Window x:Class="StartAnimationWithCode.StyleAnimationFromCode"
xmlns="http://schemas.microsoft.com/winfx/avalon/2005"
xmlns:x="http://schemas.microsoft.com/winfx/xaml/2005"
Text="Style" Width="150" Height="100">
<Window.Resources>
<Style TargetType="{x:Type Button}">
<Style.Storyboards>
<SetterTimeline BeginTime="{x:Null}" x:Name="clickTimeline"
Path="(Button.Background).(SolidColorBrush.Color)">
<ColorAnimation To="Red" Duration="0:0:0.2"
AutoReverse="True" />
</SetterTimeline>
</Style.Storyboards>
</Style>
</Window.Resources>
<Button x:Name="myButton" Background="Aqua"
HorizontalAlignment="Center" VerticalAlignment="Center">
Foo
</Button>
</Window>
示例8-22
当然,如果样式定义了一个模板,我们可能希望直接为模板的一部分定义动画。在这种情形中,动画会存在于模板的private void ButtonClick(object sender, RoutedEventArgs e)
{
Clock clock;
clock = Style.FindStoryboardClock(myButton, "clickTimeline");
clock.ClockController.Begin( );
}
示例8-23
虽然事实上,动画现在嵌入到样式模板中,而不是样式中,我们仍可以和之前同样的方式加载这个动画——使用示例<Style TargetType="{x:Type Button}">
<Setter Property="Template">
<Setter.Value>
<ControlTemplate TargetType="{x:Type Button}">
<Grid>
<Rectangle x:Name="mainRect" Fill="Aqua" Stroke="Blue" />
<ContentPresenter HorizontalAlignment="{TemplateBinding
HorizontalContentAlignment}"
VerticalAlignment="{TemplateBinding
VerticalContentAlignment}" />
</Grid>
<ControlTemplate.Storyboards>
<SetterTimeline BeginTime="{x:Null}" TargetName="mainRect"
x:Name="clickTimeline"
Path="(Rectangle.Fill).(SolidColorBrush.Color)">
<ColorAnimation To="Red" Duration="0:0:0.2"
AutoReverse="True" />
</SetterTimeline>
</ControlTemplate.Storyboards>
</ControlTemplate>
</Setter.Value>
</Setter>
</Style>
图8-11
在所有的这些示例中,我们使用了时钟的ClickController。这就为控制操作提供了可编程的接口,如开始、暂停、停止、倒带等等。这里我们使用了Begin——立即开始了动画。注意到我们只需要为顶级timeline开始这个时钟,子时钟将会被开始于恰当的时间,作为运行父一级的结果。
《Programming WPF》翻译 第8章 3.Storyboard
标签:
原文地址:http://www.cnblogs.com/lonelyxmas/p/4963870.html


