标签:
在进行springMVC开发时,我们也希望通过注解进行开发,这样比较快捷方便。现将springMVC开发步骤记录如下:
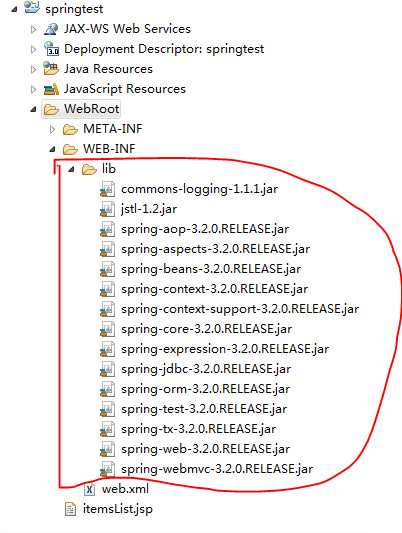
1、新建web程序,导入springMVC需要的jar包:

2、配置web.xml文件。主要是进行servlet的配置。
 1  <servlet>
 2       <servlet-name>springmvc</servlet-name>
 3       <servlet-class>org.springframework.web.servlet.DispatcherServlet</servlet-class>
 4       <init-param>
 5           <param-name>contextConfigLocation</param-name>
 6           <param-value>classpath:springmvc.xml</param-value>
 7       </init-param>
 8   </servlet>
 9
10   <servlet-mapping>
11       <servlet-name>springmvc</servlet-name>
12       <url-pattern>*.action</url-pattern>
13   </servlet-mapping>
注意:其中servlet-class的路径org.springframework.web.servlet.DispatcherServlet可以在spring-webmvc-3.2.0.RELEASE.jar中找到。
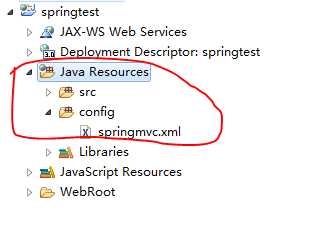
3、在工程目录下新建resource-folder命名为config,然后创建springmvc.xml文件,并进行配置,头部可以拷贝。

 1 <?xml version="1.0" encoding="UTF-8"?>
 2 <beans xmlns="http://www.springframework.org/schema/beans"
 3     xmlns:xsi="http://www.w3.org/2001/XMLSchema-instance" xmlns:mvc="http://www.springframework.org/schema/mvc"
 4     xmlns:context="http://www.springframework.org/schema/context"
 5     xmlns:aop="http://www.springframework.org/schema/aop" xmlns:tx="http://www.springframework.org/schema/tx"
 6     xsi:schemaLocation="http://www.springframework.org/schema/beans
 7         http://www.springframework.org/schema/beans/spring-beans-3.2.xsd
 8         http://www.springframework.org/schema/mvc
 9         http://www.springframework.org/schema/mvc/spring-mvc-3.2.xsd
10         http://www.springframework.org/schema/context
11         http://www.springframework.org/schema/context/spring-context-3.2.xsd
12         http://www.springframework.org/schema/aop
13         http://www.springframework.org/schema/aop/spring-aop-3.2.xsd
14         http://www.springframework.org/schema/tx
15         http://www.springframework.org/schema/tx/spring-tx-3.2.xsd ">
16
17 </beans>
4、在springmvc.xml文件中配置注解开发的映射器、适配器和视图解析器:
 1 <?xml version="1.0" encoding="UTF-8"?>
 2 <beans xmlns="http://www.springframework.org/schema/beans"
 3     xmlns:xsi="http://www.w3.org/2001/XMLSchema-instance" xmlns:mvc="http://www.springframework.org/schema/mvc"
 4     xmlns:context="http://www.springframework.org/schema/context"
 5     xmlns:aop="http://www.springframework.org/schema/aop" xmlns:tx="http://www.springframework.org/schema/tx"
 6     xsi:schemaLocation="http://www.springframework.org/schema/beans
 7         http://www.springframework.org/schema/beans/spring-beans-3.2.xsd
 8         http://www.springframework.org/schema/mvc
 9         http://www.springframework.org/schema/mvc/spring-mvc-3.2.xsd
10         http://www.springframework.org/schema/context
11         http://www.springframework.org/schema/context/spring-context-3.2.xsd
12         http://www.springframework.org/schema/aop
13         http://www.springframework.org/schema/aop/spring-aop-3.2.xsd
14         http://www.springframework.org/schema/tx
15         http://www.springframework.org/schema/tx/spring-tx-3.2.xsd ">
16
17     <!-- 注解的映射器 -->
18     <bean class="org.springframework.web.servlet.mvc.method.annotation.RequestMappingHandlerMapping"/>
19     <!-- 注解的适配器 -->
20     <bean class="org.springframework.web.servlet.mvc.method.annotation.RequestMappingHandlerAdapter"/>
21
22
23     <!-- 使用 mvc:annotation-driven代替上边注解映射器和注解适配器配置
24     mvc:annotation-driven默认加载很多的参数绑定方法,
25     比如json转换解析器就默认加载了,
26     如果使用mvc:annotation-driven不用配置上边的RequestMappingHandlerMapping和RequestMappingHandlerAdapter
27     实际开发时使用mvc:annotation-driven
28      -->
29     <!-- <mvc:annotation-driven></mvc:annotation-driven> -->
30     <!-- 视图解析器 -->
31       <bean class="org.springframework.web.servlet.view.InternalResourceViewResolver"/>
32 </beans>
注意:在实际开发工程可以使用<mvc:annotation-driven></mvc:annotation-driven>代替映射器和适配器。
5、编写模型层,并开发controler处理器。在处理器类上面使用@Controller注解,并在需要映射的方法上面使用@RequestMapping("/queryItems")注解。这样就可以访问地址/queryItmes.action了。

注意:注解的时候,使用的url会默认加上.action,所以输入网站的时候不要忘记了带上.action.
附:
其实,我们也可以改变springmvc.xml的配置,在视图解析器上配置视图的前缀和后缀。
1 <bean class="org.springframework.web.servlet.view.InternalResourceViewResolver">
2           <!--视图的前缀  -->
3           <property name="prefix" value="" />
4           <!--视图的后缀  -->
5           <property name="suffix" value=".jsp" />
6       </bean>
当加入了视图解析器的前缀和后缀以后,我们在跳转页面的时候就不用再加了,否则会出现重复导致路径错误。
1         // 指定视图
2         //modelAndView.setViewName("itemsList.jsp");
3         //配置了后缀,所以不要加.jsp
4         modelAndView.setViewName("itemsList");
标签:
原文地址:http://www.cnblogs.com/javayuan/p/4964656.html