标签:
官方教程上讲的是 GCM (Google Cloud Messaging) , 不过 GFW 是 GCM 过不去的坎.
极光推送 JPush 是国内的一个不错的替代方案.
JPush 提供的 API 易于理解, 使用也很简单, 但是要使用于 Xamarin 还是要费些周章: 要转制成 Binding Library.
JPush 提供了一篇转制的示例:
http://smilehyh.blog.163.com/blog/static/123343886201362110857402/
按照过程走一遍:
1, 下载 JPush SDK
http://docs.jpush.io/resources/
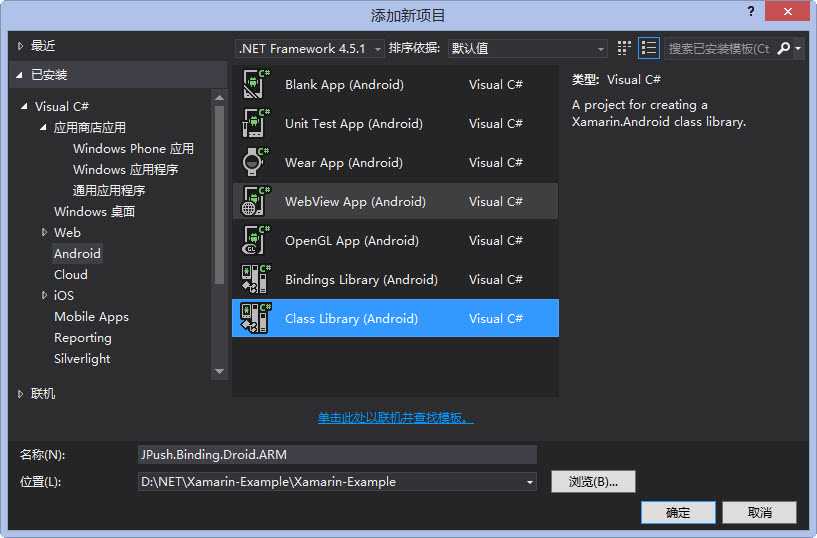
2, 新建一个 BindingLibrary
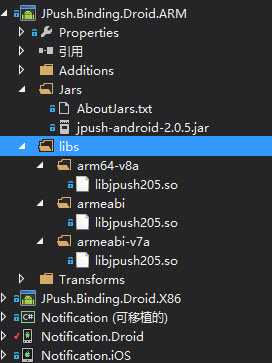
3, 将 SDK内的 JPush.xxx.jar 放到 Jars 目录下, 将 SDK 内的 arm64-v8a, armeabi, armeabi-v7a 放到 libs 目录下.
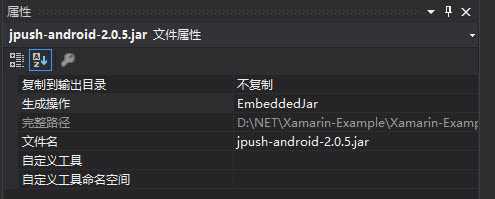
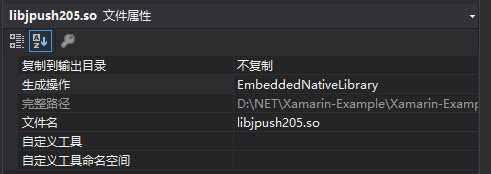
4, 指定jar 文件为 EmbeddedJar, xxx.so 为 EmbeddedNativeLibrary
具体 EmbeddedNativeLibrary 和 EmbeddedJar 各代表什么意思, 请参考:
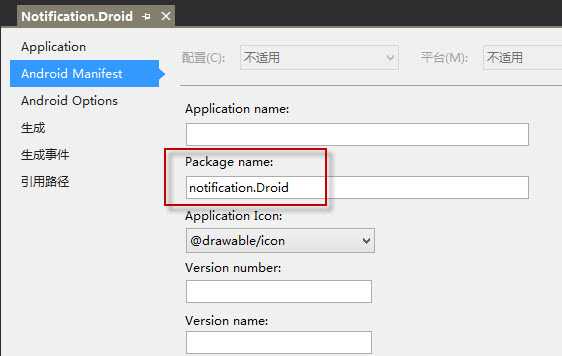
5,编译, 并在 Xamarin.Android工程中引用该项目, 修改 Android 项目属性, 指定 Package Name. 注意: 首字母要小写, 否则运会报错
6, 按照文档 http://docs.jpush.io/guideline/android_guide/ 中的说明, 修改 Properties/AndroidManifest.xml,
这一步可用编码来实现, 后面会讲到.
7, 在 MainActivity 的 OnCreate 方法里加入 (红色部分):
 1         protected override void OnCreate(Bundle bundle) {
 2             base.OnCreate(bundle);
 3
 4             global::Xamarin.Forms.Forms.Init(this, bundle);
 5
 6             FormsAppCompatActivity.ToolbarResource = Resource.Layout.toolbar;
 7             FormsAppCompatActivity.TabLayoutResource = Resource.Layout.tabs;
 8
 9             LoadApplication(new App(IoC.Get<SimpleContainer>()));
10
11             JPushInterface.SetDebugMode(true);
12             JPushInterface.Init(this);
13         }
8, 如果你是用 Visual Studio Emulator For Android 模拟器进行调试, 不出意外, 你会在输出中看到以下信息:
[JPushGlobal] Get sdk version fail![获取sdk版本失败!]
W/System.err( 2063): java.lang.UnsatisfiedLinkError: dalvik.system.PathClassLoader[DexPathList[[zip file "/data/app/notification.Droid-1/base.apk"],nativeLibraryDirectories=[/data/app/notification.Droid-1/lib/x86, /vendor/lib, /system/lib]]] couldn‘t find "libjpush205.so"
...
很显然, VS Emulator For Android 是基于 x86 的. 要解决这个问题, 请下载 JPush SDK 的 x86 版本 , 重复 2 ~ 4 的步骤, 新建另外一个 Binding Library, 并添加引用到 Xamarin.Android 项目.
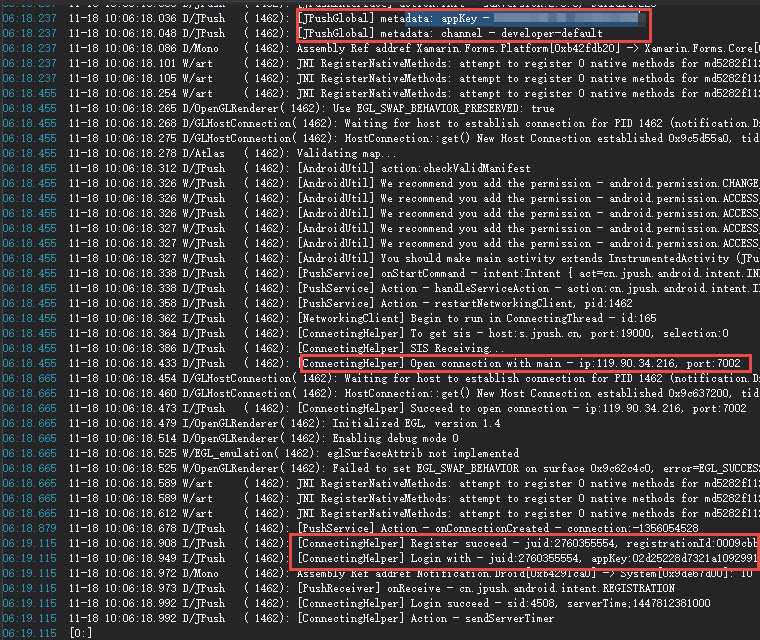
9, 编译,运行, 确认模拟器或设备连接到网络 , 如果配置没有错误, 你会看到以下信息:
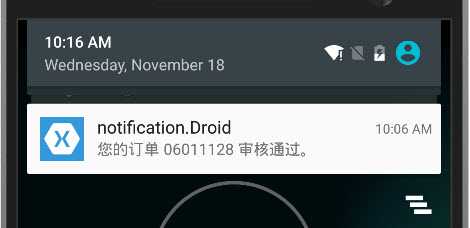
10, 发送测试:
---------------------------------分隔线-------------------------------
该部份只是一个偿试,不建议使用, 直接修改 Manifest 添加配置就挺好的。
第一眼看到极光的 AndroidManifest.xml 配置, 我头大了, 这都什么和什么啊 (对 Android 还是不太了解)!
android.permission.RECEIVE_USER_PRESENT 这个 Permission 在 VS 的 Manifest 选项卡中居然没有!
有好几处需要替换为 Package Name
<category android:name="您应用的包名"/>
<permission android:name="您应用的包名.permission.JPUSH_MESSAGE" android:protectionLevel="signature" />
<uses-permission android:name="您应用的包名.permission.JPUSH_MESSAGE" />
这里的 "包名" 即 上面的 第5步 里指定的 Package name.
Xamarin.Android 提供了很多 Attribute , 编译的时候, 会跟据这些 Attribute 对 Manifest 文件自动进行修改, 比如:
    [Activity(Label = "Notification", Theme = "@style/MyTheme", Icon = "@drawable/icon", MainLauncher = true, ConfigurationChanges = ConfigChanges.ScreenSize | ConfigChanges.Orientation)]
    public class MainActivity : FormsAppCompatActivity {
这个 ActivityAttribute 在最终的 Manifest 文件 (xxx\obj\Debug\android\AndroidManifest.xml) 中输出这样:
1     <activity android:configChanges="orientation|screenSize" android:icon="@drawable/icon" android:label="Notification" android:theme="@style/MyTheme" android:name="md5d2dc98e5b163ec8eaa18490df03b0a9d.MainActivity">
2       <intent-filter>
3         <action android:name="android.intent.action.MAIN" />
4         <category android:name="android.intent.category.LAUNCHER" />
5       </intent-filter>
6     </activity>
1     [Service]
2     [IntentFilter(new string[] { "Xamarin.BallService" })]
3     public class BallService : Service, View.IOnTouchListener, View.IOnClickListener {
这个 ServiceAttribute 和 IntentFilterAttribute 最终会输出成这样:
1     <service android:name="md5e15bd1e8131f68eb8f9fc22d8285f415.BallService">
2       <intent-filter>
3         <action android:name="Xamarin.BallService" />
4       </intent-filter>
5     </service>
在 Binding Library 项目下, 有个Additions 目录, 它的作用 就是为了在转制的时候 加入一些自定义方法 或 是自定义类, 或是对 Java 的类进行扩展:
Additions allow you to add arbitrary C# to the generated classes before they are compiled. This can be helpful for providing convenience methods or adding pure C# classes.
如果是对 Java 类进行扩展, 需要使用 partical
跟据这个牛B的特性, 我在 Additions 目录下加了这几个类:


 1 using System;
 2 using System.Collections.Generic;
 3 using System.Linq;
 4 using System.Text;
 5
 6 using Android.App;
 7 using Android.Content;
 8 using Android.OS;
 9 using Android.Runtime;
10 using Android.Views;
11 using Android.Widget;
12
13 namespace CN.Jpush.Android.Service {
14     [BroadcastReceiver(Name = "cn.jpush.android.service.AlarmReceiver")]
15     public partial class AlarmReceiver {
16
17     }
18 }
 1 using System;
 2 using System.Collections.Generic;
 3 using System.Linq;
 4 using System.Text;
 5
 6 using Android.App;
 7 using Android.Content;
 8 using Android.OS;
 9 using Android.Runtime;
10 using Android.Views;
11 using Android.Widget;
12
13 namespace CN.Jpush.Android.Service {
14
15     [Service(Name = "cn.jpush.android.service.DaemonService", Enabled = true, Exported = true)]
16     [IntentFilter(
17         new string[] { "cn.jpush.android.intent.DaemonService" },
18         Categories = new string[] { Defines.APP_ID }
19         )
20     ]
21     public partial class DaemonService {
22     }
23 }
 1 using System;
 2 using System.Collections.Generic;
 3 using System.Linq;
 4 using System.Text;
 5
 6 using Android.App;
 7 using Android.Content;
 8 using Android.OS;
 9 using Android.Runtime;
10 using Android.Views;
11 using Android.Widget;
12
13 namespace CN.Jpush.Android.Service {
14
15
16     [Service(Name = "cn.jpush.android.service.DownloadService", Enabled = true, Exported = false)]
17     public partial class DownloadService {
18
19     }
20 }
 1 using System;
 2 using System.Collections.Generic;
 3 using System.Linq;
 4 using System.Text;
 5
 6 using Android.App;
 7 using Android.Content;
 8 using Android.OS;
 9 using Android.Runtime;
10 using Android.Views;
11 using Android.Widget;
12 using Android.Content.PM;
13
14 namespace CN.Jpush.Android.UI {
15
16     [Activity(Name = "cn.jpush.android.ui.PushActivity",
17         ConfigurationChanges = ConfigChanges.Orientation | ConfigChanges.KeyboardHidden,
18         Exported = false)]
19     [IntentFilter(new string[] {
20         "cn.jpush.android.ui.PushActivity"
21     }, Categories = new string[]{
22         "android.intent.category.DEFAULT",
23         Defines.APP_ID
24     })]
25     public partial class PushActivity {
26
27         public void TTT() {
28         }
29
30     }
31 }
 1 using System;
 2 using System.Collections.Generic;
 3 using System.Linq;
 4 using System.Text;
 5
 6 using Android.App;
 7 using Android.Content;
 8 using Android.OS;
 9 using Android.Runtime;
10 using Android.Views;
11 using Android.Widget;
12
13 namespace CN.Jpush.Android.Service {
14
15     [BroadcastReceiver(Name = "cn.jpush.android.service.PushReceiver", Enabled = true)]
16     [IntentFilter(new string[]{
17         "cn.jpush.android.intent.NOTIFICATION_RECEIVED_PROXY"
18     },
19     Categories = new string[] { Defines.APP_ID },
20     Priority = 1000)]
21     [IntentFilter(new string[] {
22         "android.intent.action.USER_PRESENT" ,
23         "android.net.conn.CONNECTIVITY_CHANGE"
24     })]
25     [IntentFilter(new string[] {
26         "android.intent.action.PACKAGE_ADDED",
27         "android.intent.action.PACKAGE_REMOVED"
28     }, DataScheme = "package")]
29     public partial class PushReceiver {
30     }
31 }
 1 using System;
 2 using System.Collections.Generic;
 3 using System.Linq;
 4 using System.Text;
 5
 6 using Android.App;
 7 using Android.Content;
 8 using Android.OS;
 9 using Android.Runtime;
10 using Android.Views;
11 using Android.Widget;
12
13 namespace CN.Jpush.Android.Service {
14
15     [Service(Name = "cn.jpush.android.service.PushService", Enabled = true, Exported = false)]
16     [IntentFilter(new string[] {
17         "cn.jpush.android.intent.REGISTER",
18         "cn.jpush.android.intent.REPORT",
19         "cn.jpush.android.intent.PushService",
20         "cn.jpush.android.intent.PUSH_TIME"
21     })]
22     public partial class PushService {
23
24     }
25 }
以及:
 1 using System;
 2 using System.Collections.Generic;
 3 using System.Linq;
 4 using System.Text;
 5
 6 using Android.App;
 7 using Android.Content;
 8 using Android.OS;
 9 using Android.Runtime;
10 using Android.Views;
11 using Android.Widget;
12
13 namespace CN.Jpush.Android {
14     static class Defines {
15
16         public const string APP_ID = "notification.Droid";
17     }
18 }
这个 APP_ID 为 Android 项目的 Package name , 在 DaemonService , PushReceiver 和 PushActivity 中, 做为 IntentFilterAttribute 的 Category 出现.
而且不可缺少, 否则推送会失败....
这一点很蛋疼... 如果这样的话, 这个 Binding Library 就是不可复用的了!
查了一下, 都是说 AndroidManifest.xml 不可动态修改, 当前也没有找到如何动态注册 Receiver / Activity / Service 的方法。
然后在 Android项目下面添加一个 Application.cs 继承自 Android.App.Application:
 1 [assembly: Permission(Name = Notification.Droid.Application.JPUSH_MESSAGE_PERMISSION, ProtectionLevel = Protection.Signature)]
 2 [assembly: UsesPermission(Name = Notification.Droid.Application.JPUSH_MESSAGE_PERMISSION)]
 3 [assembly: UsesPermission(Name = Android.Manifest.Permission.Internet)]
 4 [assembly: UsesPermission(Name = Android.Manifest.Permission.WakeLock)]
 5 [assembly: UsesPermission(Name = Android.Manifest.Permission.Vibrate)]
 6 [assembly: UsesPermission(Name = Android.Manifest.Permission.ReadPhoneState)]
 7 [assembly: UsesPermission(Name = Android.Manifest.Permission.WriteExternalStorage)]
 8 [assembly: UsesPermission(Name = Android.Manifest.Permission.ReadExternalStorage)]
 9 [assembly: UsesPermission(Name = Android.Manifest.Permission.MountUnmountFilesystems)]
10 [assembly: UsesPermission(Name = Android.Manifest.Permission.AccessNetworkState)]
11 [assembly: UsesPermission(Name = "android.permission.RECEIVE_USER_PRESENT")]
12 [assembly: UsesPermission(Name = Android.Manifest.Permission.WriteSettings)]
13 namespace Notification.Droid {
14
15     [Application]
16     [MetaData("JPUSH_CHANNEL", Value = "developer-default")]
17     [MetaData("JPUSH_APPKEY", Value = "你的JPush APPKEY")]
18     public class Application : Android.App.Application {
19         //notification.Droid 即 Android 项目的 Package name
20         public const string JPUSH_MESSAGE_PERMISSION = "notification.Droid.permission.JPUSH_MESSAGE";
21
22
23         private SimpleContainer container;
24
25         public Application(IntPtr javaReference, JniHandleOwnership transfer)
26             : base(javaReference, transfer) {
27         }
做完这一步, 你可以把上面第6步中, 添加到 Proierties/AndroidManifest.xml 中的配置全删了.
编译, xxx\obj\Debug\android\AndroidManifest.xml 中就会自动添加刚刚被你删除的配置了.
只是, 少了一个:
<service
            android:name="cn.jpush.android.service.DownloadService"
            android:enabled="true"
            android:exported="false" >
        </service>
用反编译工具查看转制成的 dll , 在 CN.Jpush.Android.Service 下, 根本就没有 DownloadService 这个类.
这是为啥呢? 在仔细的看一下 Binding Library 的编译输出, 发现有如下问题:
BINDINGSGENERATOR : warning BG8102: Class CN.Jpush.Android.Service.DownloadService has unknown base type android.app.IntentService.
未知的基类: android.app.IntentService , 导致 DownloadService 没有转制成功. 具体是为什么, 不了解, 搜了一下:
One of the classes internal to the Android project had methods marked as public, so android.app.IntentService was trying to leak out.
解决方法也很简单: 用 Mono 的 IndentService 代替 android.app.intentService.
在 binding Library 项目下的 Transforms/Metadata.xml 中添加:
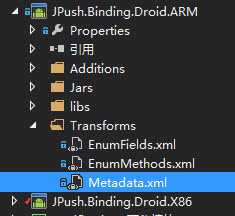
<attr path="/api/package[@name=‘cn.jpush.android.service‘]/class[@name=‘DownloadService‘ and @extends=‘android.app.IntentService‘]" name="extends">mono.android.app.IntentService</attr>
Metadata.xml 的具体用法请参见:
现在编译 Binding Library , 用反编译工具查看最终的 dll ,这个 DownloadService 就出现了.
然后编译 Android 项目, 那个 cn.jpush.android.service.DownService 也成功的出现在 AndroidManifest.xml 中了!
-------------------分隔线--------------------------
最后, 深入的集成 JPush, 在 Android 项目下添加类: Receiver
 1     [BroadcastReceiver(Enabled = true)]
 2     [IntentFilter(new string[] {
 3         "cn.jpush.android.intent.REGISTRATION",
 4         "cn.jpush.android.intent.UNREGISTRATION" ,
 5         "cn.jpush.android.intent.MESSAGE_RECEIVED",
 6         "cn.jpush.android.intent.NOTIFICATION_RECEIVED",
 7         "cn.jpush.android.intent.NOTIFICATION_OPENED",
 8         "cn.jpush.android.intent.ACTION_RICHPUSH_CALLBACK",
 9         "cn.jpush.android.intent.CONNECTION"
10     }, Categories = new string[] { "notification.Droid" })]
11     public class Receiver : PushReceiver {
12
13         public async override void OnReceive(Context ctx, Intent intent) {
14             base.OnReceive(ctx, intent);
15
16             var action = intent.Action;
17             System.Diagnostics.Debug.WriteLine(action);
18
19             var bundle = intent.Extras;
20             await ReceiverHandler.Handle(intent.Action, bundle);
21         }
22     }
Categories 中的 notification.Droid 还是 Package name
ReceiverHandler 是自定义的处理器,
具体可参考:
http://docs.jpush.io/client/android_api/
--------------------------------------
OK, 完
源码: https://github.com/gruan01/Xamarin-Example/tree/master/Notification
JPush (极光推送) For Xamarin.Android
标签:
原文地址:http://www.cnblogs.com/xling/p/JPush-for-Xamarin-Android.html
