标签:
使用MyEclipse创建Servlet时,根据默认的Servlet模板生成的Servlet代码如下:

 1 package gacl.servlet.study;
 2
 3 import java.io.IOException;
 4 import java.io.PrintWriter;
 5
 6 import javax.servlet.ServletException;
 7 import javax.servlet.http.HttpServlet;
 8 import javax.servlet.http.HttpServletRequest;
 9 import javax.servlet.http.HttpServletResponse;
10
11 public class ServletDefaultTemplateCode extends HttpServlet {
12
13     /**
14      * The doGet method of the servlet. <br>
15      *
16      * This method is called when a form has its tag value method equals to get.
17      *
18      * @param request the request send by the client to the server
19      * @param response the response send by the server to the client
20      * @throws ServletException if an error occurred
21      * @throws IOException if an error occurred
22      */
23     public void doGet(HttpServletRequest request, HttpServletResponse response)
24             throws ServletException, IOException {
25
26         response.setContentType("text/html");
27         PrintWriter out = response.getWriter();
28         out.println("<!DOCTYPE HTML PUBLIC \"-//W3C//DTD HTML 4.01 Transitional//EN\">");
29         out.println("<HTML>");
30         out.println("  <HEAD><TITLE>A Servlet</TITLE></HEAD>");
31         out.println("  <BODY>");
32         out.print("    This is ");
33         out.print(this.getClass());
34         out.println(", using the GET method");
35         out.println("  </BODY>");
36         out.println("</HTML>");
37         out.flush();
38         out.close();
39     }
40
41     /**
42      * The doPost method of the servlet. <br>
43      *
44      * This method is called when a form has its tag value method equals to post.
45      *
46      * @param request the request send by the client to the server
47      * @param response the response send by the server to the client
48      * @throws ServletException if an error occurred
49      * @throws IOException if an error occurred
50      */
51     public void doPost(HttpServletRequest request, HttpServletResponse response)
52             throws ServletException, IOException {
53
54         response.setContentType("text/html");
55         PrintWriter out = response.getWriter();
56         out.println("<!DOCTYPE HTML PUBLIC \"-//W3C//DTD HTML 4.01 Transitional//EN\">");
57         out.println("<HTML>");
58         out.println("  <HEAD><TITLE>A Servlet</TITLE></HEAD>");
59         out.println("  <BODY>");
60         out.print("    This is ");
61         out.print(this.getClass());
62         out.println(", using the POST method");
63         out.println("  </BODY>");
64         out.println("</HTML>");
65         out.flush();
66         out.close();
67     }
68
69 }
在实际开发中,这些生成的代码和注释一般我们都用不到的,每次都要手工删除这些注释和代码,很麻烦,因此可以根据开发的实际情况修改Servlet的模板代码,改成符合实际开发需求的模板代码。下面以MyEclipse 10为例进行说明如何修改Servlet的模板代码
具体步骤如下:找到MyEclipse安装目录下的\Common\plugins文件夹,比如:D:\MyEclipse10\Common\plugins,然后找到com.genuitec.eclipse.wizards_9.0.0.me201108091322.jar这个jar文件,为了方便查找com.genuitec.eclipse.wizards_9.0.0.me201108091322.jar这个jar文件,建议使用【SearchEverything】这样的文件查找工具,如下图所示:


用压缩工具打开,注意是打开不是解压这个jar包,如下图所示:


打开com.genuitec.eclipse.wizards_9.0.0.me201108091322.jar这个jar文件后,可以看到里面有一个templates文件夹,进入templates文件夹,可以看到里面有一个Servlet.java文件,如下图所示:

打开Servlet.java文件,可以看到里面的模板代码:
  1 #---------------------------------------------#
  2 # <aw:description>Template for Servlet</aw:description>
  3 # <aw:version>1.1</aw:version>
  4 # <aw:date>04/05/2003</aw:date>
  5 # <aw:author>Ferret Renaud</aw:author>
  6 #---------------------------------------------#
  7
  8 <aw:import>java.io.IOException</aw:import>
  9 <aw:import>java.io.PrintWriter</aw:import>
 10
 11 <aw:import>javax.servlet.ServletException</aw:import>
 12 <aw:import>javax.servlet.http.HttpServlet</aw:import>
 13 <aw:import>javax.servlet.http.HttpServletRequest</aw:import>
 14 <aw:import>javax.servlet.http.HttpServletResponse</aw:import>
 15
 16 <aw:parentClass>javax.servlet.http.HttpServlet</aw:parentClass>
 17
 18 <aw:constructor name="c1">
 19     /**
 20      * Constructor of the object.
 21      */
 22     public <aw:className/>() {
 23         super();
 24     }
 25
 26 </aw:constructor>
 27
 28 <aw:method name="doGet">
 29     /**
 30      * The doGet method of the servlet. <br>
 31      *
 32      * This method is called when a form has its tag value method equals to get.
 33      *
 34      * @param request the request send by the client to the server
 35      * @param response the response send by the server to the client
 36      * @throws ServletException if an error occurred
 37      * @throws IOException if an error occurred
 38      */
 39     public void doGet(HttpServletRequest request, HttpServletResponse response)
 40         throws ServletException, IOException {
 41
 42         response.setContentType("text/html");
 43         PrintWriter out = response.getWriter();
 44         out.println(
 45             "<!DOCTYPE HTML PUBLIC \"-//W3C//DTD HTML 4.01 Transitional//EN\">");
 46         out.println("<HTML>");
 47         out.println("  <HEAD><TITLE>A Servlet</TITLE></HEAD>");
 48         out.println("  <BODY>");
 49         out.print("    This is ");
 50         out.print(this.getClass());
 51         out.println(", using the GET method");
 52         out.println("  </BODY>");
 53         out.println("</HTML>");
 54         out.flush();
 55         out.close();
 56     }
 57
 58 </aw:method>
 59
 60 <aw:method name="doPost">
 61     /**
 62      * The doPost method of the servlet. <br>
 63      *
 64      * This method is called when a form has its tag value method equals to post.
 65      *
 66      * @param request the request send by the client to the server
 67      * @param response the response send by the server to the client
 68      * @throws ServletException if an error occurred
 69      * @throws IOException if an error occurred
 70      */
 71     public void doPost(HttpServletRequest request, HttpServletResponse response)
 72         throws ServletException, IOException {
 73
 74         response.setContentType("text/html");
 75         PrintWriter out = response.getWriter();
 76         out.println(
 77             "<!DOCTYPE HTML PUBLIC \"-//W3C//DTD HTML 4.01 Transitional//EN\">");
 78         out.println("<HTML>");
 79         out.println("  <HEAD><TITLE>A Servlet</TITLE></HEAD>");
 80         out.println("  <BODY>");
 81         out.print("    This is ");
 82         out.print(this.getClass());
 83         out.println(", using the POST method");
 84         out.println("  </BODY>");
 85         out.println("</HTML>");
 86         out.flush();
 87         out.close();
 88     }
 89
 90 </aw:method>
 91
 92 <aw:method name="doPut">
 93     /**
 94      * The doPut method of the servlet. <br>
 95      *
 96      * This method is called when a HTTP put request is received.
 97      *
 98      * @param request the request send by the client to the server
 99      * @param response the response send by the server to the client
100      * @throws ServletException if an error occurred
101      * @throws IOException if an error occurred
102      */
103     public void doPut(HttpServletRequest request, HttpServletResponse response)
104         throws ServletException, IOException {
105
106         // Put your code here
107     }
108
109 </aw:method>
110
111 <aw:method name="doDelete">
112     /**
113      * The doDelete method of the servlet. <br>
114      *
115      * This method is called when a HTTP delete request is received.
116      *
117      * @param request the request send by the client to the server
118      * @param response the response send by the server to the client
119      * @throws ServletException if an error occurred
120      * @throws IOException if an error occurred
121      */
122     public void doDelete(HttpServletRequest request, HttpServletResponse response)
123         throws ServletException, IOException {
124
125         // Put your code here
126     }
127
128 </aw:method>
129
130 <aw:method name="init">
131     /**
132      * Initialization of the servlet. <br>
133      *
134      * @throws ServletException if an error occurs
135      */
136     public void init() throws ServletException {
137         // Put your code here
138     }
139
140 </aw:method>
141
142 <aw:method name="destroy">
143     /**
144      * Destruction of the servlet. <br>
145      */
146     public void destroy() {
147         super.destroy(); // Just puts "destroy" string in log
148         // Put your code here
149     }
150
151 </aw:method>
152
153 <aw:method name="getServletInfo">
154     /**
155      * Returns information about the servlet, such as
156      * author, version, and copyright.
157      *
158      * @return String information about this servlet
159      */
160     public String getServletInfo() {
161         return "This is my default servlet created by Eclipse";
162     }
163
164 </aw:method>
修改该模板,根据自己的实际情况进行修改,比如

删除doGet和doPost里面的代码和方法注释,在doPost方法里面调用doGet,这是根据实际情况修改成的模板代码,修改好之后,保存,重启MyEclipse,使用MyEclipse创建Servlet,此时就是用刚才修改过的模板进行生成了,生成的代码如下:
 1 package gacl.servlet.study;
 2
 3 import java.io.IOException;
 4
 5 import javax.servlet.ServletException;
 6 import javax.servlet.http.HttpServlet;
 7 import javax.servlet.http.HttpServletRequest;
 8 import javax.servlet.http.HttpServletResponse;
 9
10 public class ServletNewTemplateCode extends HttpServlet {
11
12     public void doGet(HttpServletRequest request, HttpServletResponse response)
13             throws ServletException, IOException {
14
15     }
16
17     public void doPost(HttpServletRequest request, HttpServletResponse response)
18             throws ServletException, IOException {
19         doGet(request, response);
20     }
21
22 }
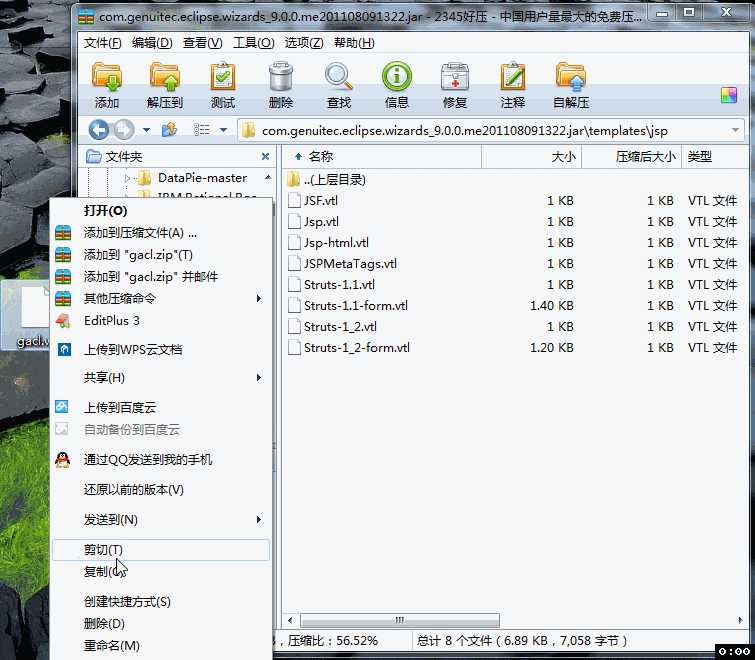
同样也是找到com.genuitec.eclipse.wizards_9.0.0.me201108091322.jar这个jar文件,用压缩工具打开,进入templates\jsp文件夹,可以看到MyEclipse自带的那些jsp模板,如下图所示:

这些jsp模板是MyEclipse自带的,我们也可以依样画葫芦,根据平时项目开发中的实际情况,创建一个jsp模板,然后添加到jsp目录中,操作步骤如下:
1、随便复制一个jsp模板出来(如:Jsp.vtl),复制到系统的桌面或者系统的其他盘进行存储

2、修改复制出来的模板,使用记事本或者editplus打开Jsp.vtl,可以看到Jsp.vtl的模板代码,如下所示:
 1 #*---------------------------------------------#
 2 # Template for a JSP
 3 # @version: 1.2
 4 # @author: Ferret Renaud
 5 # @author: Jed Anderson
 6 #---------------------------------------------#
 7 *#<%@ page language="java" import="java.util.*" pageEncoding="$encoding"%>
 8 <%
 9 String path = request.getContextPath();
10 String basePath = request.getScheme()+"://"+request.getServerName()+":"+request.getServerPort()+path+"/";
11 %>
12
13 <!DOCTYPE HTML PUBLIC "-//W3C//DTD HTML 4.01 Transitional//EN">
14 <html>
15   <head>
16     <base href="<%=basePath%>">
17
18     <title>My JSP ‘$title‘ starting page</title>
19
20     #parse( "templates/jsp/JSPMetaTags.vtl" )
21   </head>
22
23   <body>
24     This is my JSP page. <br>
25   </body>
26 </html>
这是Jsp.vtl的模板原始代码,这个模板的代码对于我来说不太符合项目开发中的实际情况,需要修改,修改后的模板如下:
 1 #*---------------------------------------------#
 2 # Template for a JSP
 3 # @version: 1.2
 4 # @author: 孤傲苍狼
 5 #---------------------------------------------#
 6 *#<%@ page language="java" pageEncoding="UTF-8"%>
 7 <!DOCTYPE HTML>
 8 <html>
 9   <head>
10     <title></title>
11   </head>
12
13   <body>
14
15   </body>
16 </html>
为了避免覆盖原来的Jsp.vtl模板,将修改后的Jsp.vtl模板重命名,例如重命名成gacl.vtl。
3.将gacl.vtl模板复制,然后粘贴到com.genuitec.eclipse.wizards_9.0.0.me201108091322.jar包里面的templates\jsp文件夹里。
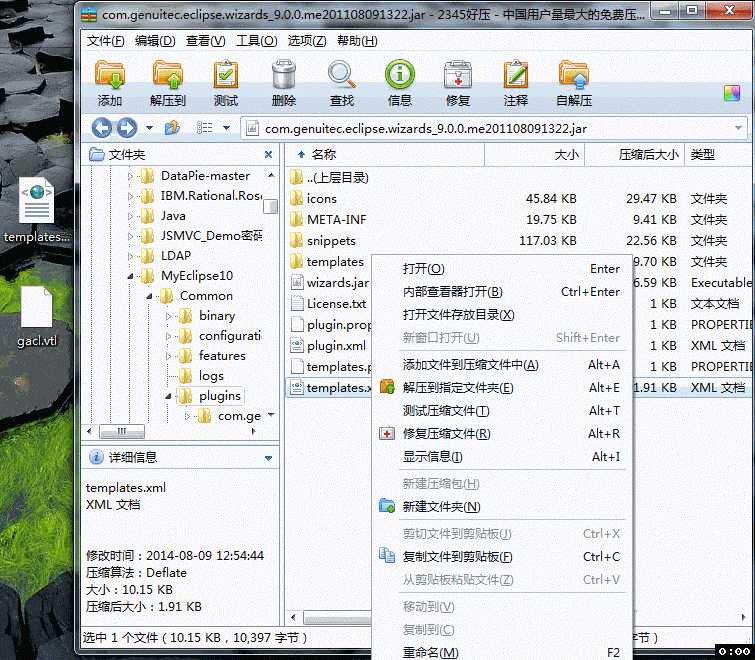
4、从查看解压文件的界面中,返回到根目录(即com.genuitec.eclipse.wizards_9.0.0.me201108091322.jar目录),找到模版配置文件templates.xml,如下图所示:

同样,将templates.xml文件复制到桌面,使用记事本或者editplus打开进行修改。
修改如下:在<templateLibrary>里添加如下元素:
1 <template
2         context="com.genuitec.eclipse.wizards.jsp"
3         script="templates/jsp/gacl.vtl"
4         name="gacl-JSP template"/>
其中:
1、templates/jsp/gacl.vtl:为新添加的jsp模板的相对路径。
2、gacl-JSP template:为MyEclipse中所要标识的模版名称,MyEclipse新建JSP文件时通过这个名字来选择对应的模版。
3、context="com.genuitec.eclipse.wizards.jsp" 这个一定要存在,并且跟其他jsp模板的设置一样,复制就可以。
templates.xml修改后的内容如下图所示:

5、修改完成后,将com.genuitec.eclipse.wizards_9.0.0.me201108091322.jar包中的templates.xml文件删除掉,然后将修改过后的templates.xml复制,粘贴到com.genuitec.eclipse.wizards_9.0.0.me201108091322.jar包中,如下图所示:
到此,我们的Jsp模板就算是创建好了。
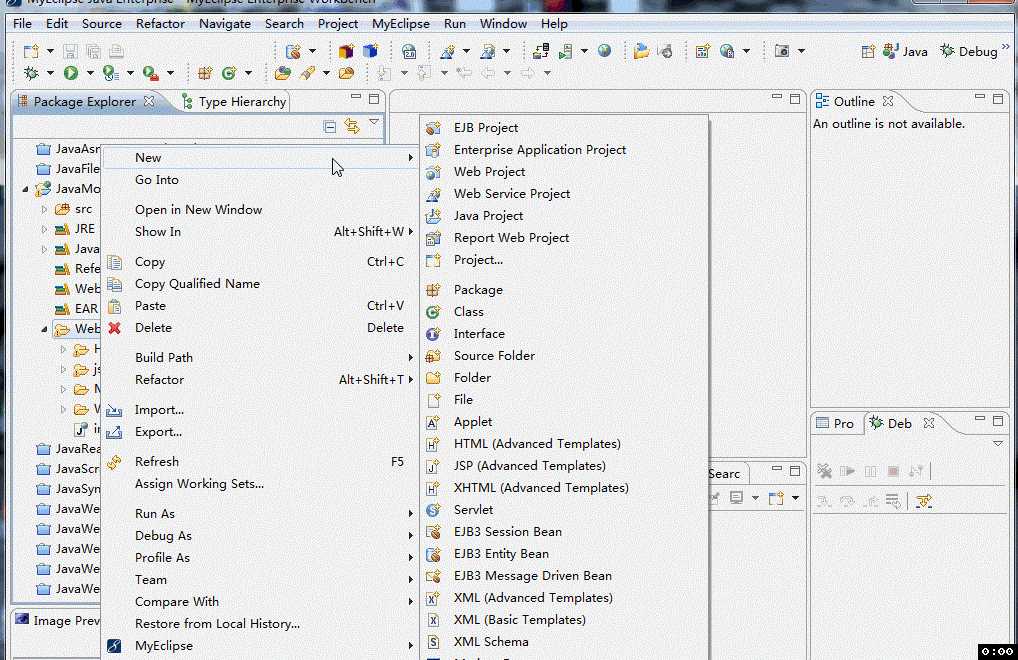
6.启动MyEclipse,然后新创建一个Jsp页面,此时就可以使用我们自定义的那个Jsp页面模板了,如下图所示:
通过以上两种方式,我们在开发的时候,就可以根据我们自己的开发习惯来定制servlet和jsp的模板了,对于开发效率上或多或少有一点提高吧,不用每次都把MyEclipse生成的很多用不到的代码删掉。
标签:
原文地址:http://www.cnblogs.com/weiqinshian/p/5001873.html