标签:
参考文章:http://www.runoob.com/css/css-intro.html
id和class:

<!DOCTYPE html>  <!--CSS 规则由两个主要的部分构成:选择器,以及一条或多条声明-->
<html>
<head>
<style>
#para1{           <!--HTML元素以id属性来设置id选择器,CSS 中 id 选择器以 "#" 来定义-->
color:red;
font-familly:arial;
}
.center{              <!--class 选择器在HTML中以class属性表示, 在 CSS 中,类选择器以一个点"."号显示-->
text-align:center;
}
</style>
</head>
<body>
<h1 class="center">hello world</h1>
<p class="center">this is a paragraph</p>
</body>
</html>
背景:

<!DOCTYPE html>
<html>
<head>
<style>
body
{
background-image: url(image/1.jpg);
background-repeat:no-repeat;
background-position:right top;
}
<!--
body{
background:#ffffff url(image/0.jpg) no-repeat right top;
}
当使用简写属性时,属性值得顺序为::
background-color
background-image
background-repeat
background-attachment
background-position
以上属性无需全部使用,你可以按照页面的实际需要使用.
-->
</style>
</head>
<body>
<p>whats</p>

</body>
</html>
text文本:

<!DOCTYPE html>
<html>
<head>
<meta charset="utf-8">
<style>
p.main
{
text-align:justify;
text-indent:50px;
}
a{text-decoration:none;}
p.uppercase{text-transform:uppercase;}
p.lowercase{text-transform:lowercase;}
#capitalize{text-transform:capitalize;}
</style>
</head>
<body>
<h1 style="text-decoration:overline;">whats</h1>
<h2 style="text-decoration:line-through;">whats</h2>
<h3 style="text-decoration:underline;">whats</h3>
<p class="main">“当我年轻的时候,我梦想改变这个世界;当我成熟以后,我发现我不能够改变这个世界,我将目光缩短了些,决定只改变我的国家;当我进入暮年以后,我发现我不能够改变我们的国家,我的最后愿望仅仅是改变一下我的家庭,但是,这也不可能。当我现在躺在床上,行将就木时,我突然意识到:如果一开始我仅仅去改变我自己,然后,我可能改变我的家庭;在家人的帮助和鼓励下,我可能为国家做一些事情;然后,谁知道呢?我甚至可能改变这个世界。”</p>
<p>link to: <a href="www.cnblogs.com">cnblogs</a></p>
<p class="uppercase">This is some text.</p>
<p class="lowercase">This is some text.</p>
<p id="capitalize">This is some text.</p>
</body>
</html>
font字体:

<!--font-family 属性设置文本的字体系列。
font-family 属性应该设置几个字体名称作为一种"后备"机制,如果浏览器不支持第一种字体,他将尝试下一种字体。
注意: 如果字体系列的名称超过一个字,它必须用引号,如Font Family:"宋体"。
多个字体系列是用一个逗号分隔指明-->
<!DOCTYPE html>
<html>
<head>
<style>
p.test1{font-family:"Times New Roman",Times,serif;font-weight:bold;}
p.test2{font-family:Arial,Helvetica,sans-serif;font-weight:800;}
p.normal{font-style:normal;font-size:40px;font-variant:small-caps;}     <!--正常-->
p.italic{font-style:italic;font-size:2.5em;}      <!--斜体-->
p.oblique{font:oblique bold 12px/30px Georgia,serif;}     <!--倾斜的文字,文字向一边倾斜(和斜体非常类似,但不太支持-->
</style>
</head>

<body>
<p class="test1">This is some text.</p>
<p class="test2">there are some flowers.</p>
<p class="normal">the first font-family</p>
<p class="italic">the second font-family</p>
<p class="oblique">the third font-family</p>
</body>
</html>
link链接:

<!--链接的样式,可以用任何CSS属性(如颜色,字体,背景等)。
特别的链接,可以有不同的样式,这取决于他们是什么状态。
这四个链接状态是:
a:link - 正常,未访问过的链接
a:visited - 用户已访问过的链接
a:hover - 当用户鼠标放在链接上时
a:active - 链接被点击的那一刻
当设置为若干链路状态的样式,也有一些顺序规则:
a:hover 必须跟在 a:link 和 a:visited后面
a:active 必须跟在 a:hover后面-->

<!DOCTYPE html>
<html>
<head>
<style>
a.one:link{color:#ff0000;text-decoration:none;background-color:#b2ff99;}
a.one:visited{color:#00ff00;text-decoration:none;background-color:#ffff85}
a.one:hover{color:#ff00ff;text-decoration:underline;background-color:#ff704d;font-size:150%;}
a.one:active{color:#0000ff;text-decoration:underline;background-color:#ff704d;}

a.two:link{color:#00ff00;background-color:b2ff99;text-decoration:none;}
a.two:visited{color:0000ff;text-decoration:none;}
a.two:hover{background-color:#66ff66;font-family:monospace;}
</style>
</head>
<body>
<p><a class="one" href="http://www.runoob.com/css" target="_blank">this is a link</a></p>
<p><a class="two" href="www.cnblogs.com" target="_blank">cnblogs</a></p>
</body>
</html>
列表:

<!--list-style    简写属性。用于把所有用于列表的属性设置于一个声明中
list-style-image    将图象设置为列表项标志。
list-style-position    设置列表中列表项标志的位置。
list-style-type    设置列表项标志的类型。-->
<!DOCTYPE html>
<html>
<head>
<style>
ul.a{list-style-type:circle;}
ol.b{list-style-type:upper-roman;}
</style>
</head>
<body>
<ul class="a">
<li>apple</li>
<li>banana</li>
<li>orange</li>
</ul>
<ol class="b">
<li>milk</li>
<li>coffee</li>
<li>tea</li>
</ol>
</body>
</html>
表格:

<!--list-style    简写属性。用于把所有用于列表的属性设置于一个声明中
list-style-image    将图象设置为列表项标志。
list-style-position    设置列表中列表项标志的位置。
list-style-type    设置列表项标志的类型。-->
<!DOCTYPE html>
<html>
<head>
<style>
table{border-collapse:collapse;}
table,th,td{border:1px solid green;}
table{width:100%;}
th{height:50px;background-color:green;color:white;vertical-align:bottom;}
td{text-align:left;height:50px;vertical-align:bottom;padding:5px;}
</style>
</head>
<body>
<table>
<tr>
<th>name</th>
<th>age</th>
</tr>
<tr>
<td>whats</td>
<td>lily</td>
</tr>
<tr>
<td>23</td>
<td>19</td>
</tr>
</table>
</body>
</html>
框模型:


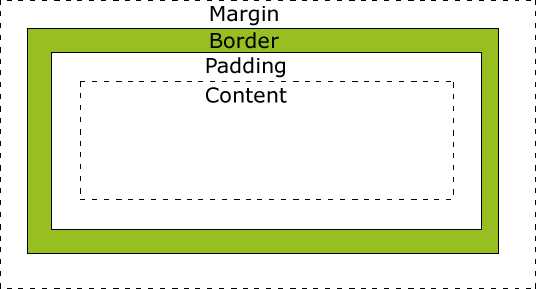
<!--所有HTML元素可以看作盒子,在CSS中,"box model"这一术语是用来设计和布局时使用。
CSS盒模型本质上是一个盒子,封装周围的HTML元素,它包括:边距,边框,填充,和实际内容。
盒模型允许我们在其它元素和周围元素边框之间的空间放置元素。
Margin - 清除边框区域。Margin没有背景颜色,它是完全透明
Border - 边框周围的填充和内容。边框是受到盒子的背景颜色影响
Padding - 清除内容周围的区域。会受到框中填充的背景颜色影响
Content - 盒子的内容,显示文本和图像
最终元素的总宽度计算公式是这样的:
总元素的宽度=宽度+左填充+右填充+左边框+右边框+左边距+右边距
元素的总高度最终计算公式是这样的:
总元素的高度=高度+顶部填充+底部填充+上边框+下边框+上边距+下边距-->
<!DOCTYPE html>
<html>
<head>
<style>
div.ex{width:200px;padding:5px;border:5px solid gray;margin:0px;}
</style>
</head>
<body>
<img src="image/0.jpg" width="220" height="123">
<div class="ex">The picture above is 220px wide.
The total width of this element is also 220px</div>
</body>
</html>
边框:

<!DOCTYPE html>
<html>
<head>
<style>
p.none{border-style:none;}
p.dotted{border-style:dotted;}
p.dashed{border-style:dashed;}
p.solid{border-style:solid;}
p.double{border-style:double;}
p.groove{border-style:groove;border-width:10px;border-color:green blue;}
p.ridge{border-style:ridge;border-width:10px;border-color:green yellow;}
p.inset{border-style:inset;border-width:10px;border-color:grey green;}
p.outset{border-style:outset;border-width:10px;border-color:pink green;}
p.hidden{border-style:hidden;}
p.four{
border-top-style:dotted;
border-right-style:solid;
border-bottom-style:double;
border-left-style:dashed;
border-color:#ff0000 #00ff00 #0000ff rgb(255,0,255);
}
p.two{
border-style:dotted solid;
}
p.one{border:10px solid grey;}
</style>
</head>
<body>
<body>
<p class="none">No border.</p>
<p class="dotted">A dotted border.</p>
<p class="dashed">A dashed border.</p>
<p class="solid">A solid border.</p>
<p class="double">A double border.</p>
<p class="groove">A groove border.</p>
<p class="ridge">A ridge border.</p>
<p class="inset">An inset border.</p>
<p class="outset">An outset border.</p>
<p class="hidden">A hidden border.</p>
<p class="four">four side.</p>
<p class="two">two side.</p>
<p class="one">one method.</p>
</body>
</html>
轮廓:

<!--轮廓(outline)是绘制于元素周围的一条线,位于边框边缘的外围,可起到突出元素的作用。
轮廓(outline)属性指定了样式,颜色和外边框的宽度。-->
<!DOCTYPE html>
<html>
<head>
<style>
p{
border:2px solid pink;
outline:green dotted 8px;
}

</style>
</head>
<body>
<p><b>note:</b>whats is a handsome boy!whats is a handsome boy!whats is a handsome boy!It‘s important things to said three times.</p>
</body>
</html>
margin:

<!--margin清除周围的元素(外边框)的区域。margin没有背景颜色,是完全透明的
margin可以单独改变元素的上,下,左,右边距。也可以一次改变所有的属性。-->
<!DOCTYPE html>
<html>
<head>
<style>
p{background-color:yellow;}
p.margin{
margin-top:100px;
margin-bottom:100px;
margin-right:50px;
margin-left:50px;
}
</style>
</head>
<body>
<p>this is a paragraph with no specified margins.</p>
<p class="margin">this is a paragraph with specified margins.</p>

</body>
</html>
padding填充:

<!--CSS Padding(填充)属性定义元素边框与元素内容之间的空间-->
<!DOCTYPE html>
<html>
<head>
<style>
p{
background-color:pink;
}
p.padding{
padding-top:25px;
padding-bottom:25px;
padding-left:50px;
padding-right:50px;

}

</style>
</head>
<body>
<p class="padding"><b>note:</b>whats is a handsome boy!whats is a handsome boy!whats is a handsome boy!It‘s important things to said three times.</p>
</body>
</html>
分组和嵌套:

<!---->
<!DOCTYPE html>
<html>
<head>
<style>
h1,h2,p{
color:green;
}
p{text-align:center;}
.marked{background-color:pink;}
.marked{color:white;}
</style>
</head>
<body>
<h1>whats</h1>
<h2>whats</h2>
<p class="marked"><b>note:</b>whats is a handsome boy!whats is a handsome boy!whats is a handsome boy!It‘s important things to said three times.</p>
</body>
</html>
尺寸:

<!---->
<!DOCTYPE html>
<html>
<head>
<style>

img.normal{height:130px;}
p.ex{max-heith:50px;background-color:pink;}
</style>
</head>
<body>
<h1 class="h">whats</h1>
<img class="normal" src="image/0.jpg" width="220" height="123"><br>
<p class="ex"><b>note:</b>whats is a handsome boy!whats is a handsome boy!whats is a handsome boy!It‘s important things to said three times.</p>
</body>
</html>
display显示:

<!--隐藏一个元素可以通过把display属性设置为"none",或把visibility属性设置为"hidden"。但是请注意,这两种方法会产生不同的结果。
visibility:hidden可以隐藏某个元素,但隐藏的元素仍需占用与未隐藏之前一样的空间。也就是说,该元素虽然被隐藏了,但仍然会影响布局。
display:none可以隐藏某个元素,且隐藏的元素不会占用任何空间。也就是说,该元素不但被隐藏了,而且该元素原本占用的空间也会从页面布局中消失。-->
<!DOCTYPE html>
<html>
<head>
<style>
h1.display{display:none;}
img.hidden{visibility:hidden;}
li{display:inline;}
span{display:block;}
</style>
</head>
<body>
<h1 class="display">whats</h1>
<img class="hidden" src="image/0.jpg" width="220" height="123"><br>
<img class="none" src="image/1.jpg" width="220" height="123"><br>
<img class="hidden" src="image/2.jpg" width="220" height="123"><br>
<ul>
<li>milk</li>
<li>coffee</li>
<li>tea</li>
</ul>
<h2>Nirvana</h2>
<span>Record: MTV Unplugged in New York</span>
<span>Year: 1993</span>
<h2>Radiohead</h2>
<span>Record: OK Computer</span>
<span>Year: </span>
<span>2015</span>
</body>
</html>
positioning定位:

<!---->
<!DOCTYPE html>
<html>
<head>
<style>

p.fixed{
position:fixed;
top:30px;
right:5px;
}
img{
position:absolute;
left:0px;
top:0px;
z-index:-1;
}
p.absolute{
position:absolute;
left:100px;
top:150px;
}
p.relative{
position:relative;
left:50px;
}
img.one{
position:absolute;
left:200px;
top:300px;
clip:rect(0px,100px,200px,0px);
}
p.two{
position:absolute;
left:330px;
top:300px;
width:100px;
height:100px;
overflow:scroll;
}
p.three{
position:absolute;
left:400px;
top:400px;
width:100px;
height:100px;
overflow:auto;
}
</style>
</head>
<body>
<p class="fixed" style="cursor:pointer" >some more text.</p>
<img src="image/2.jpg" height="123" width="220">
<p class="absolute">whats is a handsome boy!whats is a handsome boy!whats is a handsome boy!</p>
<p class="relative">whats is a handsome boy!whats is a handsome boy!whats is a handsome boy!</p>
<img class="one" src="image/3.jpg" height="150" width="220" >
<p class="two">whats is a handsome boy!whats is a handsome boy!whats is a handsome boy!</p>
<p class="three">whats is a handsome boy!whats is a handsome boy!whats is a handsome boy!</p>
<p>some text</p><p>some text</p><p>some text</p><p>some text</p><p>some text</p><p>some text</p><p>some text</p><p>some text</p><p>some text</p><p>some text</p><p>some text</p><p>some text</p><p>some text</p><p>some text</p><p>some text</p><p>some text</p><p>some text</p><p>some text</p><p>some text</p><p>some text</p>
</body>
</html>
float:

<!--CSS 的 Float(浮动),会使元素向左或向右移动,其周围的元素也会重新排列。
Float(浮动),往往是用于图像,但它在布局时一样非常有用-->
<!DOCTYPE html>
<html>
<head>
<style>
span{
float:left;
width:0.7em;
font-family:algerian,courier;
line-height:80%‘

}
img{float:left;
width:150px;
height:200px;
border:1px solid pink;
margin:5px;
}
.text_line{
clear:both;

}
</style>
</head>
<body>
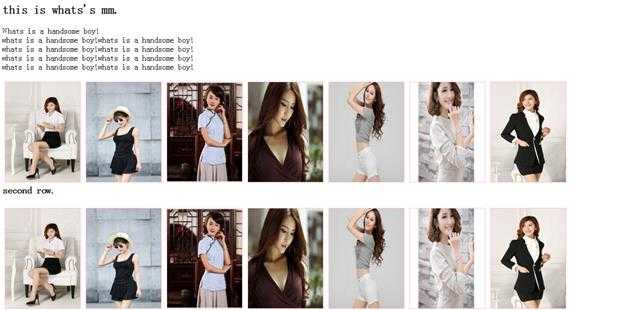
<h2>this is whats‘s mm.</h2>
<p><span>W</span>hats is a handsome boy!<br>
whats is a handsome boy!whats is a handsome boy!<br>
whats is a handsome boy!whats is a handsome boy!<br>
whats is a handsome boy!whats is a handsome boy!<br>
whats is a handsome boy!whats is a handsome boy!
</p>
<img src="image/1.jpg" width="350" height="500">
<img src="image/2.jpg" width="350" height="500">
<img src="image/3.jpg" width="350" height="500">
<img src="image/4.jpg" width="350" height="500">
<img src="image/5.jpg" width="350" height="500">
<img src="image/6.jpg" width="350" height="500">
<img src="image/7.jpg" width="350" height="500">
<h3 class="text_line">second row.</h3>
<img src="image/1.jpg" width="350" height="500">
<img src="image/2.jpg" width="350" height="500">
<img src="image/3.jpg" width="350" height="500">
<img src="image/4.jpg" width="350" height="500">
<img src="image/5.jpg" width="350" height="500">
<img src="image/6.jpg" width="350" height="500">
<img src="image/7.jpg" width="350" height="500">
</body>
</html>


<!DOCTYPE html>
<html>
<head>
<style>
div.container
{
width:100%;
margin:0px;
border:1px solid gray;
line-height:150%;
}
div.header,div.footer
{
padding:0.5em;
color:white;
background-color:gray;
clear:left;
}
h1.header
{
padding:0;
margin:0;
}
div.left
{
float:left;
width:160px;
margin:0;
padding:1em;
}
div.content
{
margin-left:190px;
border-left:1px solid gray;
padding:1em;
}
</style>
</head>

<body>
<div class="container">
<div class="header"><h1 class="header">this is header.</h1></div>
<div class="left"><p>menu:</p></div>
<div class="content"><p><b>note:</b>whats is a handsome boy!</p></div>
<div class="footer">copyright by whats 2015-11-26.</div>
</div>

</body>
</html>
align对齐:

<!DOCTYPE html>
<html>
<head>
<style>
.center
{
margin:auto;
width:80%;
background-color:pink;
}
#position{
position:absolute;
right:0px;
width:600px;
border:1px solid blue;
background-color:gray;
}
.float{
float:left;
width:300px;
background-color:gray;
}
</style>
</head>

<body>
<div class="center">
<p>In my younger and more vulnerable years my father gave me some advice that I‘ve been turning over in my mind ever since.</p>
<p>‘Whenever you feel like criticizing anyone,‘ he told me, ‘just remember that all the people in this world haven‘t had the advantages that you‘ve had.‘</p>
</div>
<p id="position"><b>Note: </b>Using margin:auto will not work in IE8, unless a !DOCTYPE is declared.</p>
<p class="float"><b>Note: </b>Using margin:auto will not work in IE8, unless a !DOCTYPE is declared.</p>
</body>
</html>
组合选择符:

<!--在 CSS3 中包含了四种组合方式:
后代选取器(以空格分隔)
子元素选择器(以大于号分隔)
相邻兄弟选择器(以加号分隔)
普通兄弟选择器(以破折号分隔)-->

<!DOCTYPE html>
<html>
<head>
<style>
div.one p
{                       <!--后代选取器匹配所有值得元素的后代元素。-->
background-color:pink;
}
div.two>p{
background-color:gray;
}
div.two+p{
background-color:green;
}
div.three~p{
background-color:yellow;
}
</style>
</head>

<body>
<div class="one">
<p>paragraph1.</p>
<p>paragraph2.</p>
</div>
<div class="two">
<p>paragraph3.</p>
<p>paragraph4.</p>
</div>
<p>paragraph5.</p>
<p>paragraph6.</p>
<div class="three">
<p>paragraph7.</p>
</div>
<p>paragraph8.</p>
<p>paragraph9.</p>
<p>paragraph10.</p>
<p>paragraph11.</p>
</body>
</html>
伪类:

<!--CSS伪类是用来添加一些选择器的特殊效果。-->
<!DOCTYPE html>
<html>
<head>
<style>
input:focus{background-color:yellow;}
p>i:first-child{color:pink;}
p:first-child{color:blue;}
q:lang(no) {quotes:"~""~";}
a:link{color:#00ff00;}
a:visited{color:#ff0000;}
a:hover{color:#ff00ff;}
a:active{color:#0000ff;}
</style>
</head>

<body>
<form>
name:<input type="text" name="username"/><br>
password:<input type="text" name="pwd"/><br>
<input type="button" value="submit"/>
</form>
<p>this is <i>some</i> text.this is <i>some</i> text.</p>
<p>this is <i>some</i> text.this is <i>some</i> text.</p>
<p>this is some <q lang="no">text.this is</q> some text.</p>
<p><a class="red" href="www.cnblogs.com" target="_blank">cnblogs</a></p>
</body>
</html>
伪元素:

<!--CSS伪元素是用来添加一些选择器的特殊效果。-->
<!DOCTYPE html>
<html>
<head>
<style>
h1:before{content:url(image/1.jpg);}
h1:after{content:url(image/2.jpg);}
p.article:first-letter{color:blue;}
p:first-letter{color:red;font-size:xx-large;}
p:first-line{color:pink;font-variant:small-caps;}
</style>
</head>

<body>
<h1>aha,amazing</h1>
<p class="article">this is some text.this is some text.<br>
this is some text.this is some text.</p>
<p>this is some text.this is some text.</p>

<p><a class="red" href="www.cnblogs.com" target="_blank">cnblogs</a></p>
</body>
</html>
导航栏:

<!DOCTYPE html>
<html>
<head>
<style>
ul{
list-style-tyle:none;  <!--list-style-type:none - 移除列表前小标志。一个导航栏并不需要列表标记-->
margin:0;
padding:0;
}
a:link,a:visited{
display:block;
font-weight:bold;
color:#ffffff;
background-color:#98bf21;
width:120px;
text-align:center;
padding:4px;
text-decoration:none;
text-transform:uppercase;
}
a:hover,a:active{
background-color:#7a991a;
}
</style>
</head>
<body>
<ul>

<li><a href="http://www.cnblogs.com">home</a></li>
<li><a href="http://www.cnblogs.com">news</a></li>
<li><a href="http://www.cnblogs.com">contact</a></li>
<li><a href="http://www.cnblogs.com">about</a></li>
</ul>
</body>
</html>

<!DOCTYPE html>
<html>
<head>
<style>
ul{
list-style-type:none;
margin:0;
padding:0;
overflow:hidden;
}
li{
float:left;
}

a:link,a:visited{
display:block;
width:120px;
font-weight:bold;
color:#ffffff;
background-color:#98bf21;
text-align:center;
padding:4px;
text-decoration:none;
text-transform:uppercase;
}
a:hover,a:active{
background-color:#7a991a;
}
</style>
</head>
<body>
<ul>
<li><a href="http://www.cnblogs.com">home</a></li>
<li><a href="http://www.cnblogs.com">news</a></li>
<li><a href="http://www.cnblogs.com">contact</a></li>
<li><a href="http://www.cnblogs.com">about</a></li>
</ul>
</body>
</html>
<!--float:left - 使用浮动块元素的幻灯片彼此相邻
display:block - 显示块元素的链接,让整体变为可点击链接区域(不只是文本),它允许我们指定宽度
width:60px - 块元素默认情况下是最大宽度。我们要指定一个60像素的宽度-->
图像透明/不透明:

<!--CSS3中属性的透明度是 opacity.-->
<!DOCTYPE html>
<html>
<head>
<style>
img{
opacity:0.4;
filter:alpha(opacity=40);
}
img:hover{
opacity:1.0;
filter:alpha(opacity=100);
}
</style>
</head>
<body>
<img src="image/1.jpg" width="120" height="200">
<img src="image/2.jpg" width="120" height="200">
</body>
</html>


<!--CSS3中属性的透明度是 opacity.-->
<!DOCTYPE html>
<html>
<head>
<style>
div.one{
width:500px;
height:250px;
background:url(image/3.jpg) repeat;
border:2px solid black;
}
div.two{
width:400px;
height:200px;
margin:30px 50px;
background-color:#ffffff;
border:1px solid black;
opacity:0.6;
filter:alpha(opacity=60);
}
div.two p{
margin:30px 40px
font-weight:bold;
color:#000000;
}
</style>
</head>
<body>
<div class="one">
<div class="two">
<p>whats is a handsome boy!whats is a handsome boy!whats is a handsome boy!
It is important thing to said three times.</p>
</div>
</div>
</body>
</html>
标签:
原文地址:http://www.cnblogs.com/whats/p/4990838.html