标签:
<?xml version="1.0" encoding="utf-8"?>
<resources>

    <declare-styleable name="myView">
        <attr name="TextColor" format="color"/>
    </declare-styleable>

</resources>
2.在自定义view类中实现其构造函数(用于初始获得view的属性配置)和复写onDraw和onTouchEvent。
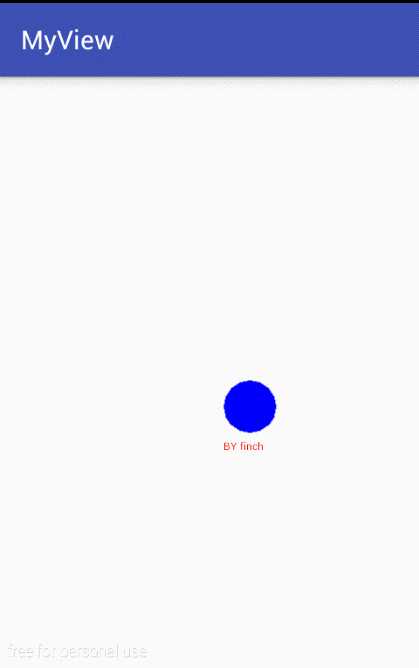
public class myView extends View{
    //定义画笔和初始位置
    Paint p = new Paint();
    public float currentX = 50;
    public float currentY = 50;
    public int textColor;

    public myView(Context context, AttributeSet attrs) {
        super(context, attrs);
        //获取资源文件里面的属性,由于这里只有一个属性值,不用遍历数组,直接通过R文件拿出color值
        //把属性放在资源文件里,方便设置和复用
        TypedArray array = context.obtainStyledAttributes(attrs,R.styleable.myView);
        textColor = array.getColor(R.styleable.myView_TextColor,Color.BLACK);
        array.recycle();
    }

    @Override
    protected void onDraw(Canvas canvas) {
        super.onDraw(canvas);
        //画一个蓝色的圆形
        p.setColor(Color.BLUE);
        canvas.drawCircle(currentX,currentY,30,p);
        //设置文字和颜色,这里的颜色是资源文件values里面的值
        p.setColor(textColor);
        canvas.drawText("BY finch",currentX-30,currentY+50,p);
    }

    @Override
    public boolean onTouchEvent(MotionEvent event) {

        currentX = event.getX();
        currentY = event.getY();
        invalidate();//重新绘制图形
        return true;

    }
}
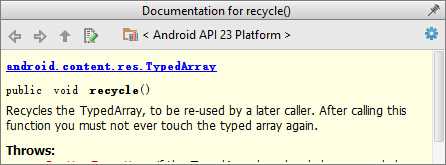
这里思路很简单,通过不断的更新当前位置坐标和重新绘制图形实现效果,要注意的是使用TypedArray后一定要记得recycle(),否则会对下次调用产生影响。
除非你不会再用TypedArray.
3.我们把myView放在activity_main.xml里面,当然也可以在代码中通过addview函数加到布局中。
<?xml version="1.0" encoding="utf-8"?>
<RelativeLayout xmlns:android="http://schemas.android.com/apk/res/android"
    xmlns:tools="http://schemas.android.com/tools"
    android:layout_width="match_parent"
    android:layout_height="match_parent"
    xmlns:myview="http://schemas.android.com/apk/res-auto"
    android:paddingBottom="@dimen/activity_vertical_margin"
    android:paddingLeft="@dimen/activity_horizontal_margin"
    android:paddingRight="@dimen/activity_horizontal_margin"
    android:paddingTop="@dimen/activity_vertical_margin"
    tools:context="finch.scu.cn.myview.MainActivity">

    <finch.scu.cn.myview.myView
        android:layout_width="match_parent"
        android:layout_height="match_parent"
        myview:TextColor="#ff0000"
        />
</RelativeLayout>
这里 xmlns:自定义控件的前缀="http://schemas.android.com/apk/res/包名(或res-auto)" , 前缀:TextColor="#ff0000"。如果不申明命名空间属性就会

最后是MainActivity
public class MainActivity extends AppCompatActivity {

    @Override
    protected void onCreate(Bundle savedInstanceState) {
        super.onCreate(savedInstanceState);
        setContentView(R.layout.activity_main);
    }
}
标签:
原文地址:http://www.cnblogs.com/amazing7/p/5007974.html