标签:
1.融云即时通讯iOS SDK下载地址 http://rongcloud.cn/downloads 选择iOS SDK下载
2.进行应用开发之前,需要先在融云开发者平台创建应用,如果您已经注册了融云开发者帐号,请前往 融云开发者平台 创建应用;如果您还没有注册融云开发者帐号,请前往 融云官方网站 首先注册开发者帐号,注册后创建应用。注册地址 https://developer.rongcloud.cn/signup
3.登陆融云开发者平台 https://developer.rongcloud.cn/signin 创建应用
4.进入后台之后点击创建应用,进入这样一个创建界面
图1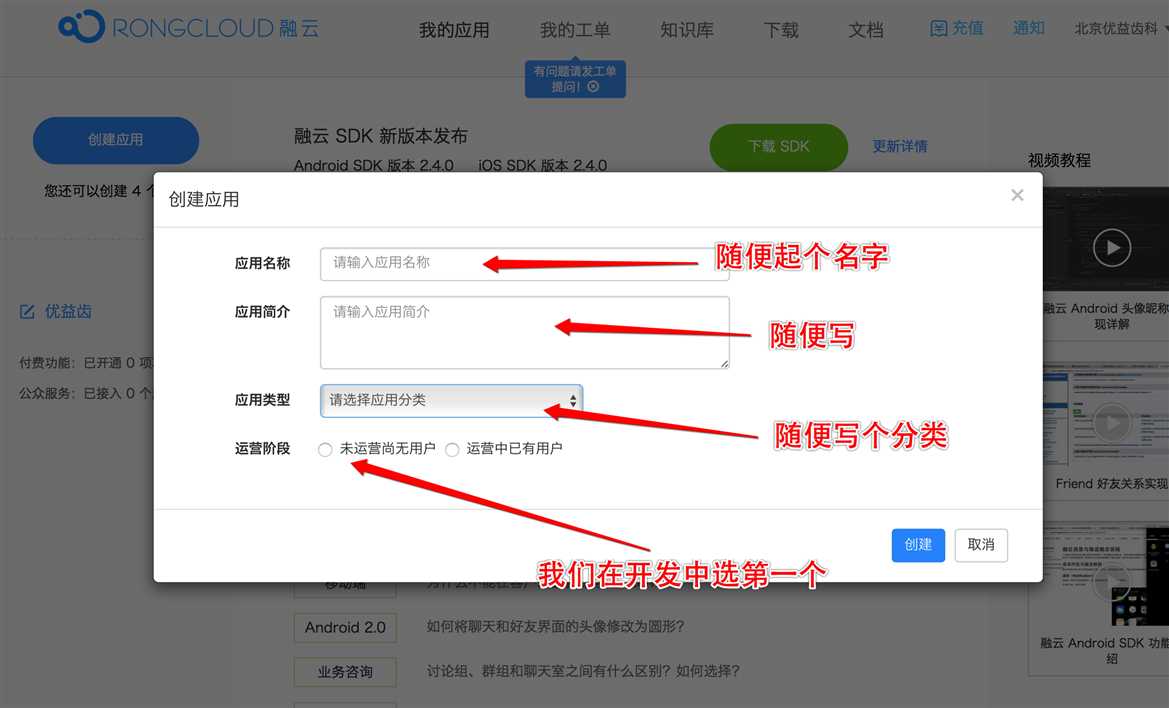
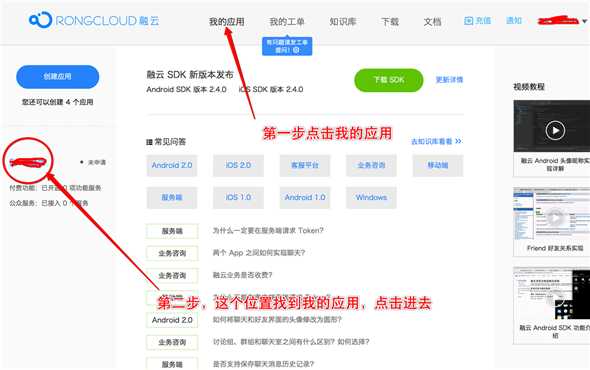
5.最后点击创建 点击我的应用 然后在左边点击我的应用名称
图2
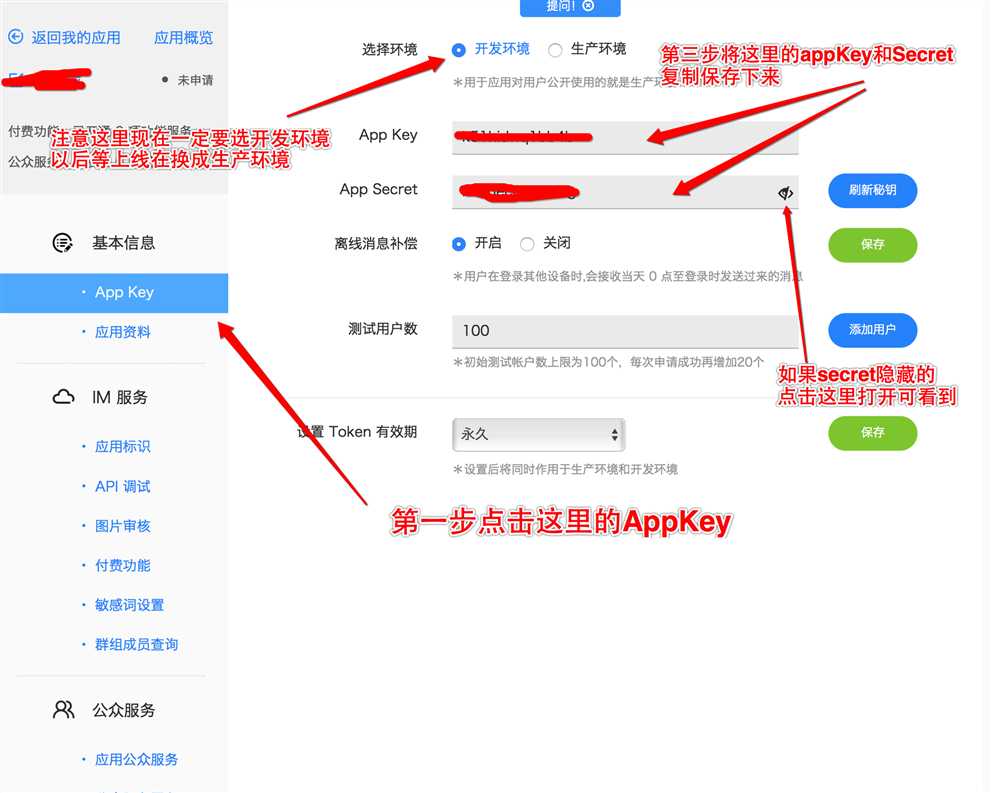
6.点击AppKey进入
图3
7.手动安装融云即时通讯SDK
7.1将下载好的最新的融云SDK导入到自己的项目中
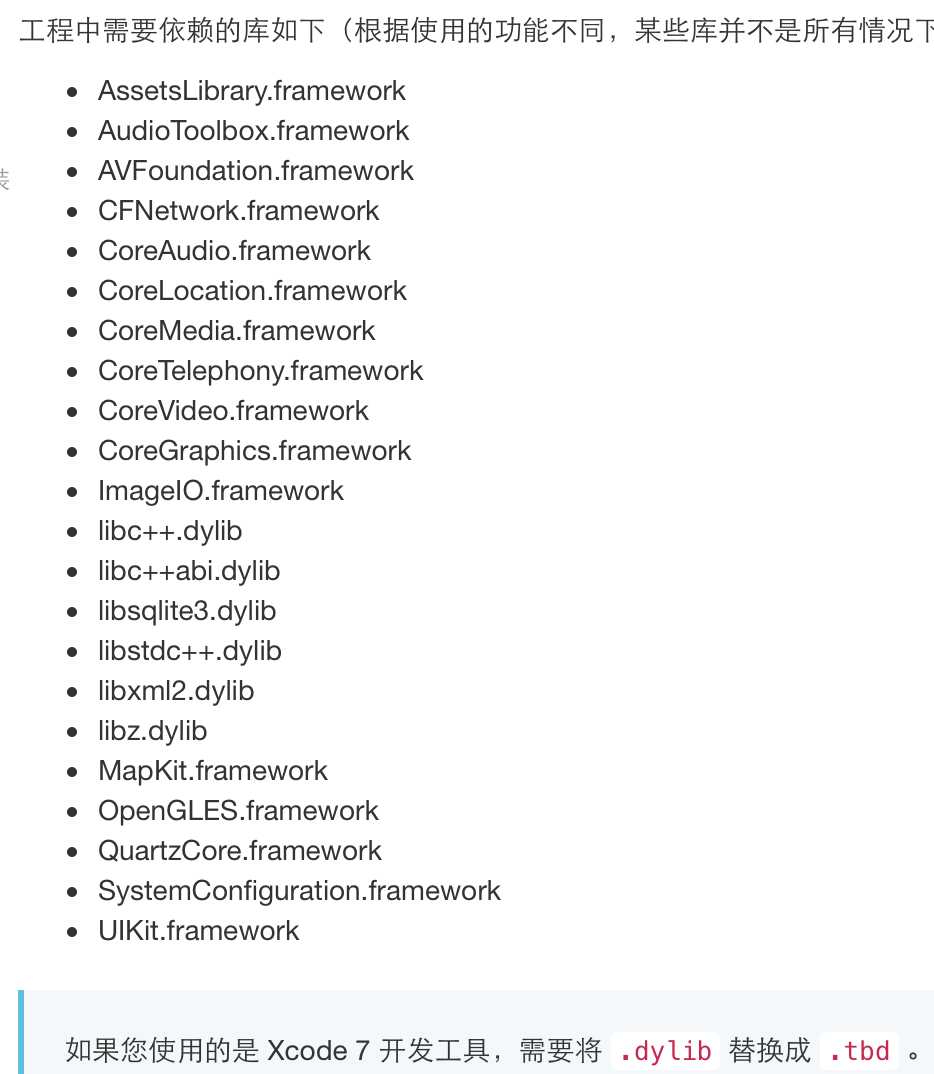
7.2添加依赖库 在Build Phases中第三个选项link中点击左下角+号添加依赖库
所需的依赖库
图4
8.获取Token
和第五步一样,进入融云后台点击我的应用—>自己的应用名称—>IM服务—>API调试
右边会进入一个界面,在这里获取调试Token
图5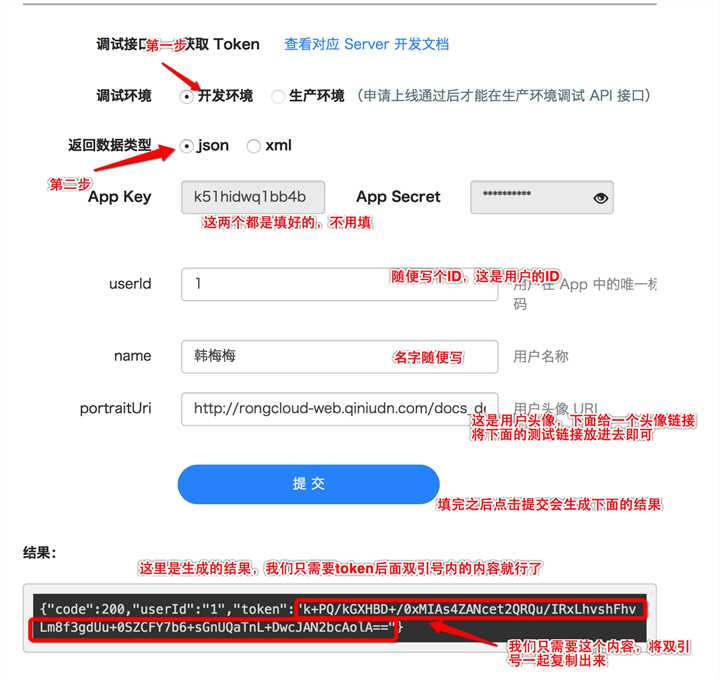
填的时候可以按照这个参数填,就是个案例
用户 Id:
userId = "1" // 用户在融云系统中唯一的身份 Id,可为任意数字或字符串,但必须保证全局唯一。
用户名称:
name = "韩梅梅" // 用户的显示名称,用来在 Push 推送时,或者客户端没有提供用户信息时,显示用户的名称。
用户头像图片:
portraitUri = "http://rongcloud-web.qiniudn.com/docs_demo_rongcloud_logo.png"
现在我们获得了AppKey和Token了
9.下面就开始快速集成了
9.1
在自己的项目中AppDelegate.h文件中导入头文件
#import <RongIMLib/RongIMLib.h>
#import <RongIMKit/RongIMKit.h>
然后遵守RCIMConnectionStatusDelegate这个代理方法
即变成这样@interface AppDelegate : UIResponder <UIApplicationDelegate,RCIMConnectionStatusDelegate>
9.2在AppDelegate.m文件中导入头文件
//融云即时通讯
#import <RongIMKit/RongIMKit.h>
#import <RongIMLib/RongIMLib.h>
#import <UIKit/UIKit.h>
然后将获得的融云的AppKey 写成一个宏 如下 将自己的AppKey 替换即可\
k51hidwq1bbcdds4b将这个换成自己的即可
//融云即时通讯AppKey
#define RONGCLOUD_IM_APPKEY @"k51hidwq1bbcdds4b"
10.在AppDelegate.m的文件中的
- (BOOL)application:(UIApplication *)application didFinishLaunchingWithOptions:(NSDictionary *)launchOptions
{
}
方法中加入以下代码
//融云即时通讯
//初始化融云SDK。
[[RCIM sharedRCIM] initWithAppKey:RONGCLOUD_IM_APPKEY];
/**
* 推送处理1
*/
if ([application
respondsToSelector:@selector(registerUserNotificationSettings:)]) {
//注册推送, iOS 8
UIUserNotificationSettings *settings = [UIUserNotificationSettings
settingsForTypes:(UIUserNotificationTypeBadge |
UIUserNotificationTypeSound |
UIUserNotificationTypeAlert)
categories:nil];
[application registerUserNotificationSettings:settings];
} else {
UIRemoteNotificationType myTypes = UIRemoteNotificationTypeBadge |
UIRemoteNotificationTypeAlert |
UIRemoteNotificationTypeSound;
[application registerForRemoteNotificationTypes:myTypes];
}
//融云即时通讯
[[NSNotificationCenter defaultCenter]
addObserver:self
selector:@selector(didReceiveMessageNotification:)
name:RCKitDispatchMessageNotification
object:nil];
[[RCIM sharedRCIM] setConnectionStatusDelegate:self];
加入到方法中的代码到这里
下面是单独的方法 直接加在AppDelegate.m的文件中即可
/**
* 将得到的devicetoken 传给融云用于离线状态接收push ,您的app后台要上传推送证书
*
* @param application <#application description#>
* @param deviceToken <#deviceToken description#>
*/
- (void)application:(UIApplication *)application
didRegisterForRemoteNotificationsWithDeviceToken:(NSData *)deviceToken {
NSString *token =
[[[[deviceToken description] stringByReplacingOccurrencesOfString:@"<"
withString:@""]
stringByReplacingOccurrencesOfString:@">"
withString:@""]
stringByReplacingOccurrencesOfString:@" "
withString:@""];
[[RCIMClient sharedRCIMClient] setDeviceToken:token];
}
/**
* 网络状态变化。
*
* @param status 网络状态。
*/
- (void)onRCIMConnectionStatusChanged:(RCConnectionStatus)status {
if (status == ConnectionStatus_KICKED_OFFLINE_BY_OTHER_CLIENT) {
UIAlertView *alert = [[UIAlertView alloc]
initWithTitle:@"提示"
message:@"您"
@"的帐号在别的设备上登录,您被迫下线!"
delegate:nil
cancelButtonTitle:@"知道了"
otherButtonTitles:nil, nil];
[alert show];
//注意这里下面的4行,根据自己需要修改 也可以注释了,但是只能注释这4行,网络状态变化这个方法一定要实现
ViewController *loginVC = [[ViewController alloc] init];
UINavigationController *_navi =
[[UINavigationController alloc] initWithRootViewController:loginVC];
self.window.rootViewController = _navi;
}
}
- (void)didReceiveMessageNotification:(NSNotification *)notification {
[UIApplication sharedApplication].applicationIconBadgeNumber =
[UIApplication sharedApplication].applicationIconBadgeNumber + 1;
}
11.开始创建会话
先创建一个继承RCConversationListViewController名为ChatListViewController的控制器
创建之后的控制器.h文件即为
#import <UIKit/UIKit.h>
#import <RongIMKit/RongIMKit.h>
@interface ChatListViewController : RCConversationListViewController
@end
这样的样式
在你要创建即时会话的界面的控制器的.h文件中导入头文件
//融云即时通讯
#import <RongIMKit/RongIMKit.h>
并遵守数据源方法RCIMUserInfoDataSource
即变成了
#import <RongIMKit/RongIMKit.h>
@interface ViewController : UIViewController<RCIMUserInfoDataSource>
在.m文件中导入头文件
//融云即时通讯
#import "ChatListViewController.h"
#import <RongIMKit/RCConversationViewController.h>
将我们获取的Token定义成宏 就像这样的格式 换成自己的Token即可
//融云即时通讯Token
#define RONGCLOUD_IM_Token @"LU0IpXzEeYXUxuJi5n9hAwNcet2QRQu/IRxLhvshFhvLm8f3gdUu+y4TIhufZfJ/fIXRJrQyBu8cJAN2bcAolA=="
比如在我所在的控制器我有一个开始回答按钮
我想在这个控制器点击开始回答按钮就想让他创建即时会话
这样来实现,点击开始回答按钮
/**
* 点击开始回答执行的方法
*/
-(void)startAnswer
{
//登陆融云
//登录融云服务器,开始阶段可以先从融云API调试网站获取,之后token需要通过服务器到融云服务器取。
NSString *token=RONGCLOUD_IM_Token;
[[RCIM sharedRCIM] connectWithToken:token success:^(NSString *userId) {
//设置用户信息提供者,页面展现的用户头像及昵称都会从此代理取 这里会跳到会话列表界面 就是我们平常QQ聊天都有一个
会话的列表 如果想直接跳到聊天界面 下面再说
[[RCIM sharedRCIM] setUserInfoDataSource:self];
NSLog(@"Login successfully with userId: %@.", userId);
dispatch_async(dispatch_get_main_queue(), ^{
ChatListViewController *chatListViewController = [[ChatListViewController alloc]init];
[self.navigationController pushViewController:chatListViewController animated:YES];
});
} error:^(RCConnectErrorCode status) {
NSLog(@"login error status: %ld.", (long)status);
} tokenIncorrect:^{
NSLog(@"token 无效 ,请确保生成token 使用的appkey 和初始化时的appkey 一致");
}];
} error:^(RCConnectErrorCode status) {
NSLog(@"login error status: %ld.", (long)status);
} tokenIncorrect:^{
NSLog(@"token 无效 ,请确保生成token 使用的appkey 和初始化时的appkey 一致");
}];
YYCLog(@"点击了开始回答");
}
然后在这个控制器再实现一个方法 就是下面这个方法
/**
*此方法中要提供给融云用户的信息,建议缓存到本地,然后改方法每次从您的缓存返回
*/
- (void)getUserInfoWithUserId:(NSString *)userId completion:(void(^)(RCUserInfo* userInfo))completion
{
//此处为了演示写了一个用户信息
if ([@"1" isEqual:userId]) {
RCUserInfo *user = [[RCUserInfo alloc]init];
user.userId = @"1";
user.name = @"测试1";
user.portraitUri = @"https://ss0.baidu.com/73t1bjeh1BF3odCf/it/u=1756054607,4047938258&fm=96&s=94D712D20AA1875519EB37BE0300C008";
return completion(user);
}else if([@"2" isEqual:userId]) {
RCUserInfo *user = [[RCUserInfo alloc]init];
user.userId = @"2";
user.name = @"测试2";
user.portraitUri = @"https://ss0.baidu.com/73t1bjeh1BF3odCf/it/u=1756054607,4047938258&fm=96&s=94D712D20AA1875519EB37BE0300C008";
return completion(user);
}
}
这个方法也要在这个.m文件中实现
这里都是测试 先这样写 我到后面再写怎么具体实现
下面代码都一样
下面就是在我们的ChatListViewController.h文件中
#import <RongIMKit/RongIMKit.h>
#import <RongIMKit/RongIMKit.h>
@interface ChatListViewController : RCConversationListViewController
@end
在.m文件中 这是会话列表界面 点击右上角的单聊即可以开始聊天 就像我们的微信聊天一样的界面
想要和不同的人聊天 只要将conversationVC.targetId = @"user”;后面的user改一下就行了 现在时界面搭建 这样
界面就搭建好了
// 会话聊天界面
#import "ChatListViewController.h"
@interface ChatListViewController ()
@end
@implementation ChatListViewController
- (void)viewDidLoad {
[super viewDidLoad];
[self setDisplayConversationTypes:@[@(ConversationType_PRIVATE),@(ConversationType_DISCUSSION)]];
//自定义导航左右按钮
UIBarButtonItem *rightButton = [[UIBarButtonItem alloc]initWithTitle:@"单聊" style:UIBarButtonItemStylePlain target:self action:@selector(rightBarButtonItemPressed:)];
[rightButton setTintColor:[UIColor whiteColor]];
UIButton *backBtn = [UIButton buttonWithType:UIButtonTypeCustom];
backBtn.frame = CGRectMake(0, 6, 67, 23);
UIImageView *backImg = [[UIImageView alloc] initWithImage:[UIImage imageNamed:@"navigator_btn_back"]];
backImg.frame = CGRectMake(-10, 0, 22, 22);
[backBtn addSubview:backImg];
UILabel *backText = [[UILabel alloc] initWithFrame:CGRectMake(12, 0, 65, 22)];
backText.text = @"退出";
backText.font = [UIFont systemFontOfSize:15];
[backText setBackgroundColor:[UIColor clearColor]];
[backText setTextColor:[UIColor whiteColor]];
[backBtn addSubview:backText];
[backBtn addTarget:self action:@selector(leftBarButtonItemPressed:) forControlEvents:UIControlEventTouchUpInside];
UIBarButtonItem *leftButton = [[UIBarButtonItem alloc] initWithCustomView:backBtn];
[self.navigationItem setLeftBarButtonItem:leftButton];
self.navigationItem.rightBarButtonItem = rightButton;
self.conversationListTableView.tableFooterView = [UIView new];
}
/**
*重写RCConversationListViewController的onSelectedTableRow事件
*
* @param conversationModelType 数据模型类型
* @param model 数据模型
* @param indexPath 索引
*/
-(void)onSelectedTableRow:(RCConversationModelType)conversationModelType conversationModel:(RCConversationModel *)model atIndexPath:(NSIndexPath *)indexPath
{
RCConversationViewController *conversationVC = [[RCConversationViewController alloc]init];
conversationVC.conversationType =model.conversationType;
conversationVC.targetId = model.targetId;
conversationVC.userName =model.conversationTitle;
conversationVC.title = model.conversationTitle;
[self.navigationController pushViewController:conversationVC animated:YES];
}
-(void)viewWillAppear:(BOOL)animated
{
[super viewWillAppear:animated];
self.tabBarController.navigationItem.title = @"会话";
}
/**
* 退出登录
*
* @param sender <#sender description#>
*/
- (void)leftBarButtonItemPressed:(id)sender {
UIAlertView *alertView = [[UIAlertView alloc] initWithTitle:@"提示" message:@"确定要退出?" delegate:self cancelButtonTitle:@"取消" otherButtonTitles:@"退出", nil];
[alertView show];
}
/**
* 重载右边导航按钮的事件 zheli
*
* @param sender <#sender description#>
*/
-(void)rightBarButtonItemPressed:(id)sender
{
RCConversationViewController *conversationVC = [[RCConversationViewController alloc]init];
conversationVC.conversationType =ConversationType_PRIVATE;
conversationVC.targetId = @"user"; //这里模拟自己给自己发消息,您可以替换成其他登录的用户的UserId
conversationVC.userName = @"测试1";
conversationVC.title = @"自问自答";
[self.navigationController pushViewController:conversationVC animated:YES];
}
- (void)alertView:(UIAlertView *)alertView clickedButtonAtIndex:(NSInteger)buttonIndex {
if (buttonIndex == 1) {
[[RCIM sharedRCIM]disconnect];
[self.navigationController popViewControllerAnimated:YES];
}
}
@end
这样融云即时聊天界面就搭建好了,就只是个测试界面 后面我会更新完整的融云即时聊天
这样集成的呢,是有会话列表的,如果不想点击开始回答进入会话列表界面,而是直接进入聊天界面
直接将
RCConversationViewController *conversationVC = [[RCConversationViewController alloc]init];
conversationVC.conversationType =ConversationType_PRIVATE;
conversationVC.targetId = @"user"; //这里模拟自己给自己发消息,您可以替换成其他登录的用户的UserId
conversationVC.userName = @"测试1";
conversationVC.title = @"自问自答";
[self.navigationController pushViewController:conversationVC animated:YES];
这段代码复制粘贴到
/**
* 点击开始回答执行的方法
*/
-(void)startAnswer
{
}
这个方法里,但是就是必须先登陆融云服务器 然后将
[[RCIM sharedRCIM] setUserInfoDataSource:self];
NSLog(@"Login successfully with userId: %@.", userId);
dispatch_async(dispatch_get_main_queue(), ^{
ChatListViewController *chatListViewController = [[ChatListViewController alloc]init];
[self.navigationController pushViewController:chatListViewController animated:YES];
});
这段代码删了
就变成了
/**
* 点击开始回答执行的方法
*/
-(void)startAnswer
{
//登陆融云
//登录融云服务器,开始阶段可以先从融云API调试网站获取,之后token需要通过服务器到融云服务器取。
NSString *token=RONGCLOUD_IM_Token;
[[RCIM sharedRCIM] connectWithToken:token success:^(NSString *userId) {
} error:^(RCConnectErrorCode status) {
NSLog(@"login error status: %ld.", (long)status);
} tokenIncorrect:^{
NSLog(@"token 无效 ,请确保生成token 使用的appkey 和初始化时的appkey 一致");
}];
//直接跳到聊天界面
RCConversationViewController *conversationVC = [[RCConversationViewController alloc]init];
conversationVC.conversationType =ConversationType_PRIVATE;
conversationVC.targetId = @"user"; //这里模拟自己给自己发消息,您可以替换成其他登录的用户的UserId
conversationVC.userName = @"测试1";
conversationVC.title = @"自问自答";
[self.navigationController pushViewController:conversationVC animated:YES];
//
//
//
YYCLog(@"点击了开始回答");
}
这样点击开始回答按钮就直接进入了聊天界面 就像我们的微信聊天界面一样的
这样就集成好了
更多进阶请参考一下官方文档
官方网站集成文档地址:http://www.rongcloud.cn/docs/ios.html
标签:
原文地址:http://www.cnblogs.com/ithongjie/p/5036383.html