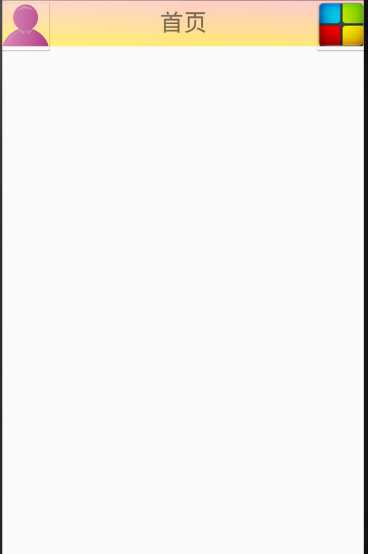
<?xml version="1.0" encoding="utf-8"?>
<LinearLayout xmlns:android="
http://schemas.android.com/apk/res/android"
android:layout_width="match_parent"
android:layout_height="50dp"
android:background="@mipmap/icon_title">
<Button
android:id="@+id/btnUser"
android:layout_width="50dp"
android:layout_height="50dp"
android:background="@mipmap/icon_body" />
<TextView
android:id="@+id/tvTitle"
android:layout_width="0dp"
android:layout_height="match_parent"
android:layout_weight="1"
android:gravity="center"
android:text="首页"
android:textSize="25sp" />
<Button
android:id="@+id/btnConfig"
android:layout_width="50dp"
android:layout_height="50dp"
android:background="@mipmap/icon_left" />
package com.example.flypie.notesbook.Layout;
import android.content.Context;
import android.util.AttributeSet;
import android.view.LayoutInflater;
import android.view.View;
import android.widget.Button;
import android.widget.LinearLayout;
import android.widget.TextView;
import android.widget.Toast;
import com.example.flypie.notesbook.R;
/**
* Created by FLYPIE on 2015/12/9.
*/
public class TitleLayout extends LinearLayout implements View.OnClickListener{
Button btnUser;
Button btnConfig;
TextView tvTitle;
public TitleLayout(Context context, AttributeSet attrs) {
super(context, attrs);
LayoutInflater.from(context).inflate(R.layout.menu_title, this);
initview();
setlistener();
}
private void setlistener() {
btnUser.setOnClickListener(this);
btnConfig.setOnClickListener(this);
}
private void initview() {
btnUser= (Button) findViewById(R.id.btnUser);
btnConfig= (Button) findViewById(R.id.btnConfig);
}
@Override
public void onClick(View v) {
switch (v.getId()){
case
R.id.btnUser:
Toast.makeText(getContext(), "btnUser", Toast.LENGTH_SHORT).show();
break;
case
R.id.btnConfig:
Toast.makeText(getContext(),"btnConfig",Toast.LENGTH_SHORT).show();
break;
default:
break;
}
}
}
<RelativeLayout xmlns:android="
http://schemas.android.com/apk/res/android"
xmlns:tools="
http://schemas.android.com/tools"
android:layout_width="match_parent"
android:layout_height="match_parent"
tools:context=".MainActivity">
<com.example.flypie.notesbook.Layout.TitleLayout
android:id="@+id/zdyTitle"
android:layout_width="match_parent"
android:layout_height="wrap_content">
</com.example.flypie.notesbook.Layout.TitleLayout>
<ListView
android:id="@+id/lvNotes"
android:layout_width="match_parent"
android:layout_height="match_parent"
android:layout_below="@+id/zdyTitle">
</ListView>
</RelativeLayout>