标签:
1.创建一个网站项目:QuickStart
2.引用程序集:NHibernate.dll
3.更改配置文件加入以下节点:
<configSections>
    <section
        name="hibernate-configuration"
        type="NHibernate.Cfg.ConfigurationSectionHandler, NHibernate"/>
  </configSections>
  <hibernate-configuration xmlns="urn:nhibernate-configuration-2.2">
    <session-factory  name="QuickStart">
      <property name="connection.driver_class">NHibernate.Driver.SqlClientDriver</property>
      <property name="connection.connection_string">Server=.;initial catalog=Quickstart;Integrated Security=True</property>
      <property name="dialect">NHibernate.Dialect.MsSql2008Dialect</property>
      <mapping assembly="QuickStart"/>
    </session-factory>
  </hibernate-configuration>
4.创建模型类:
namespace QuickStart.Models
{
    public class Cat
    {
        private string id;
        private string name;
        private char sex;
        private float weight;

        public Cat()
        {
        }

        public virtual string Id
        {
            get { return id; }
            set { id = value; }
        }

        public virtual string Name
        {
            get { return name; }
            set { name = value; }
        }

        public virtual char Sex
        {
            get { return sex; }
            set { sex = value; }
        }

        public virtual float Weight
        {
            get { return weight; }
            set { weight = value; }
        }
    }
}
在这里注意我的命名空间为:
QuickStart.Models
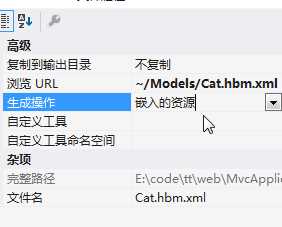
5.映射模型类,加入一个xml文件,注意需要在vs里右键设置属性为:嵌入的资源

<?xml version="1.0" encoding="utf-8" ?>
<hibernate-mapping xmlns="urn:nhibernate-mapping-2.2"
    namespace="QuickStart.Models" //注意这里的namespace为模型类的命名空间--QuickStart.Models

  assembly="QuickStart">
  <class name="Cat" table="Cat">

    <!-- A 32 hex character is our surrogate key. It‘s automatically
            generated by NHibernate with the UUID pattern. -->
    <id name="Id">
      <column name="CatId" sql-type="char(32)" not-null="true"/>
      <generator class="uuid.hex" />
    </id>

    <!-- A cat has to have a name, but it shouldn‘ be too long. -->
    <property name="Name">
      <column name="Name" length="16" not-null="true" />
    </property>
    <property name="Sex" />
    <property name="Weight" />
  </class>

</hibernate-mapping>
这里需要注意指定namespace为模型类所在的命名空间.
6.在数据库中创建一样结构的数据表.
CREATE TABLE [dbo].[Cat](
    [CatId] [char](32) NOT NULL,
    [Name] [nvarchar](16) NOT NULL,
    [Sex] [nchar](1) NULL,
    [Weight] [real] NULL,
 CONSTRAINT [PK_Cat] PRIMARY KEY CLUSTERED
(
    [CatId] ASC
)WITH (PAD_INDEX  = OFF, STATISTICS_NORECOMPUTE  = OFF, IGNORE_DUP_KEY = OFF, ALLOW_ROW_LOCKS  = ON, ALLOW_PAGE_LOCKS  = ON) ON [PRIMARY]
) ON [PRIMARY]
7.之后的操作就简单了,先创建一个NHibernateHelper.cs的类:
using System.Web;
using NHibernate;
using NHibernate.Cfg;

namespace QuickStart.Helper
{
    public sealed class NHibernateHelper
    {
        private const string CurrentSessionKey = "nhibernate.current_session";
        private static readonly ISessionFactory sessionFactory;

        static NHibernateHelper()
        {
            sessionFactory = new Configuration().Configure().BuildSessionFactory();
        }

        public static ISession GetCurrentSession()
        {
            HttpContext context = HttpContext.Current;
            ISession currentSession = context.Items[CurrentSessionKey] as ISession;

            if (currentSession == null)
            {
                currentSession = sessionFactory.OpenSession();
                context.Items[CurrentSessionKey] = currentSession;
            }

            return currentSession;
        }

        public static void CloseSession()
        {
            HttpContext context = HttpContext.Current;
            ISession currentSession = context.Items[CurrentSessionKey] as ISession;

            if (currentSession == null)
            {
                // No current session
                return;
            }

            currentSession.Close();
            context.Items.Remove(CurrentSessionKey);
        }

        public static void CloseSessionFactory()
        {
            if (sessionFactory != null)
            {
                sessionFactory.Close();
            }
        }
    }
}
8.开始操作,自己随便创建一个控制器验证代码是否可以顺利运行:
public class HomeController : Controller
    {
        //
        // GET: /Home/

        public string Index()
        {
            ISession session = NHibernateHelper.GetCurrentSession();

            NHibernate.ITransaction tx = session.BeginTransaction();

            Cat princess = new Cat();
            princess.Name = "Princess";
            princess.Sex = ‘F‘;
            princess.Weight = 7.4f;

            session.Save(princess);
            tx.Commit();

            NHibernateHelper.CloseSession();
            return "";
        }

        public string Query()
        {
            ISession session = NHibernateHelper.GetCurrentSession();
            NHibernate.ITransaction tx = session.BeginTransaction();

            IQuery query = session.CreateQuery("select c from Cat as c where c.Sex = :sex");
            query.SetCharacter("sex", ‘F‘);
            foreach (Cat cat in query.Enumerable())
            {
                Response.Write("Name="+cat.Name);
            }

            tx.Commit();
            return "";
        }

    }
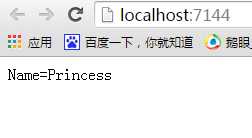
9.结果如下:

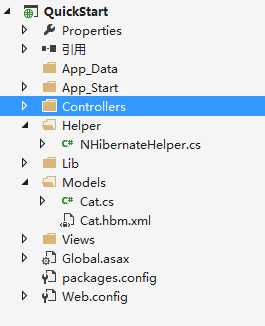
10.项目结构如下:

标签:
原文地址:http://www.cnblogs.com/a14907/p/5051339.html