标签:
这里我首先对我上一篇博文的第三个实例做一下讲解,下面是applicationContext-security.xml内容如下:
<?xml version="1.0" encoding="UTF-8"?>
<beans:beans xmlns="http://www.springframework.org/schema/security"
    xmlns:beans="http://www.springframework.org/schema/beans"
    xmlns:xsi="http://www.w3.org/2001/XMLSchema-instance"
    xsi:schemaLocation="http://www.springframework.org/schema/beans
        http://www.springframework.org/schema/beans/spring-beans-3.0.xsd
        http://www.springframework.org/schema/security
        http://www.springframework.org/schema/security/spring-security-3.0.xsd">
    <!-- 自动配置模式,拦截所有请求,有ROLE_USER才可以通过 -->
    <http auto-config="true">
        <intercept-url pattern="/login.jsp*"  access="IS_AUTHENTICATED_ANONYMOUSLY" />
        <!-- 增加 ROLE_ADMIN角色-->
        <intercept-url pattern="/admin.jsp" access="ROLE_ADMIN"/>
        <intercept-url pattern="/**" access="ROLE_USER"/>
        <form-login login-page="/login.jsp" authentication-failure-url="/login.jsp?login_error=1"/>
    </http>
    <!-- 认证管理器。用户名密码都集成在配置文件中 -->
    <authentication-manager>
        <authentication-provider>
            <user-service>
                <!-- 添加ROLE_ADMIN角色 -->
                <user name="admin" password="admin" authorities="ROLE_USER,ROLE_ADMIN"/>
                <user name="sharp" password="sharp" authorities="ROLE_USER"/>
            </user-service>
        </authentication-provider>
    </authentication-manager>
    <!-- 指定中文资源 。默认命名空间是security,所以要加前缀beans: -->
     <beans:bean id="messageSource"
         class="org.springframework.context.support.ReloadableResourceBundleMessageSource">
         <beans:property name="basename"  value="classpath:org/springframework/security/messages_zh_CN"/>
     </beans:bean>
</beans:beans>
该配置文件的注解如下:
user-service中定义了两个用户,admin和user。为了简便起见,我们使用明文定义了两个用户对应的密码,这只是为了当前演示的方便,之后的例子中我们会使用Spring Security提供的加密方式,避免用户密码被他人窃取。最最重要的部分是authorities,这里定义了这个用户登陆之后将会拥有的权限,它与上面intercept-url中定义的权限内容一一对应。每个用户可以同时拥有多个权限,例子中的admin用户就拥有ROLE_ADMIN和ROLE_USER两种权限,这使得admin用户在登陆之后可以访问ROLE_ADMIN和ROLE_USER允许访问的所有资源。与之对应的是,user用户就只拥有ROLE_USER权限,所以他只能访问ROLE_USER允许访问的资源,而不能访问ROLE_ADMIN允许访问的资源。
第四个实例:
这个实例里面用户信息存入到数据库里,我使用的是数据库是
create table USERS
(
  USERNAME VARCHAR2(64) not null,
  PASSWORD VARCHAR2(64),
  ENABLED  NUMBER
)
comment on column USERS.USERNAME
  is ‘用户名‘;
comment on column USERS.PASSWORD
  is ‘密码‘;
comment on column USERS.ENABLED
  is ‘0--不可用;1--可用‘;
alter table USERS
  add constraint PK_USERS primary key (USERNAME)

create table AUTHORITIES
(
  USERNAME  VARCHAR2(64) not null,
  AUTHORITY VARCHAR2(64) not null
)
tablespace ANDROIDXIAJUN
  pctfree 10
  initrans 1
  maxtrans 255
  storage
  (
    initial 64K
    minextents 1
    maxextents unlimited
  );
alter table AUTHORITIES
  add constraint INDEX_USER_AUTH unique (USERNAME, AUTHORITY)
alter table AUTHORITIES
  add constraint USER_AUTHORITIES_FK foreign key (USERNAME)
  references USERS (USERNAME);
数据库表创建好后,我们插入一些测试数据:
insert into users(username,password,enabled) values(‘admin‘,‘admin‘,1);
insert into users(username,password,enabled) values(‘sharp‘,‘sharp‘,1);
insert into authorities(username,authority) values(‘admin‘,‘ROLE_ADMIN‘);
insert into authorities(username,authority) values(‘admin‘,‘ROLE_USER‘);
insert into authorities(username,authority) values(‘sharp‘,‘ROLE_USER‘);
数据库的表建好,里面数据也有了,接下来就是修改我们原来的程序了。前面的三个实例都是在配置文件里配置好用户信息,而且还是明文的,如果换成数据库我们只要把这个部分的内容更改下:
 <!-- 认证管理器。用户名密码都集成在配置文件中 -->
    <authentication-manager>
        <authentication-provider>
            <user-service>
                <!-- 添加ROLE_ADMIN角色 -->
                <user name="admin" password="admin" authorities="ROLE_USER,ROLE_ADMIN"/>
                <user name="sharp" password="sharp" authorities="ROLE_USER"/>
            </user-service>
        </authentication-provider>
    </authentication-manager>
修改的新内容是:
<!-- 认证管理器。用户名密码从数据库里读取 -->
    <authentication-manager>
        <authentication-provider>
            <jdbc-user-service data-source-ref="dataSource"/>
        </authentication-provider>
    </authentication-manager>
另外我们还要增加一个数据源
dataSource,下面是我修改后完整的applicationContext-security.xml
<?xml version="1.0" encoding="UTF-8"?>
<beans:beans xmlns="http://www.springframework.org/schema/security"
    xmlns:beans="http://www.springframework.org/schema/beans"
    xmlns:xsi="http://www.w3.org/2001/XMLSchema-instance"
    xsi:schemaLocation="http://www.springframework.org/schema/beans
        http://www.springframework.org/schema/beans/spring-beans-3.0.xsd
        http://www.springframework.org/schema/security
        http://www.springframework.org/schema/security/spring-security-3.0.xsd">
    <!-- 自动配置模式,拦截所有请求,有ROLE_USER才可以通过 -->
    <http auto-config="true">
        <intercept-url pattern="/login.jsp*"  access="IS_AUTHENTICATED_ANONYMOUSLY" />
        <!-- 增加 ROLE_ADMIN角色-->
        <intercept-url pattern="/admin.jsp" access="ROLE_ADMIN"/>
        <intercept-url pattern="/**" access="ROLE_USER"/>
        <form-login login-page="/login.jsp" authentication-failure-url="/login.jsp?login_error=1"/>
    </http>
    <!-- 认证管理器。用户名密码从数据库里读取 -->
    <authentication-manager>
        <authentication-provider>
            <jdbc-user-service data-source-ref="dataSource"/>
        </authentication-provider>
    </authentication-manager>
    <!-- 指定中文资源 。默认命名空间是security,所以要加前缀beans: -->
     <beans:bean id="messageSource"
         class="org.springframework.context.support.ReloadableResourceBundleMessageSource">
         <beans:property name="basename"  value="classpath:org/springframework/security/messages_zh_CN"/>
     </beans:bean>
     <!-- 配置数据源信息  -->
     <beans:bean id="dataSource" class="com.mchange.v2.c3p0.ComboPooledDataSource">
         <beans:property name="driverClass" value="${db.driverClass}"/>
         <beans:property name="jdbcUrl" value="${db.jdbcUrl}"/>
         <beans:property name="user" value="${db.user}"/>
         <beans:property name="password" value="${db.password}"/>
     </beans:bean>
     <!-- 读取资源文件 -->
     <beans:bean id="propertyConfigurer" class="org.springframework.beans.factory.config.PropertyPlaceholderConfigurer">
      <beans:property name="locations">
            <beans:list>
                <beans:value>classpath:constants.properties</beans:value>
            </beans:list>
      </beans:property>
     </beans:bean>
</beans:beans>
按照我以前开发的习惯的,我会把spring里面很多配置信息放置到constants.properties里面,便于统一管理,constants.properties内容如下:
db.driverClass = oracle.jdbc.driver.OracleDriver
db.user        = sharpxiajun
db.password    = sharpxiajun
db.jdbcUrl     = jdbc:oracle:thin:@127.0.0.1:1521:orcl
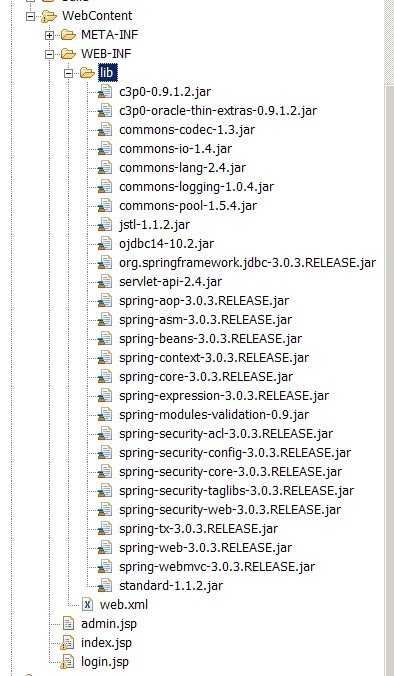
为了和数据库链接我又增加了一些jar包

至于测试和前面三个实例一样,这里不做过多表述了。
上一篇文章里,我们做的第二个实例是“自定义登录界面”,对里面一些特别的配置没有进行讲解,下面的内容就是对这个功能的具体讲解了:
  <http auto-config="true">
        <intercept-url pattern="/login.jsp"  access="IS_AUTHENTICATED_ANONYMOUSLY" />
        <!-- 增加 ROLE_ADMIN角色-->
        <intercept-url pattern="/admin.jsp" access="ROLE_ADMIN"/>
        <intercept-url pattern="/**" access="ROLE_USER"/>
        <form-login login-page="/login.jsp" authentication-failure-url="/login.jsp?login_error=1" default-target-url="/index.jsp"/>
    </http>
1.<intercept-url pattern="/login.jsp" access="IS_AUTHENTICATED_ANONYMOUSLY" />让没登陆的用户也可以访问login.jsp。这是因为配置文件中的“/**”配置,要求用户访问任意一个系统资源时,必须拥有ROLE_USER角色,/login.jsp也不例外,如果我们不为/login.jsp单独设置访问权限,会造成用户连登录权限都没有,这个是不正确的
2. <form-login login-page="/login.jsp" authentication-failure-url="/login.jsp?login_error=1" default-target-url="/index.jsp"/>login-page表示用户登陆时显示我们自定义的login.jsp。这时我们访问系统显示的登陆页面将是我们上面创建的login.jsp。authentication-failure-url表示用户登陆失败时,跳转到哪个页面。当用户输入的登录名和密码不正确时,系统将再次跳转到/login.jsp,并添加一个error=true参数作为登陆失败的标示。default-target-url表示登陆成功时,跳转到哪个页面。
自制的登录页面里也有很多没有做注解的地方,现在补上页面里的注解,页面内容如下:
<body onLoad="document.f.j_username.focus();"> <c:if test="${not empty param.login_error}"> <font color="red"> 登录失败,请重试.<br/><br/> 原因:<c:out value="${SPRING_SECURITY_LAST_EXCEPTION.message}"/> </font> </c:if> <form name="f" action="<c:url value=‘j_spring_security_check‘/>" method="POST"> <table> <tr> <td>用户名:</td> <td> <input type=‘text‘ name=‘j_username‘ value=‘<c:if test="${not empty param.login_error}"><c:out value="${SPRING_SECURITY_LAST_USERNAME}"/></c:if>‘/> </td> </tr> <tr> <td>密 码:</td> <td><input type=‘password‘ name=‘j_password‘></td> </tr> <tr> <td> <input type="checkbox" name="_spring_security_remember_me"></td><td>两周内自动登录 </td> </tr> <tr> <td colspan=‘2‘ align="center"> <input name="submit" type="submit"> <input name="reset" type="reset"> </td> </tr> </table> </form> </body>
注解如下:
1.<body onload=‘document.f.j_username.focus();‘>
表示在页面装载时onload调用函数‘document.f.j_username.focus();该函数的意思是让表单中的j_username获得焦点,即把光标移动到该控件上;
2. action="<c:url value=‘j_spring_security_check‘/>" /j_spring_security_check,提交登陆信息的URL地址。自定义form时,要把form的action设置为/j_spring_security_check。注意这里要使用绝对路径,避免登陆页面存放的页面可能带来的问题。
3. j_username,输入登陆名的参数名称。
4. j_password,输入密码的参数名称
5. _spring_security_remember_me,选择是否允许自动登录的参数名称。
可以直接把这个参数设置为一个checkbox,无需设置value,Spring Security
总结下了:Springsecurity应用讲解暂时告一段落,这个系列主要是为了应付实际工作,并不是我的研究重点,不过我很想在项目里面使用到它,到那时我一定会更加什么的讲解。另外我手头上springsecurity的资料并不太好,没有做深入研究的,如果哪位童鞋有更好的相关资料,希望能跟我分享下。
标签:
原文地址:http://www.cnblogs.com/longshiyVip/p/5055238.html