标签:des style blog class code java
一、Linux Security Modules
Linux Security Modules (LSM) 是一种 Linux 内核子系统,旨在将内核以模块形式集成到各种安全模块中。在 2001 年的 Linux Kernel 峰会上,NSA 代表建议在 Linux 内核版本 2.5 中包含强制控制访问系统 Security-Enhanced Linux。然而,Linus Torvalds 拒绝了这一提议,因为 SELinux 并不是惟一一个用于增强 Linux 安全性的安全系统。除此之外,并不是所有的开发人员都认为 SELinux 是最佳解决方案。SELinux 并没有直接包含在内核中,相反,创建了 Linux Security Modules 系统,允许安全子系统作为模块使用,这意味着可以比较方便地连接新的模块。
LSM 子系统的开发工作持续了大约三年时间,并从版本 2.6 开始,就被包含到 Linux 内核中。目前具备正式官方支持的安全模块包括 SELinux、Apparmor、Smack 和 TOMOYO Linux。
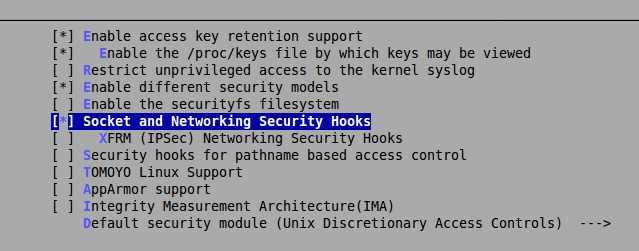
Linux Security Modules内核配置选项:

LSM的初始化阶段发生在系统内核的初始化阶段,linux在init/main.c的start_kernel()函数中启动了一系列的内核模块,当然也包含了安全模块的初始化函数调用,可以看到有:
asmlinkage void __init start_kernel(void)
{
    char * command_line;
    extern const struct kernel_param __start___param[], __stop___param[];
    ...
    thread_info_cache_init();
    cred_init();
    fork_init(totalram_pages);
    proc_caches_init();
    buffer_init();
    key_init();
    security_init();
    dbg_late_init();
    vfs_caches_init(totalram_pages);
    signals_init();
    /* rootfs populating might need page-writeback */
    page_writeback_init();
#ifdef CONFIG_PROC_FS
    proc_root_init();
#endif
    cgroup_init();
    cpuset_init();
    taskstats_init_early();
    delayacct_init();

    check_bugs();

    acpi_early_init(); /* before LAPIC and SMP init */
    sfi_init_late();

    ftrace_init();

    /* Do the rest non-__init‘ed, we‘re now alive */
    rest_init();
}
其中security_init()便是初始化LSM,在key_init()之前,dbg_late_init()及vfs_caches_init()之后,这就是其所处的层次。
接着看security_init()的实现,其位于security/security.c中,安全相关的代码基本都位于security目录下,包括selinux的实现源码:
/**
 * security_init - initializes the security framework
 *
 * This should be called early in the kernel initialization sequence.
 */
int __init security_init(void)
{
    printk(KERN_INFO "Security Framework initialized\n");

    security_fixup_ops(&default_security_ops);
    security_ops = &default_security_ops;
    do_security_initcalls();

    return 0;
}
这里做了三件事:
(1)设置默认安全操作对象(default_security_ops)中的钩子函数,这个操作在security_fixup_ops函数中完成,它将LSM提供的默认钩子函数赋值给default_security_ops,这些默认的钩子函数并不做任何事,全是返回NULL的,其具体实现留给其它安全模型,LSM只是提供了一个良好可扩展的框架。
(2)将default_security_ops赋值给全局变量security_ops,也即主体访问客体时应用的安全操作对象。在内核配置表里选上Socket and Networking Security Hooks,会产生CONFIG_SECURITY_NETWORK,当没有具体的安全策略注册时,系统会调用default_security_ops的成员函数。
(3)调用do_security_initcalls调用各个安全策略的注册函数,具体的安全策略注册,例如SELinux、Apparmor、Smack 和 TOMOYO Linux。
static void __init do_security_initcalls(void)
{
    initcall_t *call;
    call = __security_initcall_start;
    while (call < __security_initcall_end) {
        (*call) ();
        call++;
    }
}

#define SECURITY_INITCALL \
    VMLINUX_SYMBOL(__security_initcall_start) = .;         *(.security_initcall.init)         VMLINUX_SYMBOL(__security_initcall_end) = .;
do_security_initcalls()调用__security_initcall_start和__security_initcall_end之间的初始化函数,这些函数security_initcall()的注册:
#define security_initcall(fn) static initcall_t __initcall_##fn __used __section(.security_initcall.init) = fn
security_initcall(selinux_init);//security/selinux/hooks.c SELinux 安全策略
security_initcall(apparmor_init);//security/apparmor/lsm.c Apparmor 安全策略
security_initcall(smack_init);//security/smack/smack_lsm.c Smack 安全策略
security_initcall(tomoyo_init);//security/tomoyo/tomoyo.c TOMOYO Linux 安全策略
我的内核没有选择任何安全策略,默认的策略。
二、SELinux 架构
如前所述,SELinux 系统从研究操作系统 Flask 那里继承了安全子系统架构。Flask 的主要特性是它使用了 “最小特权” 的概念向用户或应用程序授权,并且该权限仅够用于执行所请求的操作。该概念使用类型强制实现(参见 类型强制),这都归功于 SELinux 中的强制访问能够作为域类型模型的一部分操作。在该模型中,每个流程主体在一个特定的安全上下文(域)中启动(即它有一个特定的访问级别),而所有操作系统的资源对象(文件、目录、套接字和其他)都有一个特定的类型(保密级别)与之相关联。
由于采用了类型增强,SELinux 的访问控制选项极大地扩展了 UNIX? 类型系统中使用的基本自主 (discretionary) 访问控制模型中的选项。例如,SELinux 可用于严格限制网络服务器能够访问的网络端口号。它还允许创建单独的文件并将数据保存到文件中,但是无法删除这些文件,等等。这种操作系统对象分级有助于对系统和用户流程进行限制,这是通过使用明确分配给特定资源的访问权限实现的。如果 SELinux 控制的任何一个服务受到破坏,那么入侵者将无法越过沙盒(由规则集限制),即使入侵者具有超级用户的权限。
规则列表也是一种安全策略,它定义允许某些域访问某些类型的权限。该安全策略将在系统启动时应用,包含一组文本文件,这些文本文件将在系统启动时载入到 Linux 内核的内存中。
这些规则采用可读的形式,甚至可以被普通用户理解。例如,在如下所示的 http 服务器域规则中,给出了允许读取包含网络配置文件的权限:
allow httpd_t net_conf_t:file { read getattr lock ioctl };
SELinux 从 Flask 安全子系统中继承了使用标签定义操作系统对象和主体的安全上下文的结构和规则,以及 “域类型” 模型。要确保实现整体保护,必须对系统中的每个对象和主体定义安全上下文。标签采用以下形式:
<user>:<role>:<type>
例如,分布式安全上下文的标签采用下面的形式:system_u:object_r:httpd_exec_t。在
SELinux 中,用户 system_u 通常为系统的 daemon 的默认名称。角色
object_r 被分配给普通文件或设备等系统对象。httpd_exec_t
类型应用到正在执行的 httpd file 文件,地址为 /usr/sbin/httpd。user、role
和 type 元素将在下一篇文章中详细讨论。

SELinux 包含五个基本组成:
SELinux 的操作可以分为下面几个步骤:
除了判断是否允许或禁止某些操作外,Policy Enforcement Server 模块还负责执行一些辅助任务,例如安全标签管理(分配和移除)。
和所有优秀的系统一样,SELinux 实现了操作简便性,确保通过完整的强制访问控制系统实现可靠的操作、低资源需求和良好的生产力。
三、SElinux代码分析
1> 初始化第一步: 向LSM注册策略
SE Linux的初始化是在内核的加载过程中的初期就开始的,第一个被系统执行的函数是hook.c文件中的selinux_init函数,其代码如下:
static __init int selinux_init(void)
{
    //判断SELinux是否为配置的默认安全模块
    if (!security_module_enable(&selinux_ops)) {
        selinux_enabled = 0;
        return 0;
    }

    //如果没有配置SELinux为默认安全模块,则退出
    if (!selinux_enabled) {
        printk(KERN_INFO "SELinux:  Disabled at boot.\n");
        return 0;
    }


    printk(KERN_INFO "SELinux:  Initializing.\n");

    // 设置当前进程的安全状态
    cred_init_security();

    default_noexec = !(VM_DATA_DEFAULT_FLAGS & VM_EXEC);

    // 给inode安全属性对象sel_inode_cache分配空间
    sel_inode_cache = kmem_cache_create("selinux_inode_security",
                                       sizeof(struct inode_security_struct),
                                       0, SLAB_PANIC, NULL);
    //初始化访问向量缓存(AVC)
    avc_init();

        //将SELinux注册到LSM中
    if (register_security(&selinux_ops))
        panic("SELinux: Unable to register with kernel.\n");

       // 显示SE Linux的强制模式
    if (selinux_enforcing)
        printk(KERN_DEBUG "SELinux:  Starting in enforcing mode\n");
    else
        printk(KERN_DEBUG "SELinux:  Starting in permissive mode\n");

    return 0;
}

// 确保可以尽早启动,以便在创建进程和对象时对其进行标识
// 该宏在include/linux/init.h文件中定义
security_initcall(selinux_init);
首先来看看cred_init_security()函数中用到的task_security_struct数据结构,其在include/objsec.h文件中定义:
struct task_security_struct {
    u32 osid;            // 最后一次execve前的SID
    u32 sid;            // 当前SID
    u32 exec_sid;        // exec的SID
    u32 create_sid;        // 创建文件系统的SID
    u32 keycreate_sid;        // 创建密钥的SID
    u32 sockcreate_sid;        // 创建套接字的SID
};
函数调用hook.c文件中的cred_init_security()函数给当前进程设置安全状态,其代码如下:
/*
 * initialise the security for the init task
 */
static void cred_init_security(void)
{
    struct cred *cred = (struct cred *) current->real_cred;
    struct task_security_struct *tsec;

    // 创建描述进程安全属性的数据结构
    tsec = kzalloc(sizeof(struct task_security_struct), GFP_KERNEL);
    if (!tsec)
        panic("SELinux:  Failed to initialize initial task.\n");

    // 设置当前进程的安全属性
    tsec->osid = tsec->sid = SECINITSID_KERNEL;
    cred->security = tsec;
}
在给inode安全属性对象分配空间后,函数会调用avc.c文件中的avc_init函数来初始化AVC(必须在执行任意权限检测前完成),其代码如下:
#define AVC_CACHE_SLOTS 512
void __init avc_init(void)
{
    int i;

    // 初始化每一个缓存槽
    for (i = 0; i < AVC_CACHE_SLOTS; i++) {
        INIT_LIST_HEAD(&avc_cache.slots[i]);
        spin_lock_init(&avc_cache.slots_lock[i]);    // 写时加锁

    }
    atomic_set(&avc_cache.active_nodes, 0);
    atomic_set(&avc_cache.lru_hint, 0);

    // 给AVC缓存记录分配空间
    avc_node_cachep = kmem_cache_create("avc_node", sizeof(struct avc_node),
                0, SLAB_PANIC, NULL, NULL);

    // 记录AVC初始化
    audit_log(current->audit_context, GFP_KERNEL, AUDIT_KERNEL, "AVC INITIALIZED\n");
}
该函数中用到了一个名为avc_cache的结构,在同一文件中定义:
struct avc_cache {
    struct list_head slots[AVC_CACHE_SLOTS];
    spinlock_t slots_lock[AVC_CACHE_SLOTS];    // 用以在写入时加锁

    atomic_t lru_hint;            // 在reclaim搜索时的LRU提示

    atomic_t active_nodes;
    u32 latest_notif;            // 最近撤销提醒

};
然后,selinux_init函数将会调用register_security函数向LSM注册SE Linux模块,其代码如下:
/**
 * register_security - registers a security framework with the kernel
 * @ops: a pointer to the struct security_options that is to be registered
 *
 * This function allows a security module to register itself with the
 * kernel security subsystem.  Some rudimentary checking is done on the @ops
 * value passed to this function. You‘ll need to check first if your LSM
 * is allowed to register its @ops by calling security_module_enable(@ops).
 *
 * If there is already a security module registered with the kernel,
 * an error will be returned.  Otherwise %0 is returned on success.
 */
int __init register_security(struct security_operations *ops)
{
    if (verify(ops)) {
        printk(KERN_DEBUG "%s could not verify "
               "security_operations structure.\n", __func__);
        return -EINVAL;
    }

    if (security_ops != &default_security_ops)
        return -EAGAIN;

    security_ops = ops;

    return 0;
}
至此,SE Linux就完成了初始化过程的第一步,而其个模块的初始化函数均被定义成普通的初始化调用,在Linux内核的后续初始化过程中进一步完成。
2> 初始化第二步:文件系统的挂载
static struct file_system_type sel_fs_type = {
    .name        = "selinuxfs",
    .mount        = sel_mount,
    .kill_sb    = kill_litter_super,
};

struct vfsmount *selinuxfs_mount;

static int __init init_sel_fs(void)
{
    int err;

    if (!selinux_enabled)
        return 0;
    err = register_filesystem(&sel_fs_type);
    if (!err) {
        selinuxfs_mount = kern_mount(&sel_fs_type);
        if (IS_ERR(selinuxfs_mount)) {
            printk(KERN_ERR "selinuxfs:  could not mount!\n");
            err = PTR_ERR(selinuxfs_mount);
            selinuxfs_mount = NULL;
        }
    }
    return err;
}

__initcall(init_sel_fs);
3> 初始化第三步
    static struct tree_descr selinux_files[] = {
        [SEL_LOAD] = {"load", &sel_load_ops, S_IRUSR|S_IWUSR},
        [SEL_ENFORCE] = {"enforce", &sel_enforce_ops, S_IRUGO|S_IWUSR},
        [SEL_CONTEXT] = {"context", &transaction_ops, S_IRUGO|S_IWUGO},
        [SEL_ACCESS] = {"access", &transaction_ops, S_IRUGO|S_IWUGO},
        [SEL_CREATE] = {"create", &transaction_ops, S_IRUGO|S_IWUGO},
        [SEL_RELABEL] = {"relabel", &transaction_ops, S_IRUGO|S_IWUGO},
        [SEL_USER] = {"user", &transaction_ops, S_IRUGO|S_IWUGO},
        [SEL_POLICYVERS] = {"policyvers", &sel_policyvers_ops, S_IRUGO},
        [SEL_COMMIT_BOOLS] = {"commit_pending_bools", &sel_commit_bools_ops, S_IWUSR},
        [SEL_MLS] = {"mls", &sel_mls_ops, S_IRUGO},
        [SEL_DISABLE] = {"disable", &sel_disable_ops, S_IWUSR},
        [SEL_MEMBER] = {"member", &transaction_ops, S_IRUGO|S_IWUGO},
        [SEL_CHECKREQPROT] = {"checkreqprot", &sel_checkreqprot_ops, S_IRUGO|S_IWUSR},
        [SEL_REJECT_UNKNOWN] = {"reject_unknown", &sel_handle_unknown_ops, S_IRUGO},
        [SEL_DENY_UNKNOWN] = {"deny_unknown", &sel_handle_unknown_ops, S_IRUGO},
        [SEL_STATUS] = {"status", &sel_handle_status_ops, S_IRUGO},
        [SEL_POLICY] = {"policy", &sel_policy_ops, S_IRUSR},
        /* last one */ {""}
    };
最后,/sbin/init进程将载入SE Linux的初始策略库,并调用sel_load_ops->sel_write_load->sel_make_policycap->security_load_policy->selinux_complete_init函数来完成整个初始化过程。
Linux Security模块,布布扣,bubuko.com
标签:des style blog class code java
原文地址:http://www.cnblogs.com/cslunatic/p/3709356.html