标签:
一、Python介绍
1、Python的诞生
Python的作者叫Guido Van Rossum(吉多 范 罗苏姆),是在1989年圣诞节的时候老婆孩子不在家,他为了打发时候写的一个程序,作为ABC语言的一种继承,太牛奔了!
2、和其他语言的比较
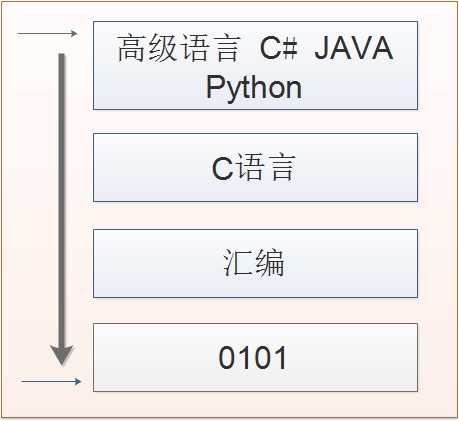
Python属于高级语言,和C#、Java一样,编译的顺序都是从代码==>内存==>解释器编译成字节码==>机器码,所以速度上会比C语言差一些,因为C语言是直接将代码编译成机器码的。
3、自己对Python的理解
Python用途很广泛,现在也很火,在网站开发,在数据分析,在运维管理上都很受欢迎,所以才要学它,都说Python学习简单,其他一点儿都不简单,它是一门高级语言,也有面向对象,也有函数,不像Shell是脚本语言,之所以说它简单我想是因为它有很多实用的库和成熟的框架,可以让开发人员快速使用这些框架来完成任务。编写时也是动态写法,不会像c#那样每个变量都要提前定义。还有一点儿Python的源码都是明文的,看起来不是很安全。还有就是执行速度不如C快,其实这个怎么说呢,任何语言都有两面性,快慢只是相对的,因为它可以让我们快速开发东西,提高效率。执行的慢只是在理论层面,在人的感官上是差不多的,如果真的慢,只能说是程序写的有问题。
4、内存垃圾回收
高级语言(c#、JAVA、Python)这些不需要考虑内存回收的问题,都会有一套非常好的垃圾回收机制,而C语言就不同了,C语言程序员要照顾内存的开辟与释放的事情
5、Python的版本
JPython——JAVA版的
CPython——C语言版的,也是最流行的,Guido就是用C写的Python
PYPY——Python自己的版本
在这里只讨论CPython,也是就常说的Python
还有就是现在的工业版本都是python 2.x的,python 3.x的和2.x是不兼容的,所以现在就是工业版本都用2.x,不过2.7版本是2.x和3.x的过滤版本,相信过不了几年3.x会越来越多,之所以现在3.x用的不多,是因为以前都用的2.x的跑了N年的网站不能因为和3.x兼容的问题就重新写代码,那是得不偿失的。
二、第一个程序Hello World
1、安装
安装很简单,去python下载 官方下载地址:https://www.python.org/downloads/
Windows安装:
直接安装,一直下一步即可,默认的安装路径是
C:\Python27>
记得要把这下面的两个路径加到Windows的环境变量中 【右键我的电脑】选择【属性】找到【高级系统设置】找到【高级】点击【环境变量】在【系统变量】里编辑【Path】
C:\Python27\;C:\Python27\Scripts;
升级的话就直接卸载老版本,安装新版本
Linux安装
Linux系统自带python,Ubuntu带的版本比较高是2.7.x的,CentOS因为走的是稳定路线,所以还是2.6.x的,因为开发喜欢用新的,所以选择用2.7.x版本的,如果是CentOS6.x系统需要进行更新,在CentOS上更新完成后记得在yum程序里把开头的指定解释器的版本改成2.6,否则yum程序可能会不正常。如——
#!/usr/bin/python
2、在终端里显示 hello world

1 root@py:~# python
2 Python 2.7.6 (default, Jun 22 2015, 17:58:13)
3 [GCC 4.8.2] on linux2
4 Type "help", "copyright", "credits" or "license" for more information.
5 >>> print ‘hello world‘;
6 hello world
7 >>>
3、在文件里写 hello world

1 root@py:/home/ghost/python_exercise/s11day1# python hello.py
2 hello world
3 root@py:/home/ghost/python_exercise/s11day1# cat hello.py
4 #!/usr/bin/env python
5 print ‘hello world‘
6 root@py:/home/ghost/python_exercise/s11day1#
Python的“Hello World”可比其他语言简单多了,就一个print就解决了。
第一行“#!/usr/bin/env python”是指定由哪个程序运行,如果在命令行用./pro_name的形式执行的话,如果没有这行,系统不知道它是由哪个程序执行的。
三、编码的问题
如果想打印中文咋办?先来看一下结果

root@py:/home/ghost/python_exercise/s11day1# cat hello.py
#!/usr/bin/env python
#print ‘hello world‘
print ‘你好,世界‘
root@py:/home/ghost/python_exercise/s11day1# python hello.py
  File "hello.py", line 3
SyntaxError: Non-ASCII character ‘\xe4‘ in file hello.py on line 3, but no encoding declared; see http://www.python.org/peps/pep-0263.html for details
root@py:/home/ghost/python_exercise/s11day1#
会报错,意思是字符编码问题,因为程序是老外开发的,他们没想过有中文这个东西,所以默认都是ASCII的,ASCII最多可以表示256个符号,英文就够使了,可中文不行,说一段绕口令就够好几百字了。在ASCII中,一个字符占8bit,也就是1byte。后来有了Unicode码(万国码),它是最少16bit(2bytes),可以解决中文的问题,但是它是ASCII码的存储的2位,同样一段英文如果用Unicode就比ASCII占一倍的空间,所以后来有了UTF-8字符编码,这种编码是动态编码,会根据内容自动指定占用的空间数,比如如果是英文字符就会用ASCII码,占8bit,如果是汉字就用UTF-8,24bit(3bytes)。
所以我们要给程序指定字符编码方式
# _*_ coding:utf-8 _*_
或
# coding:utf-8
两种方式都可以,但为了统一,以后统一用第一种。python3.x应该默认就是支持utf-8编码。

1 root@py:/home/ghost/python_exercise/s11day1# cat hello.py
2 #!/usr/bin/env python
3 # _*_ coding:utf-8 _*_
4 #print ‘hello world‘
5 print ‘你好,世界‘
6 root@py:
四、文件的导入(import)
Python可以导入其他文件为其所有,如下:

 1 root@py:/home/ghost/python_exercise/s11day1# cat m.py
 2 print ‘This is import‘
 3 root@py:/home/ghost/python_exercise/s11day1# cat hello.py
 4 #!/usr/bin/env python
 5 # coding:utf-8
 6 import m
 7 #print ‘hello world‘
 8 print ‘你好,世界‘
 9 root@py:/home/ghost/python_exercise/s11day1# python hello.py
10 This is import
11 你好,世界
12 root@py:/home/ghost/python_exercise/s11day1# ls
13 hello.py  m.py  m.pyc
14 root@py:/home/ghost/python_exercise/s11day1#
在导入代码后,被导入的文件会生成一个.pyc的字节码文件,下一次python会导入这个.pyc文件(前提是这个.pyc文件和py文件要完成一样),这是因为字节码文件的执行速度会更快一些,导入的顺序是.pyc大于.py,如果这时把.py文件删除,也是不会报错的。
root@py:/home/ghost/python_exercise/s11day1# mv m.py a.py
root@py:/home/ghost/python_exercise/s11day1# python hello.py
This is import
你好,世界
root@py:/home/ghost/python_exercise/s11day1#
当新建一个m.py文件后,再执行hello.py时,Python会重新生成.pyc文件,导入新的.pyc文件
1 root@py:/home/ghost/python_exercise/s11day1# cat m.py
2 print ‘Another import‘
3 root@py:/home/ghost/python_exercise/s11day1# python hello.py
4 Another import
5 你好,世界
6 root@py:/home/ghost/python_exercise/s11day1#
五、变量
1、声明变量
1 root@py:/home/ghost/python_exercise/s11day1# cat ex1.py
2 #!/usr/bin/env python
3 # _*_ coding:utf-8 _*_
4
5 name = u‘王伟‘
6 print name
7 root@py:/home/ghost/python_exercise/s11day1# python ex1.py
8 王伟
9 root@py:/home/ghost/python_exercise/s11day1#
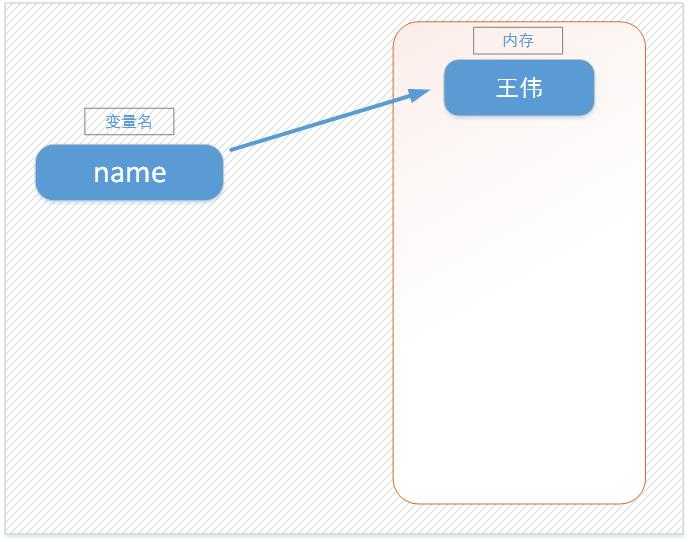
上述代码声明了一个变量,变量名为:name,变量name的值为:"王伟"
变量的作用:昵称,其代指内存里某个地址中保存的内容
变量定义的规则:
[‘and‘, ‘as‘, ‘assert‘, ‘break‘, ‘class‘, ‘continue‘, ‘def‘, ‘del‘, ‘elif‘, ‘else‘, ‘except‘, ‘exec‘, ‘finally‘, ‘for‘, ‘from‘, ‘global‘, ‘if‘, ‘import‘, ‘in‘, ‘is‘, ‘lambda‘, ‘not‘, ‘or‘, ‘pass‘, ‘print‘, ‘raise‘, ‘return‘, ‘try‘, ‘while‘, ‘with‘, ‘yield‘]
2、变量的赋值
#!/usr/bin/env python
# _*_ coding:utf-8 _*_

name1 = u‘王伟‘
name2 = ‘ghost‘
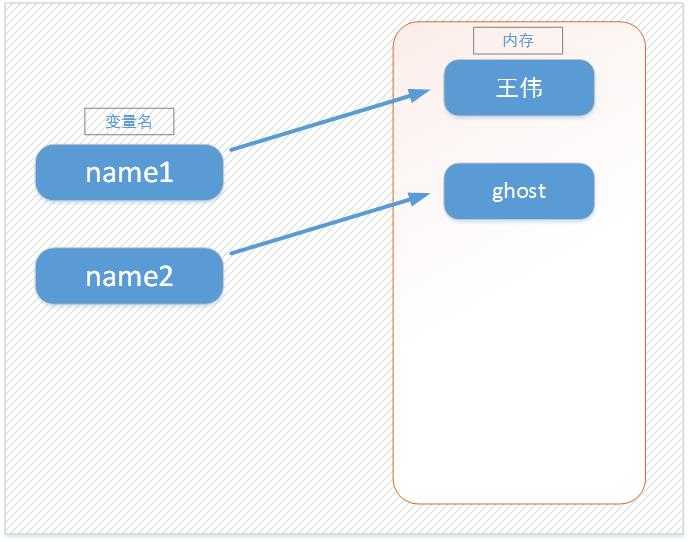
>>> name1 = ‘wangwei‘
>>> name2 = name1
>>> id(name1),id(name2)
(140255227764832, 140255227764832)
>>> name1 = ‘hello‘
>>> id(name1),id(name2)
(140255227765072, 140255227764832)
>>>
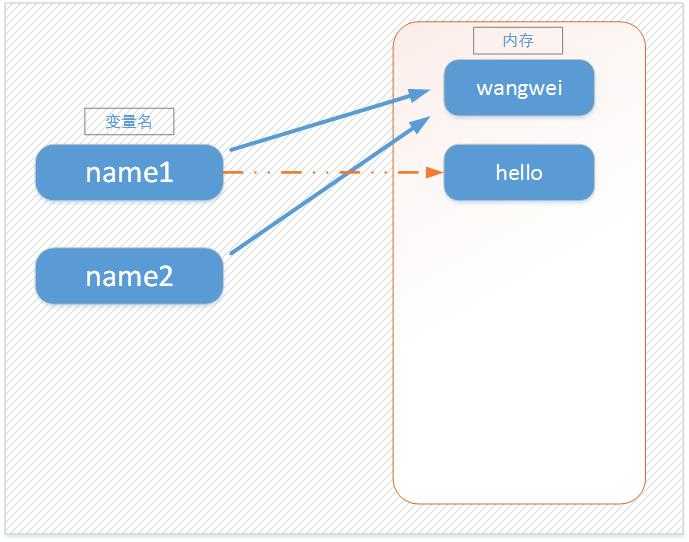
可以看到name1和name2同时指向了一个内存空间,当把name1改成‘hello’时,name2并没有跟着改变,还是指向原来的空间,但name1的变量又开辟了一个空间存放‘hello’这个值
1 >>> name1 = ‘wangwei‘
2 >>> name2 = ‘wangwei‘
3 >>> id(name1),id(name2)
4 (140255227764832, 140255227764832)
5 >>>
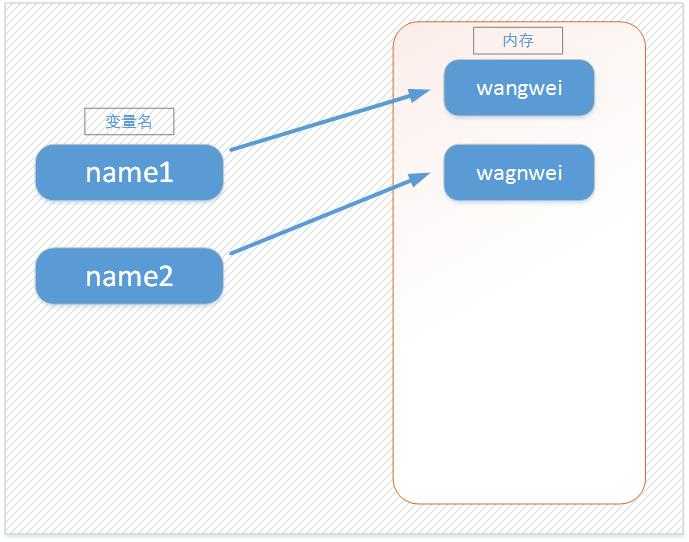
虽然看上去两个变量的内存地址一样,但这是python的一种优化机制,是为了节省内存空间。所以不要矫情。要把它当成是两个独立的变量。
六、脚本参数
在shell中可以得到命令行执行命令时的参数,用$0/$1/$2...表示。在Python中一样也可以得到,不过要导入一个模块——sys。

root@py:/home/ghost/python_exercise/s11day1# cat argv.py
#!/bin/usr/env python
# _*_ coding:utf-8 _*_

import sys
print sys.argv
root@py:/home/ghost/python_exercise/s11day1# python argv.py 1 2
[‘argv.py‘, ‘1‘, ‘2‘]
root@py:/home/ghost/python_exercise/s11day1#
得到的参数是以列表形式返回。
七、关于字符串
在C语言中是没有字符串这一说法的,准确的说应该是字符数组,比如hello是由5个字符组成的[h][e][l][l][o]这五个组成。在Python中也是这样,所以也是字符数组,字符串在内存中开空间是连续的,在这个字符串后面是不会留下空间来保证以后更改字符串内容做准备的,所以在更改字符串时,会开辟新的空间来保存字符串。旧的内存空间因为没有引用了,所以会被回收。
八、输入输出
输入:将用户在命令行输入的内容存入到变量中,使用命令——raw_input()
 1 root@py:/home/ghost/python_exercise/s11day1# cat input.py
 2 #!/usr/bin/env python
 3 #! _*_ coding:utf-8 _*_
 4
 5 name = raw_input(‘Pls input your Name:‘);
 6 print name;
 7 root@py:/home/ghost/python_exercise/s11day1# python input.py
 8 Pls input your Name:wagnwei
 9 wagnwei
10 root@py:/home/ghost/python_exercise/s11day1#
raw_input默认都是以字符串形式接收
输出就是print,当输入密码时,想让密码不可见,可以用python的一个模块——getpass
 1 root@py:/home/ghost/python_exercise/s11day1# cat input.py
 2 #!/usr/bin/env python
 3 #! _*_ coding:utf-8 _*_
 4 import getpass
 5 name = raw_input(‘Pls input your Name:‘);
 6 passwd = getpass.getpass(‘Pls input your PassWord:‘);
 7 print name;
 8 print passwd
 9 root@py:/home/ghost/python_exercise/s11day1# python input.py
10 Pls input your Name:wagnwei
11 Pls input your PassWord:
12 wagnwei
13 hello
14 root@py:/home/ghost/python_exercise/s11day1#
还有的时候,我想知道输入了多少个字符,又不想显示密码,用‘*’表示,这个在网上找了一个网友写的方法,还没有实验,借此机会实验一下

 1 #!/bin/usr/env python
 2 # _*_ coding:utf-8 _*_
 3
 4 import msvcrt
 5 def pwd_input():
 6     chars = []
 7     while True:
 8         try:
 9             newChar = msvcrt.getch().decode(encoding=‘utf-8‘)
10         except:
11             return input(‘你很可能不是在cmd命令下运行,密码输入将不能隐藏:‘)
12         if newChar in ‘\r\n‘:   #如果是换行,则输入结束
13             break
14         elif newChar == ‘\b‘:   #如果是退格,则删除密码末尾一位并且删除一个星号
15             if chars:
16                 del chars[-1]
17                 msvcrt.putch(‘\b‘.encode(encoding=‘utf-8‘)) #光标回退一格
18                 msvcrt.putch(‘ ‘.encode(encoding=‘utf-8‘))  #输出一个空格覆盖原来的星号
19                 msvcrt.putch(‘\b‘.encode(encoding=‘utf-8‘)) #光标回退一格准备接受新的输入
20         else:
21             chars.append(newChar)
22             msvcrt.putch(‘*‘.encode(encoding=‘utf-8‘))  #显示为星号
23     return (‘‘.join(chars))
24 print(u"请输入密码:")
25 pwd = pwd_input()
26 print (u"\n密码是:{0}".format(pwd))
27 #input(‘按回车键退出‘)
因为msvcrt只能在windows下运行,所以这段代码只适合在windows下
九、流程控制
在Python中的流程控制只有“if...elif...else”,而没有“case”,可能是作者觉得case有点儿鸡肋吧,有一个if就够了,呵呵!
if语句翻译成中文就是——如果。。。否则如果。。。否则。。。
例子:用输入输出和流程控制语句写一个简单的验证,如果用户名和密码验证通过就打印欢迎语句,失败就打印失败语句

 1 root@py:/home/ghost/python_exercise/s11day1# cat simpleAuth.py
 2 #!/usr/bin/env python
 3 # _*_ coding:utf-8 _*_
 4 import getpass
 5 import sys
 6 sys.stdout.write(‘请输入用户名:‘)
 7 #print (u‘请输入用户名:‘)
 8 userName = raw_input()
 9 #print(u‘请输入密码:‘)
10 passwd = getpass.getpass(‘请输入密码:‘)
11
12 if userName == ‘wangwei‘ and passwd == ‘123‘:
13   print u‘欢迎登录‘,userName
14 else:
15   print u‘用户名或密码错误‘
16   root@py:/home/ghost/python_exercise/s11day1# python simpleAuth.py
17 请输入用户名:wangwei
18 请输入密码:
19 欢迎登录 wangwei
20 root@py:/home/ghost/python_exercise/s11day1# python simpleAuth.py
21 请输入用户名:abc
22 请输入密码:
23 用户名或密码错误
24 root@py:/home/ghost/python_exercise/s11day1#
多重判断

 1 root@py:/home/ghost/python_exercise/s11day1# cat if2.py
 2 #!/usr/bin/env python
 3 # _*_ coding:utf-8 _*_
 4
 5 userName = raw_input(‘Pls input Name:‘)
 6 if userName == ‘a‘:
 7     print ‘Input is a "A"‘
 8 elif userName == ‘b‘:
 9     print ‘Input is a "B"‘
10 else:
11     print ‘Input is a another letter‘
12 root@py:/home/ghost/python_exercise/s11day1# python if2.py
13 Pls input Name:a
14 Input is a "A"
15 root@py:/home/ghost/python_exercise/s11day1# python if2.py
16 Pls input Name:b
17 Input is a "B"
18 root@py:/home/ghost/python_exercise/s11day1# python if2.py
19 Pls input Name:c
20 Input is a another letter
21 root@py:/home/ghost/python_exercise/s11day1#
注:python的代码段不是用{}来括起来的,而是用缩进来控制的,所以一个代码段的缩进要一致,否则就会抛异常,第一级不能有缩进,要顶头写。
十、初识基本数据类型
1、数字
123、12、3这些就是整数,也就是整型
长整型就是很大的整数
3.14159和52.2E-4是浮点数的例子。E标记表示10的幂。在这里,表示52.2 * 10-4
(-5+4j)和(2.3-4.6j)是复数
int(整型)
32位机器上,整数的位数为32位,取值范围为-2**31~2**31-1,即-2147483648~2147483647
64位系统上,整数的位数为64位,取值范围为-2**63~2**63-1,即-9223372036854775808~9223372036854775807
long(长整型)
和C语言不同,Python的长整数没有指定位宽,即:Python没有限制长整型数值的大小,但实际上由于机器内存有限,我们使用的长整型数值不可能无限大。
注意,自从Python2.2起,如果整型发生溢出,Python会自动将整型数值转换为长整型,所以如今在长整型后面不加字母L也不会导致严重后果了。
float(浮点型)
浮点数用来处理实数,即带有小数的数字。类似于C语言中的double类型,占8个字节(64位),其中52位表示底,11位表示指数,剩下的一位表示符号。
complex(复数)
复数由实数部分和虚数部分组成,一般形式为x+yj,期中的x是复数的实数部分,y是复数的虚数部分,这里的x和y都是实数。
注:Python中存在小数池:-5~257
2、布尔类型
真(True)或假(False)
1或0
3、字符串
“hello world"就是一个字符串
万恶的字符串拼接
Python中的字符串在C语言中体现为是一个字符数组,每次创建字符串时需要在内存中开辟一块连续的空间,并且一旦需要修改字符串的话,就需要再次开辟空间,万恶的+号每出现一次就会在内存中重新开辟一块空间。可以用字符串格式化中的占位符代替。
 1 1、
 2 >>> name = ‘I am %s,Age %d‘ %(‘wangwei‘,23)
 3 >>> name
 4 ‘I am wangwei,Age 23‘
 5 >>> name = ‘I am %s,Age %d‘ %(‘hello‘,26)
 6 >>> name
 7 ‘I am hello,Age 26‘
 8 2、
 9 >>> info = ‘I am {0},Age {1}‘
10 >>> newInfo = info.format(‘wangwei‘,33)
11 >>> newInfo
12 ‘I am wangwei,Age 33‘
13 >>>
以上两种形式本质一样,只是表现形式不一样
注:占位符%s是字符串或其他所有类型,%d是数值型,%f是浮点型,%s可以说是万能型的。其他如果用错的话会抛异常
1 >>> name = ‘I am %s,Age %d‘ %(‘hello‘,‘22‘)
2 Traceback (most recent call last):
3   File "<stdin>", line 1, in <module>
4 TypeError: %d format: a number is required, not str
5 >>> name = ‘I am %s,Age %s‘ %(‘hello‘,22)
6 >>> name
7 ‘I am hello,Age 22‘
8 >>>
可以看到第一个用的%d,但传入的是字符串(因为用单引号把22给引起来了),会抛一个类型错误异常。下面那个用的%s,但传入的是数值,但没有报错。
字符串的常用功能
♥移除空白
strip()方法可以将字符串两边的空格去掉,lstrip()去掉左边的,rstrip()去掉右边的
 1 >>> a = ‘ 1234567890 ‘
 2 >>> a.strip()
 3 ‘1234567890‘
 4 >>> a
 5 ‘ 1234567890 ‘
 6 >>> a.lstrip()
 7 ‘1234567890 ‘
 8 >>> a.rstrip()
 9 ‘ 1234567890‘
10 >>>
♥分割
1 >>> a = ‘abc def ghi jkl mno pqr‘
2 >>> a.split()
3 [‘abc‘, ‘def‘, ‘ghi‘, ‘jkl‘, ‘mno‘, ‘pqr‘]
4 >>>
split()方法可以将字符串分割成列表,默认用空格分割,也可以指定分隔符
1 >>> a = ‘I am a techer,hello‘
2 >>> a.split(‘,‘)
3 [‘I am a techer‘, ‘hello‘]
4 >>>
♥长度
1 >>> a = ‘123456789‘
2 >>> len(a)
3 9
4 >>>
♥索引
 1 root@py:/home/ghost/python_exercise/s11day1# cat str_index.py
 2 #!/usr/bin/env python
 3 # _*_ coding:utf-8 _*_
 4 i = 0
 5 a = ‘123456789‘
 6 while i < len(a):
 7     print ‘index:%s---value:%s‘ %(i,a[i]);
 8     i += 1
 9 root@py:/home/ghost/python_exercise/s11day1# python str_index.py
10 index:0---value:1
11 index:1---value:2
12 index:2---value:3
13 index:3---value:4
14 index:4---value:5
15 index:5---value:6
16 index:6---value:7
17 index:7---value:8
18 index:8---value:9
19 root@py:/home/ghost/python_exercise/s11day1#
字符串、列表、元组的索引全是从0开始的
♥切片
 1 >>> a[0:3]
 2 ‘123‘
 从下标0开始取,到下标2,可以记成取的个数是后面的数减去前面的数,比如3-0,那就取3个
 3 >>> a[2:3]
 4 ‘3‘
 从下标2开始取,取的个数就是3-2,取1个
 5 >>> a[2:]
 6 ‘3456789‘
 从下标2开始取到结尾,下标2也会取到
 7 >>> a[:2]
 8 ‘12‘
 从下标2往前取,不包括下标2
 9 >>> a[-1]
10 ‘9‘
取最后一个
11 >>> a[1:]
12 ‘23456789‘
从下标1开始取,下标1也会取到
13 >>>
4、列表
创建列表
1 name_list = [‘Tom‘,‘Jerry‘,‘David‘]
2 或
3 name_list = list([‘Tom‘,‘Jerry‘,‘David‘])
基本操作
♥索引
>>> name_list = [‘Tom‘,‘Jerry‘,‘David‘]
>>> name_list
[‘Tom‘, ‘Jerry‘, ‘David‘]
>>> name_list[0]
‘Tom‘
>>>
索引的用法和字符串一样,也是下标从0开始
♥切片
1 >>> name_list[-1]
2 ‘David‘
3 >>> name_list[0:2]
4 [‘Tom‘, ‘Jerry‘]
5 >>>
切片的用法和字符串一样
♥追加
 1 >>> name_list.append(‘Ben‘)
 追加元素到最后一个
 2 >>> name_list
 3 [‘Tom‘, ‘Jerry‘, ‘David‘, ‘Ben‘]
 4 >>> name_list[2] = ‘Clark‘
 修改的时候直接引用下标修改
 5 >>> name_list
 6 [‘Tom‘, ‘Jerry‘, ‘Clark‘, ‘Ben‘]
 7 >>> name_list.insert(2,‘Daniel‘)
 插入元素,指定将插入的下标位置,后面的后移
 8 >>> name_list
 9 [‘Tom‘, ‘Jerry‘, ‘Daniel‘, ‘Clark‘, ‘Ben‘]
10 >>>
♥删除
1 >>> name_list
2 [‘Tom‘, ‘Jerry‘, ‘Daniel‘, ‘Clark‘, ‘Ben‘]
3 >>> del name_list[2]
4 >>> name_list
5 [‘Tom‘, ‘Jerry‘, ‘Clark‘, ‘Ben‘]
6 >>>
删除用del,直接引用下标,del在其他地方也可以用,如字符串,元组
♥长度
1 >>> name_list
2 [‘Tom‘, ‘Jerry‘, ‘Clark‘, ‘Ben‘]
3 >>> len(name_list)
4 4
5 >>>
♥循环
 1 root@py:/home/ghost/python_exercise/s11day1# cat list_loop.py
 2 #!/usr/bin/env python
 3 # _*_ coding:utf-8 _*_
 4
 5 name_list = [‘Tom‘,‘Jerry‘,‘Clark‘,‘Ben‘]
 6 for ele in name_list:
 7     print ele
 8 root@py:/home/ghost/python_exercise/s11day1# python list_loop.py
 9 Tom
10 Jerry
11 Clark
12 Ben
13 root@py:/home/ghost/python_exercise/s11day1#
♥包含
1 >>> name_list = [‘Tom‘,‘Jerry‘,‘Clark‘,‘Ben‘]
2 >>> ‘Tom‘ in name_list
3 True
4 >>> ‘John‘ in name_list
5 False
6 >>>
用‘in’可以判断一个元素是否在列表里,如果是,返回‘True’,如果没有,就返回‘False’。
5、元组
创建元组
1 >>> age = (22,33,44,55)
2 或
3 >>> age = tuple((22,33,44,55))
4 >>>
基本操作
♥索引
1 >>> age = (22,33,44,55)
2 >>> age = tuple((22,33,44,55))
3 >>> age[1]
4 33
5 >>>
索引和列表、字符串一样,下标也是从0开始
♥切片
1 >>> age = tuple((22,33,44,55))
2 >>> age[1]
3 33
4 >>> age[-1]
5 55
6 >>> age[1:4]
7 (33, 44, 55)
8 >>>
切片的功能也和字符串、列表一样
♥循环
 1 root@py:/home/ghost/python_exercise/s11day1# cat tuple_loop.py
 2 #!/usr/bin/env python
 3 # _*_ coding:utf-8 _*_
 4
 5 name_list = (‘Tom‘,‘Jerry‘,‘Clark‘,‘Ben‘)
 6 for ele in name_list:
 7     print ele
 8 root@py:/home/ghost/python_exercise/s11day1# python tuple_loop.py
 9 Tom
10 Jerry
11 Clark
12 Ben
13 root@py:/home/ghost/python_exercise/s11day1#
循环的方法和列表也一样,取元素
♥长度
>>> age
(22, 33, 44, 55)
>>> len(age)
4
>>>
长度的计算方法也是用len(),可以计算元素的个数
♥包含
1 >>> 22 in age
2 True
3 >>> ‘hello‘ in age
4 False
5 >>>
6、字典
创建字典:
1 >>> person = {‘name‘:‘Tom‘,‘gender‘:‘Male‘,‘age‘:22}
2 或
3 >>> person = dict({‘name‘:‘Tom‘,‘gender‘:‘Male‘,‘age‘:22})
基本操作:
长度
1 >>> person
2 {‘gender‘: ‘Male‘, ‘age‘: 22, ‘name‘: ‘Tom‘}
3 >>> len(person)
4 3
5 >>>
键、值对/循环
 1 root@py:/home/ghost/python_exercise/s11day1# cat dict_loop.py
 2 #!/usr/bin/env python
 3 # _*_ coding:utf-8 _*_
 4
 5 person = {‘gender‘: ‘Male‘, ‘age‘: 22, ‘name‘: ‘Tom‘}
 6 for ele in person:
 7     print ele;
 8 print ‘----------------‘
 9
10 for k,v in person.items():
11     print k,v;
12 root@py:/home/ghost/python_exercise/s11day1# python dict_loop.py
13 gender
14 age
15 name
16 ----------------
17 gender Male
18 age 22
19 name Tom
20 root@py:/home/ghost/python_exercise/s11day1#
字典和列表不一样,它的查找是靠key值查找的,所以它是无序的,是没有下标的
 1 >>> person
 2 {‘gender‘: ‘Male‘, ‘age‘: 22, ‘name‘: ‘Tom‘}
 3 >>> person.values()
 4 [‘Male‘, 22, ‘Tom‘]
 5 >>> person.keys()
 6 [‘gender‘, ‘age‘, ‘name‘]
 7 >>> person.values()
 8 [‘Male‘, 22, ‘Tom‘]
 9 >>> person.items()
10 [(‘gender‘, ‘Male‘), (‘age‘, 22), (‘name‘, ‘Tom‘)]
11 >>>
十一、运算

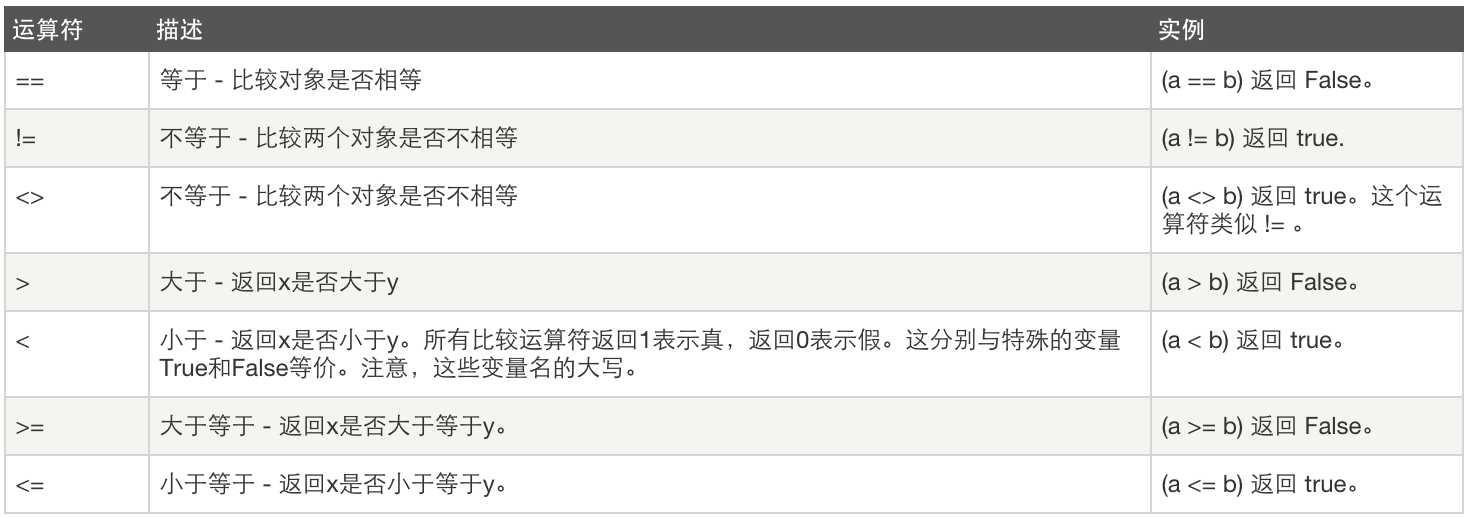
比较运算:
赋值运算:

逻辑运算:

成员运算:

身份运算:

位运算:

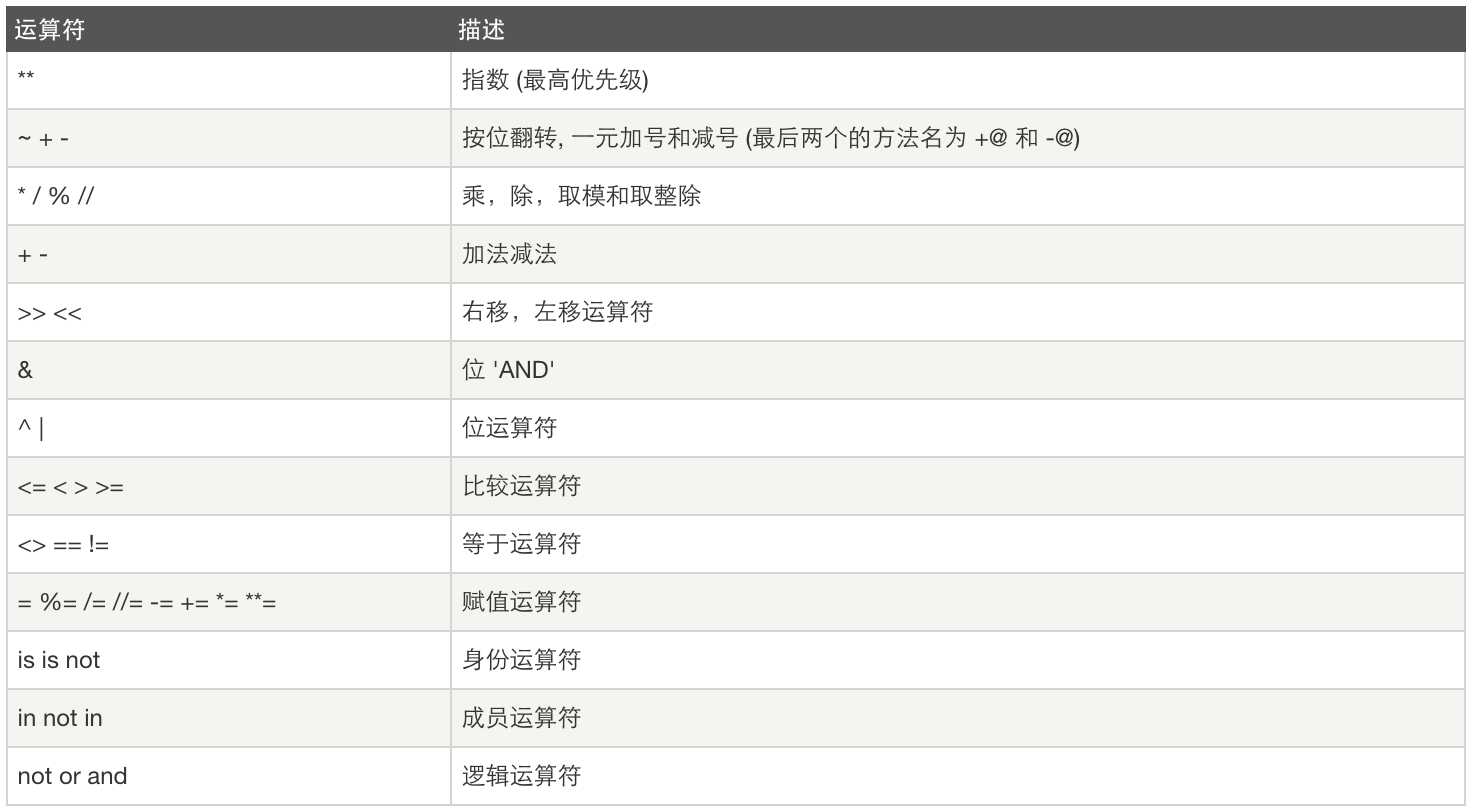
运算符优先级:
十二、初识文件的基本操作
打开文件:
file_obj = file(‘路径及文件名‘,‘打开模式‘) 注:open方法和file方法是一样的,open方法最终会调用file方法
文件里读写
保存并关闭文件
打开的文件模式有:
文件对象的属性
一个文件被打开后,会有一个file对象,可以得到有关该文件的各种信息
 1 root@py:/home/ghost/python_exercise/s11day1# cat file_ex.py
 2 #!/usr/bin/env python
 3 # _*_ coding:utf-8 _*_
 4
 5 file_name = ‘file.txt‘
 6 f = file(file_name,‘r‘) #打开文件,以只读方式
 7 #print f.read()         #一次性把文件内容全部读入内存
 8 #print f.readlines()    #全部读入,并按换行符进行分割
 9 for line in f:          #一行一行的读取文件内容到内存,避免一次性读入过多
10     print line.strip();
11
12 f.close()   #关闭文件
13 root@py:/home/ghost/python_exercise/s11day1#
查看文件对象的属性
 1 root@py:/home/ghost/python_exercise/s11day1# cat file_attr.py
 2 #!/usr/bin/python
 3 # -*- coding: UTF-8 -*-
 4
 5 # 打开一个文件
 6 fo = open("file.txt", "wb")
 7 print "Name of the file: ", fo.name
 8 print "Closed or not : ", fo.closed
 9 print "Opening mode : ", fo.mode
10 print "Softspace flag : ", fo.softspace
11 fo.close()
12 root@py:/home/ghost/python_exercise/s11day1# python file_attr.py
13 Name of the file:  file.txt
14 Closed or not :  False
15 Opening mode :  wb
16 Softspace flag :  0
17 root@py:/home/ghost/python_exercise/s11day1#
将上面的内容写到文件里:
 1 root@py:/home/ghost/python_exercise/s11day1# cat file_write.py
 2 #!/usr/bin/python
 3 # -*- coding: UTF-8 -*-
 4
 5 strs = []   #定义一个空列表,用来存要写入文件的内容
 6
 7 # 打开一个文件
 8 fo = open("file.txt", "wb")
 9
10 strs.append("Name of the file: %s" %fo.name)    #往列表里追加内容,如下三行一样的功能
11 strs.append("Closed or not : %s" %fo.closed)
12 strs.append("Opening mode : %s" %fo.mode)
13 strs.append("Softspace flage : %s" %fo.softspace)
14 strr = ‘\n‘.join(strs)  #因为往文件不能写列表,要把列表转换成字符串,要用换行符给连起来,不然在文件里没有换行
15 fo.write(strr+‘\n‘)     #将内容写到文件里,后面加个换行符
16 fo.close()
17 root@py:/home/ghost/python_exercise/s11day1# cat file.txt
18 Name of the file: file.txt
19 Closed or not : False
20 Opening mode : wb
21 Softspace flage : 0
22 root@py:/home/ghost/python_exercise/s11day1#
写在最后:
虽然说上面的内容全是最基本的,高手们肯定不屑的看,只所以把它写出来就是为了让自己养成一个总结的习惯,不然学过的东西很快就会忘了。
慢慢积累,经自己加点儿压力,毕竟年纪大了,再学这些有些吃力,多多练习吧!
不积跬步,无以至千里;不积小流,无以成江海!
标签:
原文地址:http://www.cnblogs.com/wangwei325/p/5055647.html