标签:
如果你还没有SAE的账号,请在http://sae.sina.com.cn 注册新用户。具体的注册流程请参见:Sina App Engine(SAE)入门教程(1)在常规的环境下,我们可以通过http://php.sinaapp.com/manual/zh/ref.mysql.php中PHP的原生函数去操作Mysql,但是由于SAE的环境问题,使用了主从分离技术,因此我们对数据库的操纵做了一次封装,当然你也可以继续使用这种方式去操作mysql。你可以如下使用。首先得到数据库连接的主机名,账号,密码,端口。你可以在sae上运行一下的脚本:
<?php
header("Content-Type:text/html;charset=utf-8");
echo "用户名:".SAE_MYSQL_USER."<br>";
echo "密码:". SAE_MYSQL_PASS.‘<br>‘;
echo "主库域名:".SAE_MYSQL_HOST_M."<br>";
echo "从库域名:".SAE_MYSQL_HOST_S."<br>";
echo "端口".SAE_MYSQL_PORT."<br>";
echo "数据库名:".SAE_MYSQL_DB."<br>";
?>
可以得到如下信息:
用户名:k5nmzy5445
密码:lzxkxy0x2iyili3k113iiw1mz5kimlwk33j5wyl1
主库域名:w.rdc.sae.sina.com.cn
从库域名:r.rdc.sae.sina.com.cn
端口3307
数据库名:app_lazydemo
访问 http://1.lazydemo.sinaapp.com/saemysql/mysqlcontant.php查看掩饰。
这样我们就得到了SAE的数据库连接信息,那么我们就可以按照常规的方式连接我们的mysql了,注意最好不要直接使用上面打出来的信息而是使用sae提供的常量名,因为可能这些信息是会发生变化的,如果变化那么你在写死的情况下可能就会出现无法连接数据库的错误了。下面就是一个常规方式连接SAE Mysql的例子。
<?php
$hostname = SAE_MYSQL_HOST_M.‘:‘.SAE_MYSQL_PORT;
$dbuser = SAE_MYSQL_USER;
$dbpass = SAE_MYSQL_PASS;
$dbname = SAE_MYSQL_DB;
$link = mysql_connect($hostname, $dbuser, $dbpass);
if (!$link) {
    die(‘Could not connect: ‘ . mysql_error());
}
echo ‘Connected successfully<br/>‘;
//select db
mysql_select_db($dbname, $link) or die (‘Can\‘t use dbname : ‘ . mysql_error());
echo ‘Select db ‘.$dbname.‘ successfully‘;
mysql_close($link);
?>
可以访问http://1.lazydemo.sinaapp.com/saemysql/connect_common.php 查看演示,可以得到结果:
Connected successfully
Select db app_lazydemo successfully
但是明显可以看到以上的代码中只使用到了主库,当然也可以自己实现脚本实现读写分离:) 由于本教程只供入门使用,此处不再提供。没有用到SAE提供的主从分离,因此我们还是建议使用SAE封装好的SaeMysql操作类来操作数据库,相比于以上的方法,使用SaeMysql就简单的多了,我们只需要如下的脚本就完成了数据库的连接和数据库的选择,
<?php
$mysql = new SaeMysql();
?>
以下从一个简单的数据库操作实例来展示SaeMysql的使用,首先创建一个简单的数据表(在自己练习的时候可以直接导入压缩包中的mysqldemo.sql),先看看表的结构:
CREATE TABLE IF NOT EXISTS `mysqldemo` (
  `id` int(10) NOT NULL AUTO_INCREMENT,
  `content` text COLLATE utf8_unicode_ci NOT NULL,
  `timeline` datetime NOT NULL,
  PRIMARY KEY (`id`)
) ENGINE=MyISAM DEFAULT CHARSET=utf8 COLLATE=utf8_unicode_ci AUTO_INCREMENT=1 ;
看得出只有简单的三个字段id,content,timeline。由于现在的数据表是空的,我们就先来插入几条数据,写一个循环吧,代码如下:
<?php
$mysql = new SaeMysql();
for($i = 1;$i < 11;$i++)
{
        $timeline = date(‘Y-m-d H:i:s‘,time());
        $content = ‘This num is‘.$i;
        $sql = "insert into mysqldemo(content,timeline)values(‘$content‘,‘$timeline‘)";
        $mysql->runSql($sql);
}
//close db connection
$mysql->closeDb();
?>
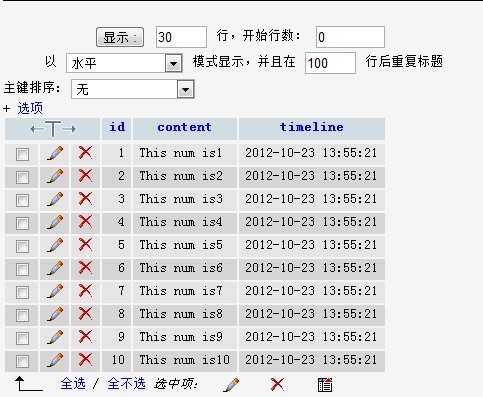
我们访问下写的代码插入数据,可以看到:

数据已经写进去了。那么下面就演示下如何用SaeMysql其他的函数对其进行操作。
<?php
$mysql = new SaeMysql();
//查询单条数据
$sql = "select * from mysqldemo limit 1";
$result = $mysql->getLine($sql);
var_dump($result);
//发现这个已经是按数组的方式返回的
echo "<hr>";
//查询多条数据
$sql = "select * from mysqldemo";
$mut_data = $mysql->getData($sql);
var_dump($mut_data);
//发现这个就是按二维数组输出的了,下面一个foreach输出
echo "<hr>";
foreach($mut_data as $small)
{
        echo "No ".$small[‘id‘]." Content:".$small[‘content‘].‘ Timeline:‘.$small[‘timeline‘].‘<br>‘;
}
?>
可以看到输出是:
array(3) { ["id"]=> string(1) "1" ["content"]=> string(12) "This num is1" ["timeline"]=> string(19) "2012-10-23 13:55:21" }
array(10) { [0]=> array(3) { ["id"]=> string(1) "1" ["content"]=> string(12) "This num is1" ["timeline"]=> string(19) "2012-10-23 13:55:21" } [1]=> array(3) { ["id"]=> string(1) "2" ["content"]=> string(12) "This num is2" ["timeline"]=> string(19) "2012-10-23 13:55:21" } [2]=> array(3) { ["id"]=> string(1) "3" ["content"]=> string(12) "This num is3" ["timeline"]=> string(19) "2012-10-23 13:55:21" } [3]=> array(3) { ["id"]=> string(1) "4" ["content"]=> string(12) "This num is4" ["timeline"]=> string(19) "2012-10-23 13:55:21" } [4]=> array(3) { ["id"]=> string(1) "5" ["content"]=> string(12) "This num is5" ["timeline"]=> string(19) "2012-10-23 13:55:21" } [5]=> array(3) { ["id"]=> string(1) "6" ["content"]=> string(12) "This num is6" ["timeline"]=> string(19) "2012-10-23 13:55:21" } [6]=> array(3) { ["id"]=> string(1) "7" ["content"]=> string(12) "This num is7" ["timeline"]=> string(19) "2012-10-23 13:55:21" } [7]=> array(3) { ["id"]=> string(1) "8" ["content"]=> string(12) "This num is8" ["timeline"]=> string(19) "2012-10-23 13:55:21" } [8]=> array(3) { ["id"]=> string(1) "9" ["content"]=> string(12) "This num is9" ["timeline"]=> string(19) "2012-10-23 13:55:21" } [9]=> array(3) { ["id"]=> string(2) "10" ["content"]=> string(13) "This num is10" ["timeline"]=> string(19) "2012-10-23 13:55:21" } }
No 1 Content:This num is1 Timeline:2012-10-23 13:55:21
No 2 Content:This num is2 Timeline:2012-10-23 13:55:21
No 3 Content:This num is3 Timeline:2012-10-23 13:55:21
No 4 Content:This num is4 Timeline:2012-10-23 13:55:21
No 5 Content:This num is5 Timeline:2012-10-23 13:55:21
No 6 Content:This num is6 Timeline:2012-10-23 13:55:21
No 7 Content:This num is7 Timeline:2012-10-23 13:55:21
No 8 Content:This num is8 Timeline:2012-10-23 13:55:21
No 9 Content:This num is9 Timeline:2012-10-23 13:55:21
No 10 Content:This num is10 Timeline:2012-10-23 13:55:21
也可以直接访问:http://lazydemo.sinaapp.com/saemysql/query_mysql.php
Sina App Engine(SAE)入门教程(2)-Mysql使用
标签:
原文地址:http://www.cnblogs.com/litao0505/p/5065036.html