标签:
前言:实在没想到2015年就这么过去了,真真实实的是颓废了一年,感觉自己没什么进步啊,而且退步明显。现在都已经半年没怎么写过代码了,趁着跨年的时间点回望了一下过去,在博客里突然发现还有好几篇大半年以前或一年以前写的文章还没有发布的,本想删了算了,犹豫了一下还是发布出来吧,毕竟那也是曾经的我啊~要是叫现在的我来写这篇文章的话还不一定写得出来,好多知识点都忘了。2016年得好好奋斗了,还得填了2015年留下的坑,出来混迟早要还的……
在Android 开发中,系统自带控件的功能和效果常常不满足于需求,因此需要创造一个一个的“新”控件来实现新功能。
Android中实现自定义控件的方式大体上就两种:
1、继承已有控件实现自定义控件。
2、继承View或ViewGroup,重新绘制新的控件。
其实已有控件都是继承自View的,因此自定义控件的本质可以说是对View的扩展。
自定义View的步骤大体如下:
3.x:(对第3步进行说明)
测量:onMeasure 设置自己显示在屏幕上的宽高
布局:onLayout 设置自己显示在屏幕上的位置(只有在自定义ViewCroup中才用到)
绘制:onDraw 控制显示在屏幕上的样子(自定义Viewgroup时不需要这个)
下面就来实现一个简单的自定义View。
定义自定义属性:
这些资源通常是放在res/values/attrs.xm文件里。
<?xml version="1.0" encoding="utf-8"?>
<resources>

    <declare-styleable name="PieChart">
        <attr name="showText" format="boolean" />
        <attr name="textSize" format="dimension"></attr>
        <attr name="contentText" format="string"></attr>
    </declare-styleable>

</resources>
这些代码声明了三个自定义属性:"showText"和"textSize"以及“contentText”,他们属于一个叫做PieChart的样式实体。按照惯例,样式实体的名字是和声明的自定义view类名是相同的。尽管遵循这个惯例不是绝对必要的,但很多有名的代码编写者都基于这个命名惯例来提供声明。
这里的format是自定义属性的值的类型。其类型共有10种:reference,float,string,color,demension,integer,enum,boolean,fraction,flag。
这里有一篇关于format的类型的文章,可以看看。http://www.cnblogs.com/rayray/p/3442026.html
在布局文件中引用自定义的命名空间,类似系统控件般的设置属性:
在布局文件activity_main.xml中实现如下:
<RelativeLayout xmlns:android="http://schemas.android.com/apk/res/android"
    xmlns:tools="http://schemas.android.com/tools"
    xmlns:custom="http://schemas.android.com/apk/res/com.example.customview"
    android:layout_width="match_parent"
    android:layout_height="match_parent"
    tools:context="com.example.customview.MainActivity" >

    <com.example.customview.view.PieChart
        android:layout_width="250dp"
        android:layout_height="250dp"
        android:layout_centerInParent="true"
        android:background="@android:color/holo_blue_light"
        custom:contentText="你好"
        custom:showText="true"
        custom:textSize="50sp" />

</RelativeLayout>
其中xmlns:custom="http://schemas.android.com/apk/res/com.example.customview"是自定义的命名空间,其名称为custom。
其中custom:contentText="你好" custom:showText="true" custom:textSize="50sp"就是我们之前设置的属性。
注意:用来向布局中添加自定义view的XML标签的名字。这是自定义view类的完全表述。如果view内是一个内部类,必须使用外部类的名字进一步限定它。例如,PieChart类有一个叫做PieView的内部类。为了使用这个类中的自定义属性,必须使用标签com.example.customviews.charting.PieChart$PieView。
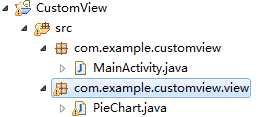
接下来,我们创建一个View包,新建一个PieChart类。如图所示:
PieChart类继承自View。
接着重写它的构造函数。public PieChart(Context context, AttributeSet attrs)
值得注意的是,构造函数有三种,而且这三种构造函数是有区别的:
当view从XML布局中创建了之后,XML标签中所有的属性都从资源包中读取出来并作为一个AttributeSet传递给view的构造函数。尽管从AttributeSet中直接读取值是可以的,但是这样做有一些缺点:
1、带有值的资源引用没有进行处理。
2、样式并没有得到允许。
取而代之的是,将AttributeSet传递给obtainStyledAttributes()方法。这个方法传回了一个TypedArray数组,包含了已经解除引用和样式化的值。
为了能够更容易的调用obtainStyledAttributes()方法,Android资源编译器做了大量的工作。res文件夹中的每个<declare-styleable>资源,生成的R.java都定义了一个属性ID的数组以及一套定义了指向数组中的每一个属性的常量。可以使用预定义的常量从TypedArry中读取属性。
代码如下:
private boolean mShowText;
private int mTextSize;
private String mContentText;
public PieChart(Context context, AttributeSet attrs) {
        super(context, attrs);
        TypedArray a = context.getTheme().obtainStyledAttributes(attrs,
                R.styleable.PieChart, 0, 0);

        try {
            mShowText = a.getBoolean(R.styleable.PieChart_showText, false);
            // mTextSize = a.getInteger(R.styleable.PieChart_textSize,12);这是错误的获取方式
            mTextSize = a.getDimensionPixelSize(R.styleable.PieChart_textSize,
                    (int) TypedValue.applyDimension(TypedValue.COMPLEX_UNIT_SP,
                            12, getResources().getDisplayMetrics()));
            mContentText = a.getString(R.styleable.PieChart_contentText);
        } finally {
            a.recycle();
        }
        init();
    }
注意,TypedArry对象是一个共享的资源,使用完毕必须回收它。
在构造函数的最后处,我们实现init()初始化的方法。这个方法主要是为onDraw()方法做准备,例如实现Paint的初始化。
private Paint mTextPaint;
private Rect mBound;
private void init() {
        mTextPaint = new Paint(Paint.ANTI_ALIAS_FLAG);
        mTextPaint.setTextSize(mTextSize);
        mTextPaint.setStyle(Paint.Style.FILL);
        mTextPaint.setColor(0xff101010);
        mBound = new Rect();
        mTextPaint
                .getTextBounds(mContentText, 0, mContentText.length(), mBound);

    }
提前创建对象是一个很重要的优化. 视图频繁的被重画, 并且许多绘图对象初始化需要消耗大量的资源. 在onDraw()方法里创建绘图对象会严重降低性能, 并可以让你的UI显得有些迟钝。
添加属性和事件:
属性是控制view的行为和外观的强有力的方式,但是只有view在初始化后这些属性才可读。为了提供动态的行为,需要暴露每个自定义属性的一对getter和setter。下面的代码片段显示PieChart是如何提供showText属性的。
public boolean isShowText() {
   return mShowText;
}

public void setShowText(boolean showText) {
   mShowText = showText;
   invalidate();
   requestLayout();
}
注意,setShowText调用了invalidate()和requestLayout() 。这些调用关键是为了保证view行为是可靠的。必须在改变这个可能改变外观的属性后废除这个view,这样系统才知道需要重绘。同样,如果属性的变化可能影响尺寸或者view的形状,需要请求一个新的布局。忘记调用这些方法可能导致难以寻找的bug。
一个应该遵从的准则是:暴露您view中所有影响可见外观的属性或者行为。
接着,我们重写onDraw方法进行绘制。
@Override
    protected void onDraw(Canvas canvas) {
        // TODO Auto-generated method stub
        super.onDraw(canvas);
        if (mShowText)//根据我们获取的设置的自定义属性,判断是否显示文本
            canvas.drawText(mContentText, getWidth() / 2 - mBound.width() / 2,
                    getHeight() / 2 + mBound.height() / 2, mTextPaint);
        //getWidth() / 2 - mBound.width() / 2,getHeight() / 2 + mBound.height() / 2
        //这是为了使文本居中
        else
            canvas.drawText("内容为空", getWidth() / 2 - mBound.width() / 2,
                    getHeight() / 2 + mBound.height() / 2, mTextPaint);

    }
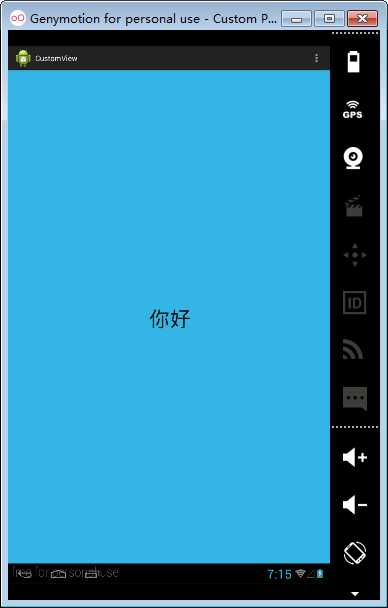
此时,运行程序的结果如图所示:

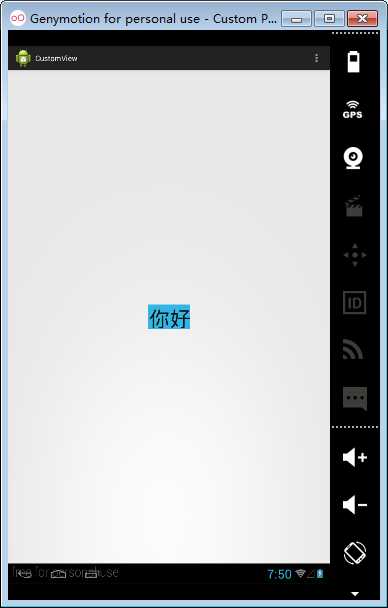
晃眼一看,好像我们的自定义View好像搞定了。细心的朋友估计已经发现了,在我们重写的方法中并没有重写onMeasure方法。而且从运行效果来看,的确没什么问题。其实不然,如果我们将布局文件中的 android:layout_width="250dp" ,android:layout_height="250dp"改成 android:layout_width="wrap_content",android:layout_height="wrap_content"。再次运行程序,则效果如下:
是的,你没有看错,一运行就成这样了。ToT
原因是这样的:系统帮我们测量的高度和宽度都是MATCH_PARNET,当我们设置明确的宽度和高度时,系统帮我们测量的结果就是我们设置的结果,当我们设置为WRAP_CONTENT,或者MATCH_PARENT系统帮我们测量的结果就是MATCH_PARENT的长度。
所以,当设置了WRAP_CONTENT时,我们需要自己进行测量,即重写onMesure方法”。
说时迟,那时快,我已经写好了:
@Override
    protected void onMeasure(int widthMeasureSpec, int heightMeasureSpec) {
        setMeasuredDimension(measureWidth(widthMeasureSpec),
                measureHeight(heightMeasureSpec));
    }
这里的widthMeasureSpec和heightMeasureSpec由父View构建,表示父View给子View的测量要求。
measureWidth()和measureHeight()是两个方法。
MeasureSpec的specMode,一共三种类型:
1、EXACTLY:一般是设置了明确的值或者是MATCH_PARENT。
2、AT_MOST:表示子布局限制在一个最大值内,一般为WARP_CONTENT。
3、UNSPECIFIED:表示子布局想要多大就多大,很少使用。
这里的measureWidth()和measureHeight()方法如下:
(注意:计算需要考虑视图的padding。 如上所示, 这个是视图的职责。)
/**
     * Determines the width of this view
     *
     * @param measureSpec
     *            A measureSpec packed into an int
     * @return The width of the view, honoring constraints from measureSpec
     */
    private int measureWidth(int measureSpec) {
        int result = 0;
        int specMode = MeasureSpec.getMode(measureSpec);
        int specSize = MeasureSpec.getSize(measureSpec);

        if (specMode == MeasureSpec.EXACTLY) {
            // We were told how big to be
            result = specSize;
        } else {
            // Measure the text
            result = (int) mTextPaint.measureText(mContentText)
                    + getPaddingLeft() + getPaddingRight();
            if (specMode == MeasureSpec.AT_MOST) {
                // Respect AT_MOST value if that was what is called for by
                // measureSpec
                result = Math.min(result, specSize);
            }
        }

        return result;
    }
Paint.measureText()是获取字符串宽度值的方法,但只限于宽度。
private int mAscent;
(这里的mAscent是个什么东西等会解释)
/**
     * Determines the height of this view
     *
     * @param measureSpec
     *            A measureSpec packed into an int
     * @return The height of the view, honoring constraints from measureSpec
     */
    private int measureHeight(int measureSpec) {
        int result = 0;
        int specMode = MeasureSpec.getMode(measureSpec);
        int specSize = MeasureSpec.getSize(measureSpec);

        mAscent = (int) mTextPaint.ascent();
        if (specMode == MeasureSpec.EXACTLY) {
            // We were told how big to be
            result = specSize;
        } else {
            // Measure the text (beware: ascent is a negative number)
            result = (int) (-mAscent + mTextPaint.descent()) + getPaddingTop()
                    + getPaddingBottom();
            if (specMode == MeasureSpec.AT_MOST) {
                // Respect AT_MOST value if that was what is called for by
                // measureSpec
                result = Math.min(result, specSize);
            }
        }
        return result;
    }
此时,运行程序如此:
(是的,现在wrap_content也可以了)
现在来解释一下Paint.ascent()吧。
还是上图吧,想了想,说不清楚啊~~~ToT。
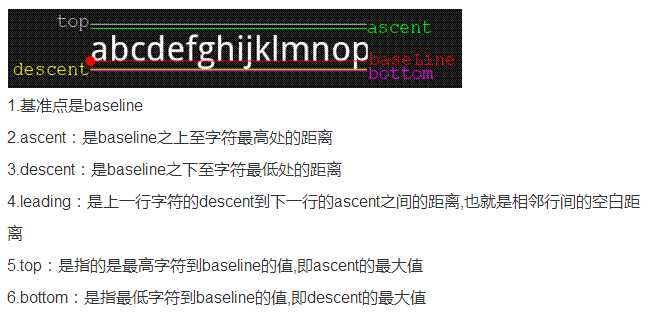
注意, ascent和top都是负数
在此,附上整个piechart类的代码:

public class PieChart extends View {

    private boolean mShowText;
    private int mTextSize;
    private String mContentText;
    private Paint mTextPaint;
    private Rect mBound;
    private int mAscent;

    public PieChart(Context context, AttributeSet attrs) {
        super(context, attrs);
        TypedArray a = context.getTheme().obtainStyledAttributes(attrs,
                R.styleable.PieChart, 0, 0);

        try {
            mShowText = a.getBoolean(R.styleable.PieChart_showText, false);
            // mTextSize =
            // a.getInteger(R.styleable.PieChart_textSize,12);//这是错误的获取方式
            mTextSize = a.getDimensionPixelSize(R.styleable.PieChart_textSize,
                    (int) TypedValue.applyDimension(TypedValue.COMPLEX_UNIT_SP,
                            12, getResources().getDisplayMetrics()));
            mContentText = a.getString(R.styleable.PieChart_contentText);
        } finally {
            a.recycle();
        }
        init();
    }

    public boolean ismShowText() {
        return mShowText;
    }

    public void setmShowText(boolean mShowText) {
        this.mShowText = mShowText;
        invalidate();
        requestLayout();
    }

    // setShowText调用了invalidate()和requestLayout() 。这些调用关键是为了保证view行为是可靠的。
    // 你必须在改变这个可能改变外观的属性后废除这个view,这样系统才知道需要重绘。
    // 同样,如果属性的变化可能影响尺寸或者view的形状,您需要请求一个新的布局。
    // 忘记调用这些方法可能导致难以寻找的bug。

    @Override
    protected void onMeasure(int widthMeasureSpec, int heightMeasureSpec) {
        setMeasuredDimension(measureWidth(widthMeasureSpec),
                measureHeight(heightMeasureSpec));
    }

    @Override
    protected void onDraw(Canvas canvas) {
        // TODO Auto-generated method stub
        super.onDraw(canvas);
        if (mShowText)// 根据我们获取的设置的自定义属性,判断是否显示文本
            canvas.drawText(mContentText, getWidth() / 2 - mBound.width() / 2,
                    getHeight() / 2 + mBound.height() / 2, mTextPaint);
        // getWidth() / 2 - mBound.width() / 2,getHeight() / 2 + mBound.height()
        // / 2
        // 这是为了使文本居中
        else
            canvas.drawText("内容为空", getWidth() / 2 - mBound.width() / 2,
                    getHeight() / 2 + mBound.height() / 2, mTextPaint);

    }

    /**
     * Determines the width of this view
     *
     * @param measureSpec
     *            A measureSpec packed into an int
     * @return The width of the view, honoring constraints from measureSpec
     */
    private int measureWidth(int measureSpec) {
        int result = 0;
        int specMode = MeasureSpec.getMode(measureSpec);
        int specSize = MeasureSpec.getSize(measureSpec);

        if (specMode == MeasureSpec.EXACTLY) {
            // We were told how big to be
            result = specSize;
        } else {
            // Measure the text
            result = (int) mTextPaint.measureText(mContentText)
                    + getPaddingLeft() + getPaddingRight();
            if (specMode == MeasureSpec.AT_MOST) {
                // Respect AT_MOST value if that was what is called for by
                // measureSpec
                result = Math.min(result, specSize);
            }
        }

        return result;
    }

    /**
     * Determines the height of this view
     *
     * @param measureSpec
     *            A measureSpec packed into an int
     * @return The height of the view, honoring constraints from measureSpec
     */
    private int measureHeight(int measureSpec) {
        int result = 0;
        int specMode = MeasureSpec.getMode(measureSpec);
        int specSize = MeasureSpec.getSize(measureSpec);

        mAscent = (int) mTextPaint.ascent();
        if (specMode == MeasureSpec.EXACTLY) {
            // We were told how big to be
            result = specSize;
        } else {
            // Measure the text (beware: ascent is a negative number)
            result = (int) (-mAscent + mTextPaint.descent()) + getPaddingTop()
                    + getPaddingBottom();
            if (specMode == MeasureSpec.AT_MOST) {
                // Respect AT_MOST value if that was what is called for by
                // measureSpec
                result = Math.min(result, specSize);
            }
        }
        return result;
    }

    public int getmTextSize() {
        return mTextSize;
    }

    public void setmTextSize(int mTextSize) {
        this.mTextSize = mTextSize;
        invalidate();
        requestLayout();
    }

    public String getmContentText() {
        return mContentText;
    }

    public void setmContentText(String mContentText) {
        this.mContentText = mContentText;
        invalidate();
        requestLayout();
    }

    private void init() {
        mTextPaint = new Paint(Paint.ANTI_ALIAS_FLAG);
        mTextPaint.setTextSize(mTextSize);
        mTextPaint.setStyle(Paint.Style.FILL);
        mTextPaint.setColor(0xff101010);
        mBound = new Rect();
        mTextPaint
                .getTextBounds(mContentText, 0, mContentText.length(), mBound);

    }
}
好吧,这篇文章就到此为止吧,主要是对自定义View做一个简单的了解。(虽然很简单,讲得也不是很清楚,我尽力了。)
参考文献:Android官网。
标签:
原文地址:http://www.cnblogs.com/scetopcsa/p/4576405.html
