标签:
写第二篇文章之前,我在想第二篇应该怎么写?后来觉得与其写Objective-C语言的相关语法,不如直接开始写个小项目。语法简单入门即可。因为,即便把语法看的很深到最后还是不一定能做项目,运用到项目中去。那就从HelloWorld开始吧。
1)用Storyboard和纯代码实现Hello World简单应用,了解iOS项目的创建流程。
2)了解 AppDelegate
3)了解 View Controller
为了方便理解,我懒得截图。录了一段视频,可以看一下。
创建工程的过程和用storyboard相近,工程创建完成之后,需要修改info.plist文件,把Main storyboard file base name属性去掉。
引入View Controller的头文件
#import "ViewController.h"
并修改- (BOOL)application:(UIApplication *)application didFinishLaunchingWithOptions:(NSDictionary *)launchOptions 方法。
- (BOOL)application:(UIApplication *)application didFinishLaunchingWithOptions:(NSDictionary *)launchOptions {
    // Override point for customization after application launch.
    self.window = [[UIWindow alloc] initWithFrame:[UIScreen mainScreen].bounds];
    self.window.rootViewController = [[ViewController alloc] init];
    self.window.backgroundColor = [UIColor whiteColor];
    [self.window makeKeyAndVisible];
    return YES;
}
#import "ViewController.h"

#define HELLO_EN @"Hello World"
#define HELLO_ZH @"你好世界"

@interface ViewController ()

@property (strong, nonatomic) UILabel *label;
@property (strong, nonatomic) UIButton *button;

@end

@implementation ViewController

- (void)viewDidLoad {
    [super viewDidLoad];
    // Do any additional setup after loading the view, typically from a nib.
    self.label = [[UILabel alloc] initWithFrame:CGRectMake(10, 50, 120, 20)];
    self.label.text = HELLO_EN;
    [self.view addSubview:self.label];

    self.button = [[UIButton alloc] initWithFrame:CGRectMake(10, 80, 120, 30)];
    [self.button setTitle:@"点我" forState:UIControlStateNormal];
    [self.button setTitleColor:[UIColor blueColor] forState:UIControlStateNormal];
    [self.button addTarget:self action:@selector(tapButton) forControlEvents:UIControlEventTouchUpInside];
    [self.view addSubview:self.button];
}

- (void)didReceiveMemoryWarning {
    [super didReceiveMemoryWarning];
    // Dispose of any resources that can be recreated.
}

- (void)tapButton {
    self.label.text = ([self.label.text isEqualToString:HELLO_EN])?HELLO_ZH:HELLO_EN;
}

@end
另,用xib创建工程的方法见http://www.cnblogs.com/nycoder/p/4333879.html
应用从开始运行到被用户/系统终止都有其周期,那应用具体的生命周期是怎样的呢?
我们可以先分析程序的main.m 和 AppDelegate.h的代码。
main.m文件中代码:
#import <UIKit/UIKit.h>
#import "AppDelegate.h"

int main(int argc, char * argv[]) {
    @autoreleasepool {
        return UIApplicationMain(argc, argv, nil, NSStringFromClass([AppDelegate class]));
    }
}
这个程序文件中:
i)引入了UIKit库
ii)引入AppDelegate.h文件
iii)应用程序单一入口main函数,其中main函数的自动释放池中调用了UIApplicationMain方法,其中参数列表的第四个参数为NSStringFromClass([AppDelegate class]),查看UIApplicationMain的文档(鼠标指到方法名上,按住option键,在弹出的视图中找到UIKit Function Reference链接,点开即可)
The name of the class from which the application delegate is instantiated. If principalClassName designates a subclass of UIApplication, you may designate the subclass as the delegate; the subclass instance receives the application-delegate messages. Specify nil if you load the delegate object from your application’s main nib file.
即可看到这个参数的描述,这个参数就是实例化的应用代理,即AppDelegate类的实例。并且如果用UIApplication子类的子类做参数,那须指定该子类为delegate。
再看AppDelegate.h文件
#import <UIKit/UIKit.h>

@interface AppDelegate : UIResponder <UIApplicationDelegate>

@property (strong, nonatomic) UIWindow *window;

@end
可以观察到这段代码:
i)引入了UIKit库文件
ii)声明了AppDelegate的类,并且继承自UIResponder,且遵循UIApplicationDelegate协议
iii)声明了一个属性window
打开苹果官方文档(command+shift+0)查找UIApplicationDelegate可以看到下面的叙述。
The UIApplicationDelegate protocol defines methods that are called by the singleton UIApplication object in response to important events in the lifetime of your app.

The app delegate works alongside the app object to ensure your app interacts properly with the system and with other apps. Specifically, the methods of the app delegate give you a chance to respond to important changes. For example, you use the methods of the app delegate to respond to state transitions, such as when your app moves from foreground to background execution, and to respond to incoming notifications. In many cases, the methods of the app delegate are the only way to receive these important notifications.
主旨大意是,简述了App Delegate单例在App的生命周期中起到的作用——为开发者提供App不同运行状态的方法,让应用可以协调的跟系统其他的应用一同正常运行。
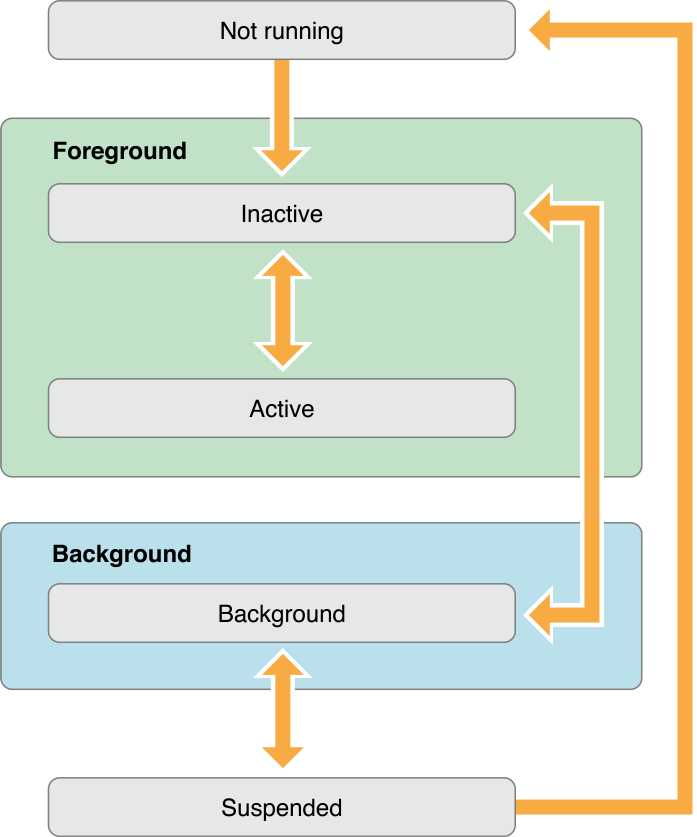
也就是,AppDelegate起到了管理应用的生命周期的作用,文档为开发者提供了应用的五个状态表格:
Table 1 App states
|
State |
Description |
|
Not running |
The app has not been launched or was terminated, either by the user or the system. |
|
Inactive |
The app is running in the foreground but is not receiving events. (It may be executing other code though.) An app usually stays in this state only briefly as it transitions to a different state. Upon entering this state, the app should put itself into a quiescent state with the expectation of moving to the background or active state shortly. |
|
Active |
The app is running in the foreground and receiving events. This is the normal mode for foreground apps. An app in the active state has no special restrictions placed on it. It is the foreground app and should be responsive to the user. |
|
Background |
The app is executing code but is not visible onscreen. When the user quits an app, the system moves the app to the background state briefly before suspending it. At other times, the system may launch the app into the background (or wake up a suspended app) and give it time to handle specific tasks. For example, the system may wake up an app so that it can process background downloads, certain types of location events, remote notifications, and other types of events. An app in the background state should do as little work as possible. Apps that request time to process specific types of events should process those events and return control back to the system as quickly as possible. |
|
Suspended |
The app is in memory but is not executing code. The system suspends apps that are in the background and do not have any pending tasks to complete. The system may purge suspended apps at any time without waking them up to make room for other apps. |
从上表中可以看到,应用共不运行、活动的、不活动的、后台运行、挂起五个状态。其中这五个状态的转变如图所示
而对应这五个状态,有相应的7个代理协议的方法,可以打开AppDelegate.m文件
#import "AppDelegate.h"
#import "ViewController.h"
@interface AppDelegate ()

@end

@implementation AppDelegate

- (BOOL)application:(UIApplication *)application willFinishLaunchingWithOptions:(NSDictionary *)launchOptions {
//这个方法是我自己加的,默认创建的时候没有
    return YES;
}
- (BOOL)application:(UIApplication *)application didFinishLaunchingWithOptions:(NSDictionary *)launchOptions {
    // Override point for customization after application launch.
    self.window = [[UIWindow alloc] initWithFrame:[UIScreen mainScreen].bounds];
    self.window.rootViewController = [[ViewController alloc] init];
    self.window.backgroundColor = [UIColor whiteColor];
    [self.window makeKeyAndVisible];
    return YES;
}

- (void)applicationWillResignActive:(UIApplication *)application {
    // Sent when the application is about to move from active to inactive state. This can occur for certain types of temporary interruptions (such as an incoming phone call or SMS message) or when the user quits the application and it begins the transition to the background state.
    // Use this method to pause ongoing tasks, disable timers, and throttle down OpenGL ES frame rates. Games should use this method to pause the game.
}

- (void)applicationDidEnterBackground:(UIApplication *)application {
    // Use this method to release shared resources, save user data, invalidate timers, and store enough application state information to restore your application to its current state in case it is terminated later.
    // If your application supports background execution, this method is called instead of applicationWillTerminate: when the user quits.
}

- (void)applicationWillEnterForeground:(UIApplication *)application {
    // Called as part of the transition from the background to the inactive state; here you can undo many of the changes made on entering the background.
}

- (void)applicationDidBecomeActive:(UIApplication *)application {
    // Restart any tasks that were paused (or not yet started) while the application was inactive. If the application was previously in the background, optionally refresh the user interface.
}

- (void)applicationWillTerminate:(UIApplication *)application {
    // Called when the application is about to terminate. Save data if appropriate. See also applicationDidEnterBackground:.
    // Saves changes in the application‘s managed object context before the application terminates.

}
@end
从代码的注释中就可以看到这些方法对应的应用生命周期的阶段。
可以发现不论是创建storyboard的工程,还是创建仅有代码的工程,都会有根视图控制器这个概念。那什么是根视图控制器呢?继续回到AppDelegate的m文件,将鼠标移动到self.window的window上,点开其对应的文档。苹果文档如下:
Providing a Window for Storyboarding
window
 Required Property
The window to use when presenting a storyboard.

Declaration
SWIFT
optional var window: UIWindow? { get set }
OBJECTIVE-C
@property(nonatomic, strong, nullable) UIWindow *window
Discussion
This property contains the window used to present the app’s visual content on the device’s main screen.
文档中简述了作用,为应用提供可视的视图容器。所有自定义的视图控制器都要在该window中显示,成为该视图的子视图。另外,查看UIWindow的苹果文档可以发现
UIWindow 继承自 UIView : UIResponder : NSObject 。即,window实例也是一个视图。
The UIWindow class defines an object known as a window that manages and coordinates the views an app displays on a device screen. Unless an app can display content on an external device screen, an app has only one window.
此段文档说明了window的作用:管理视图及定位视图的坐标,以在设备屏幕上显示。除非一个应用可以在外置的屏幕上显示内容,一个应用仅有一个window。
而window又声明了rootViewController属性。
rootViewController
 Property
The root view controller for the window.

Declaration
SWIFT
var rootViewController: UIViewController?
OBJECTIVE-C
@property(nonatomic, strong, nullable) UIViewController *rootViewController
Discussion
The root view controller provides the content view of the window. Assigning a view controller to this property (either programmatically or using Interface Builder) installs the view controller’s view as the content view of the window. If the window has an existing view hierarchy, the old views are removed before the new ones are installed.
这段文档说明rootViewController,为window提供了内容视图,并且,被分配的视图控制器的视图会装载到window中。例如,上面用代码创建的项目中
self.window.rootViewController = [[ViewController alloc] init];
这句代码就是将应用的根视图的根视图控制器指定为,ViewController类型的实例,那么该视图控制器的视图就装载到window中了。这样程序运行之后,手机屏幕就能显示ViewController的视图了。
那么到此,App Delegate基本介绍完了,其实App Delegate除了上面7个应用生命周期的协议方法以外还有一些比较常用的方法。我补充一下。更多方法还是需要自己查阅官方文档。
- application: didFailToRegisterForRemoteNotificationsWithError:
- application: didRegisterForRemoteNotificationsWithDeviceToken:
- application: didReceiveRemoteNotification: fetchCompletionHandler:
以上方法用于接受苹果的消息通知,比如,收到苹果的推送。如果要对推送消息作处理,就需要实现这些代理方法。
- application:openURL:options: (iOS 9)
该方法一般应用于打开第三方应用,比如分享、支付等情景。
iOS9 失效的方法:
- application:handleOpenURL:
- application:openURL:sourceApplication:annotation:
- applicationDidReceiveMemoryWarning:
这个方法在我适配 512MB iPhone4 的时候用到了,它的作用时,收到系统内存警告的时候会掉用该方法。在这个方法中就可以,做一些内存管理的操作,缓解内存压力。(当然,一般内存报警都是由于图像过大造成的。所以,调试的时候看看你的图片是不是又大又多。。囧)
刚才提到了根视图控制器,那何为视图控制器呢?其实,视图控制器,就是管理视图,以及相关业务逻辑的类,作为模型和视图的连接桥梁。iOS应用开发严格遵循软件设计模式的规范,而这里的视图控制器就是MVC三层架构中的C。
打开苹果官方文档,即可看到UIViewController的继承关系 , UIViewController 继承自 UIResponder : NSObject,“The UIViewController class provides the infrastructure for managing the views of your iOS apps.”这句话也表明了视图控制器的作用。例如,helloworld的项目中,在viewDidLoad方法中我们创建了一个label视图,和一个button视图,并且将视图添加到self.view中。
iOS开发中自定义视图控制器最需要了解的就是视图控制器的生命周期方法。
初始化:
- init
- initWithNibName:bundle: 从xib文件初始化视图控制器
- loadView 不要重写这个方法(If you want to perform any additional initialization of your views, do so in the viewDidLoad method.)
- viewDidLoad 视图加载完成,一般这个方法中创建各种视图
- viewWillAppear: 视图将要显示,一般在可以在这个方法请求数据,不要在该方法中创建视图,还可以设置观察者,但是要在disappear的时候remove观察者
- viewDidAppear: 视图已经显示
- viewWillLayoutSubviews
- viewDidLayoutSubviews
- viewWillDisappear: 视图将要消失
- viewDidDisappear: 视图已经消失
- dealloc 销毁实例
文档很重要,作为学习资源,和开发的辅助工具文档使用非常频繁。刚开始转iOS开发的时候,我用文档很不习惯,原因是英语能力略渣,但是用得久了读起来就没那么吃力了,之后我也会写一篇文档使用文档的文章,分享给大家。
AppDelegate实质是应用单一入口的代理实例,管理应用的生命周期,也有其他协议方法,如,打开URL资源,管理消息通知,内存报警等。具体其他方法请自行查阅文档。
View Controller视图控制器最根本的作用就是管理视图。之后还会接触到UITableViewController、UITabBarController、UINavigationController等其它视图控制器,但不管他们是啥控制器都继承自UIViewController类,并对要显示的视图进行管理。
下一篇将写一篇利用Objective-C创建对象的文章,将会介绍Objective-C的基础语法,Objective-C与其它语言的异同,同时,介绍Xcode和苹果文档的使用方法。
感谢您的阅读,如有错误,敬请批评指正,感谢~~??
标签:
原文地址:http://www.cnblogs.com/nycoder/p/5093631.html