标签:
1)使用相应的控件类创建控件对象;
2)设置该控件的各种属性;
3)添加空间到视图中;
4)如果是 UIButton 等控件,还需考虑控件的单击事件等;
[topbtn addTarget:self action:@selector(move:) forControlEvents:UIControlEventTouchUpInside];
1) addTarget:forControlEvents: 方法定义在 UIControl 类中,意味着所有继承自 UIControl 类的对象均可添加;
2)第一个参数为对象本身;
3)第二个参数为监听控件的事件。
1 @interface ViewController ()
2 @property (nonatomic, weak) IBOutlet UIButton *headImageView;  //被控制用于移动的按钮
3 @end
 //手工添加上下左右、放大缩小按钮
 1 - (void)viewDidLoad {
 2     [super viewDidLoad];
 3     //设置按钮对象为自定义型
 4     UIButton *headbtn = [UIButton buttonWithType:UIButtonTypeCustom];
 5     //设置按钮对象普通状态下的各项属性
 6     headbtn.frame = CGRectMake(100, 100, 100, 100);
 7     [headbtn setBackgroundImage:[UIImage imageNamed:@"beauty10"] forState:UIControlStateNormal];
 8     [headbtn setTitle:@"点我!" forState:UIControlStateNormal];
 9     [headbtn setTitleColor:[UIColor redColor] forState:UIControlStateNormal];
10     //设置按钮对象高亮状态下的属性
11     [headbtn setBackgroundImage:[UIImage imageNamed:@"beauty11"] forState:UIControlStateHighlighted];
12     [headbtn setTitle:@"还行吧~~" forState:UIControlStateHighlighted];
13     [headbtn setTitleColor:[UIColor blueColor] forState:UIControlStateHighlighted];
14     //将按钮对象添加到视图中显示出来
15     [self.view addSubview:headbtn];
16     self.headImageView = headbtn;  //建立IBOutlet连接
17
18     //向上移动的按钮
19     UIButton *topbtn = [UIButton buttonWithType:UIButtonTypeCustom];
20     topbtn.frame = CGRectMake(100, 250, 40, 40);
21     [topbtn setTitle:@"上移" forState:UIControlStateNormal];
22     [topbtn setTitleColor:[UIColor blueColor] forState:UIControlStateNormal];
23     [topbtn setTag:1];
24     [self.view addSubview:topbtn];
25     //添加按钮的单击事件
26     [topbtn addTarget:self action:@selector(move:) forControlEvents:UIControlEventTouchUpInside];
27
28     //向下移动的按钮
29     UIButton *downbtn = [UIButton buttonWithType:UIButtonTypeCustom];
30     downbtn.frame = CGRectMake(100, 350, 40, 40);
31     [downbtn setTitle:@"下移" forState:UIControlStateNormal];
32     [downbtn setTitleColor:[UIColor blueColor] forState:UIControlStateNormal];
33     [downbtn setTag:2];
34     [self.view addSubview:downbtn];
35     //添加按钮的单击事件
36     [downbtn addTarget:self action:@selector(move:) forControlEvents:UIControlEventTouchUpInside];
37
38     //向左移动的按钮
39     UIButton *leftbtn = [UIButton buttonWithType:UIButtonTypeCustom];
40     leftbtn.frame = CGRectMake(50, 300, 40, 40);
41     [leftbtn setTitle:@"左移" forState:UIControlStateNormal];
42     [leftbtn setTitleColor:[UIColor blueColor] forState:UIControlStateNormal];
43     [leftbtn setTag:3];
44     [self.view addSubview:leftbtn];
45     //添加按钮的单击事件
46     [leftbtn addTarget:self action:@selector(move:) forControlEvents:UIControlEventTouchUpInside];
47
48     //向右移动的按钮
49     UIButton *rightbtn = [UIButton buttonWithType:UIButtonTypeCustom];
50     rightbtn.frame = CGRectMake(150, 300, 40, 40);
51     [rightbtn setTitle:@"右移" forState:UIControlStateNormal];
52     [rightbtn setTitleColor:[UIColor blueColor] forState:UIControlStateNormal];
53     [rightbtn setTag:4];
54     [self.view addSubview:rightbtn];
55     //添加按钮的单击事件
56     [rightbtn addTarget:self action:@selector(move:) forControlEvents:UIControlEventTouchUpInside];
57
58     //放大的按钮
59     UIButton *zoombtn = [UIButton buttonWithType:UIButtonTypeCustom];
60     zoombtn.frame = CGRectMake(75, 400, 40, 40);
61     [zoombtn setTitle:@"放大" forState:UIControlStateNormal];
62     [zoombtn setTitleColor:[UIColor blueColor] forState:UIControlStateNormal];
63     [zoombtn setTag:0];
64     [self.view addSubview:zoombtn];
65     //添加按钮的单击事件
66     [zoombtn addTarget:self action:@selector(zoom:) forControlEvents:UIControlEventTouchUpInside];
67
68     //缩小的按钮
69     UIButton *minusbtn = [UIButton buttonWithType:UIButtonTypeCustom];
70     minusbtn.frame = CGRectMake(125, 400, 40, 40);
71     [minusbtn setTitle:@"缩小" forState:UIControlStateNormal];
72     [minusbtn setTitleColor:[UIColor blueColor] forState:UIControlStateNormal];
73     [minusbtn setTag:1];
74     [self.view addSubview:minusbtn];
75     //添加按钮的单击事件
76     [minusbtn addTarget:self action:@selector(zoom:) forControlEvents:UIControlEventTouchUpInside];
77 }
先声明上下左右移动的枚举类型,及移动或放大缩小的常量值:
 1 //ViewController.m
 2 typedef NS_ENUM(NSUInteger, kMovingDir)
 3 {
 4     kMovingDirTop = 1,
 5     kMovingDirButtom,
 6     kMovingDirLeft,
 7     kMovingDirRight,
 8 };
 9
10 CGFloat const kMovingDelta = 50.0;      //移动系数
11 CGFloat const kZoomingDelta = 50.0;     //放大缩小系数
实现按钮的事件:
 1 - (void)move:(id)sender {
 2     UIButton *button = (UIButton *)sender;
 3
 4     CGPoint p = self.headImageView.center;
 5     switch (button.tag) {
 6         case kMovingDirTop: p.y -= kMovingDelta; break;  //往上移动
 7         case kMovingDirButtom: p.y += kMovingDelta; break;  //往下移动
 8         case kMovingDirLeft: p.x -= kMovingDelta; break; //往左移动
 9         case kMovingDirRight: p.x += kMovingDelta; break; //往右移动
10     }
11
12     [UIView beginAnimations:nil context:nil];
13     [UIView setAnimationDuration:2.0];
14     self.headImageView.center = p;
15     [UIView commitAnimations];
16 }
17
18 - (void)zoom:(id)sender {
19     UIButton *button = (UIButton *)sender;
20
21     CGRect rect = self.headImageView.bounds;
22     if (button.tag) {   //缩小
23         rect.size.width -= kZoomingDelta;
24         rect.size.height -= kZoomingDelta;
25     } else {            //放大
26         rect.size.width += kZoomingDelta;
27         rect.size.height += kZoomingDelta;
28     }
29
30     [UIView beginAnimations:nil context:nil];
31     [UIView setAnimationDuration:2.0];
32     self.headImageView.bounds = rect;
33     [UIView commitAnimations];
34 }
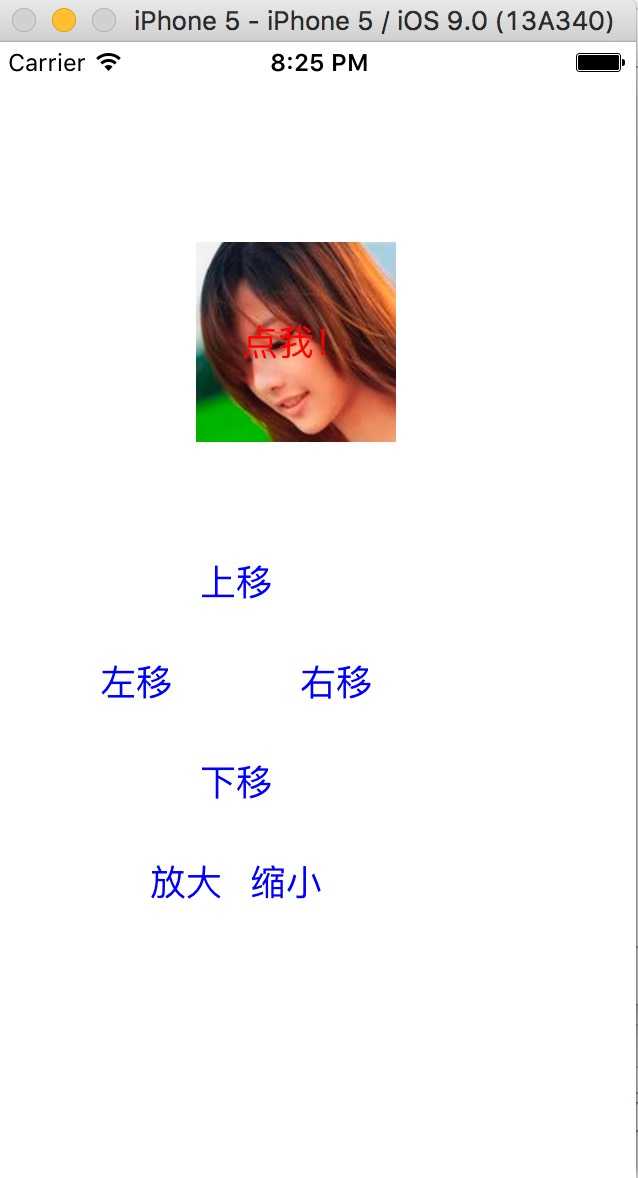
示图如下:

示例代码:http://pan.baidu.com/s/1i3SainN
1)开始动画;
2)设置动画相关的参数,如时间等;
3)参与动画的行动
4)提交动画。
示例代码如下:
1     [UIView beginAnimations:nil context:nil];
2     [UIView setAnimationDuration:2.0];
3     self.headImageView.bounds = rect;
4     [UIView commitAnimations];
参考博客:iOS开发UI基础—手写控件,frame,center和bounds属性
标签:
原文地址:http://www.cnblogs.com/wjq-Law/p/5097051.html