标签:
在WPF应用程序开发过程中,大数据量的数据展现通常都要考虑性能问题。有下面一种常见的情况:原始数据源数据量很大,但是某一时刻数据容器中的可见元素个数是有限的,剩余大多数元素都处于不可见状态,如果一次性将所有的数据元素都渲染出来则会非常的消耗性能。因而可以考虑只渲染当前可视区域内的元素,当可视区域内的元素需要发生改变时,再渲染即将展现的元素,最后将不再需要展现的元素清除掉,这样可以大大提高性能。在WPF中System.Windows.Controls命名空间下的VirtualizingStackPanel可以实现数据展现的虚拟化功能,ListBox的默认元素展现容器就是它。但有时VirtualizingStackPanel的布局并不能满足我们的实际需要,此时就需要实现自定义布局的虚拟容器了。本文将简单介绍容器自定义布局,然后介绍实现虚拟容器的基本原理,最后给出一个虚拟化分页容器的演示程序。
通常实现一个自定义布局的容器,需要继承System.Windows.Controls.Panel, 并重写下面两个方法:
MeasureOverride —— 用来测量子元素期望的布局尺寸
ArrangeOverride —— 用来安排子元素在容器中的布局。
下面用一个简单的SplitPanel来加以说明这两个方法的作用。下面的Window中放置了一个SplitPanel,每点击一次“添加”按钮,都会向SplitPanel中添加一个填充了随机色的Rectangle, 而SplitPanel中的Rectangle无论有几个,都会在垂直方向上布满容器,水平方向上平均分配宽度。
实现代码如下:

 1 /// <summary>
 2 /// 简单的自定义容器
 3 /// 子元素在垂直方向布满容器,水平方向平局分配容器宽度
 4 /// </summary>
 5 public class SplitPanel : Panel
 6 {
 7     protected override Size MeasureOverride(Size availableSize)
 8     {
 9         foreach (UIElement child in InternalChildren)
10         {
11             child.Measure(availableSize);   // 测量子元素期望布局尺寸(child.DesiredSize)
12         }
13
14         return base.MeasureOverride(availableSize);
15     }
16
17     protected override Size ArrangeOverride(Size finalSize)
18     {
19         if (double.IsInfinity(finalSize.Height) || double.IsInfinity(finalSize.Width))
20         {
21             throw new InvalidOperationException("容器的宽和高必须是确定值");
22         }
23
24         if (Children.Count > 0)
25         {
26             double childAverageWidth = finalSize.Width / Children.Count;
27             for (int childIndex = 0; childIndex < InternalChildren.Count; childIndex++)
28             {
29                 // 计算子元素将被安排的布局区域
30                 var rect = new Rect(childIndex * childAverageWidth, 0, childAverageWidth, finalSize.Height);
31                 InternalChildren[childIndex].Arrange(rect);
32             }
33         }
34
35         return base.ArrangeOverride(finalSize);
36     }
37 }
SplitPanel的MeasureOverride 方法参数availableSize是容器可以给出的总布局大小,在方法体中只依次调用了子元素的Measure方法,调用该方法后,子元素的DesiredSize属性就会被赋值, 该属性指明了子元素期望的布局尺寸。(在SplitPanel中并不需要知道子元素的期望布局尺寸,所以可以不必重写MeasureOverride 方法,但是在一些比较复杂的布局中需要用到子元素的DesiredSize属性时就必须重写)
SplitPaneld的ArrangeOverride 方法参数finalSize是容器最终给出的布局大小,26行根据子元素个数先计算出子元素平均宽度,30行再按照子元素索引计算出各自的布局区域信息。然后31行调用子元素的Arrange方法将子元素安排在容器中的合适位置。这样就可以实现期望的布局效果。当UI重绘时(例如子元素个数发生改变、容器布局尺寸发生改变、强制刷新UI等),会重新执行MeasureOverride 和ArrangeOverride 方法。
要想实现一个虚拟容器,并让虚拟容器正常工作,必须满足以下两个条件:
1、容器继承自System.Windows.Controls.VirtualizingPanel,并实现子元素的实例化、虚拟化及布局处理。
2、虚拟容器要做为一个System.Windows.Controls.ItemsControl(或继承自ItemsControl的类)实例的ItemsPanel(实际上是定义一个ItemsPanelTemplate)
下面我们先来了解一下ItemsControl的工作机制:
当我们为一个ItemsControl指定了ItemsSource属性后,ItemsControl的Items属性就会被初始化,这里面装的就是原始的数据(题外话:通过修改Items的Filter可以实现不切换数据源的元素过滤,修改Items的SortDescriptions属性可以实现不切换数据源的元素排序)。之后ItemsControl会根据Items来生成子元素的容器(ItemsControl生成ContentPresenter, ListBox生成ListBoxItem, ComboBox生成ComboBox等等),同时将子元素容器的DataContext设置为与之对应的数据源,最后每个子元素容器再根据ItemTemplate的定义来渲染子元素实际显示效果。
对于Panel来说,ItemsControl会一次性生成所有子元素的子元素容器并进行数据初始化,这样就导致在数据量较大时性能会很差。而对于VirtualizingPanel,ItemsControl则不会自动生成子元素容器及子元素的渲染,这一过程需要编程实现。
接下来我们引入另一个重要概念:GeneratorPosition,这个结构体用来描述ItemsControl的Items属性中实例化和虚拟化数据项的位置关系,在VirtualizingPanel中可以通过ItemContainerGenerator(注意:在VirtualizingPanel第一次访问这个属性之前要先访问一下InternalChildren属性,否则ItemContainerGenerator会是null,貌似是一个Bug)属性来获取数据项的位置信息,此外通过这个属性还可以进行数据项的实例化和虚拟化。
获取数据项GeneratorPosition信息:

 1 /// <summary>
 2 /// 显示数据GeneratorPosition信息
 3 /// </summary>
 4 public void DumpGeneratorContent()
 5 {
 6     IItemContainerGenerator generator = this.ItemContainerGenerator;
 7     ItemsControl itemsControl = ItemsControl.GetItemsOwner(this);
 8
 9     Console.WriteLine("Generator positions:");
10     for (int i = 0; i < itemsControl.Items.Count; i++)
11     {
12         GeneratorPosition position = generator.GeneratorPositionFromIndex(i);
13         Console.WriteLine("Item index=" + i + ", Generator position: index=" + position.Index + ", offset=" + position.Offset);
14     }
15     Console.WriteLine();
16 }
第7行通过ItemsControl的静态方法GetItemsOwner可以找到容器所在的ItemsControl,这样就可以访问到数据项集合,第12行代码调用generator 的GeneratorPositionFromIndex方法,通过数据项的索引得到数据项的GeneratorPosition 信息。
数据项实例化:

 1 /// <summary>
 2 /// 实例化子元素
 3 /// </summary>
 4 /// <param name="itemIndex">数据条目索引</param>
 5 public void RealizeChild(int itemIndex)
 6 {
 7     IItemContainerGenerator generator = this.ItemContainerGenerator;
 8     GeneratorPosition position = generator.GeneratorPositionFromIndex(itemIndex);
 9
10     using (generator.StartAt(position, GeneratorDirection.Forward, allowStartAtRealizedItem: true))
11     {
12         bool isNewlyRealized;
13         var child = (UIElement)generator.GenerateNext(out isNewlyRealized); // 实例化(构造出空的子元素UI容器)
14
15         if (isNewlyRealized)
16         {
17             generator.PrepareItemContainer(child); // 填充UI容器数据
18         }
19     }
20 }
第10行调用generator 的StartAt方法确定准备实例化元素的数据项位置,第13行调用generator的GenerateNext方法进行数据项的实例化,输出参数isNewlyRealized为ture则表明该元素是从虚拟化状态实例化出来的,false则表明该元素已被实例化。注意,该方法只是构造出了子元素的UI容器,只有调用了17行的PrepareItemContainer方法,UI容器的实际内容才会根据ItemsControl的ItemTemplate定义进行渲染。
数据项虚拟化:

 1 /// <summary>
 2 /// 虚拟化子元素
 3 /// </summary>
 4 /// <param name="itemIndex">数据条目索引</param>
 5 public void VirtualizeChild(int itemIndex)
 6 {
 7     IItemContainerGenerator generator = this.ItemContainerGenerator;
 8     var childGeneratorPos = generator.GeneratorPositionFromIndex(itemIndex);
 9     if (childGeneratorPos.Offset == 0)
10     {
11         generator.Remove(childGeneratorPos, 1); // 虚拟化(从子元素UI容器中清除数据)
12     }
13 }
通过数据条目索引得出GeneratorPosition 信息,之后在11行调用generator的Remove方法即可实现元素的虚拟化。
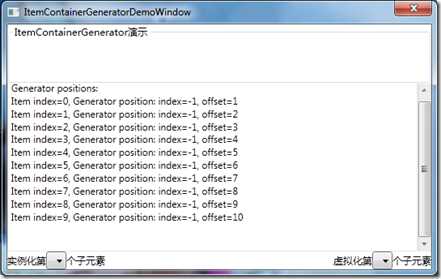
通过几张图片来有一个直观的认识,数据条目一共有10个,初始化时全部都为虚拟化状态:

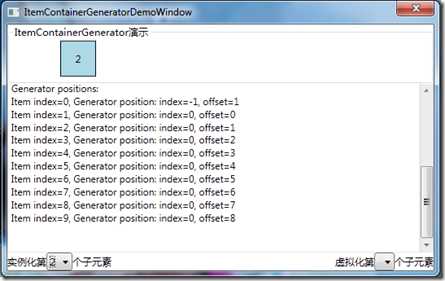
实例化第二个元素:

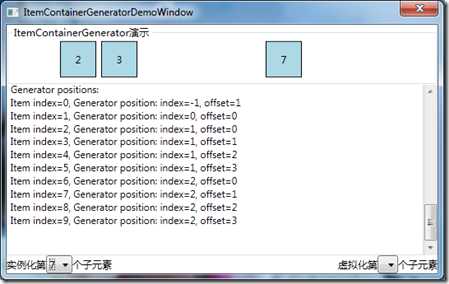
增加实例化第三、七个元素:

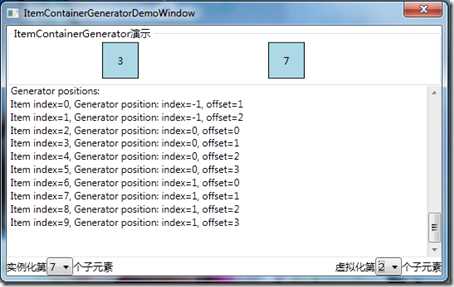
虚拟化第二个元素:

通过观察可以发现,实例化的数据项位置信息按顺序从0开始依次增加,所有实例化的数据项位置信息的offset属性都是0,虚拟化数据项index和前一个最近的实例化元素index保持一致,offset依次增加。
了解了子元素自定义布局、数据项GeneratorPosition信息、虚拟化、实例化相关概念和实现方法后,离实现一个自定义虚拟容器还剩一步重要的工作:计算当前应该显示的数据项起止索引,实例化这些数据项,虚拟化不再显示的数据项。
再前进一步,实现一个虚拟化分页容器:
这个虚拟化分页容器有ChildWidth和ChildHeight两个依赖属性,用来定义容器中子元素的宽和高,这样在容器布局尺寸确定的情况下可以计算出可用布局下一共能显示多少个子元素,也就是PageSize属性。为容器指定一个有5000个数据的数据源,再提供一个分页控件用来控制分页容器的PageIndex,用来达到分页显示的效果。
贴出主要代码:

 1 /// <summary>
 2 /// 计算可是元素起止索引
 3 /// </summary>
 4 /// <param name="availableSize">可用布局尺寸</param>
 5 /// <param name="firstVisibleChildIndex">第一个显示的子元素索引</param>
 6 /// <param name="lastVisibleChildIndex">最后一个显示的子元素索引</param>
 7 private void ComputeVisibleChildIndex(Size availableSize, out int firstVisibleChildIndex, out int lastVisibleChildIndex)
 8 {
 9     ItemsControl itemsControl = ItemsControl.GetItemsOwner(this);
10
11     if (itemsControl != null && itemsControl.Items != null && ChildWidth > 0 && ChildHeight > 0)
12     {
13         ChildrenCount = itemsControl.Items.Count;
14
15         _horizontalChildMaxCount = (int)(availableSize.Width / ChildWidth);
16         _verticalChildMaxCount = (int)(availableSize.Height / ChildHeight);
17
18         PageSize = _horizontalChildMaxCount * _verticalChildMaxCount;
19
20         // 计算子元素显示起止索引
21         firstVisibleChildIndex = PageIndex * PageSize;
22         lastVisibleChildIndex = Math.Min(ChildrenCount, firstVisibleChildIndex + PageSize) - 1;
23
24         Debug.WriteLine("firstVisibleChildIndex:{0}, lastVisibleChildIndex{1}", firstVisibleChildIndex, lastVisibleChildIndex)
25     }
26     else
27     {
28         ChildrenCount = 0;
29         firstVisibleChildIndex = -1;
30         lastVisibleChildIndex = -1;
31         PageSize = 0;
32     }
33 }

 1 /// <summary>
 2 /// 测量子元素布局,生成需要显示的子元素
 3 /// </summary>
 4 /// <param name="availableSize">可用布局尺寸</param>
 5 /// <param name="firstVisibleChildIndex">第一个显示的子元素索引</param>
 6 /// <param name="lastVisibleChildIndex">最后一个显示的子元素索引</param>
 7 private void MeasureChild(Size availableSize, int firstVisibleChildIndex, int lastVisibleChildIndex)
 8 {
 9     if (firstVisibleChildIndex < 0)
10     {
11         return;
12     }
13
14     // 注意,在第一次使用 ItemContainerGenerator之前要先访问一下InternalChildren,
15     // 否则ItemContainerGenerator为null,是一个Bug
16     UIElementCollection children = InternalChildren;
17     IItemContainerGenerator generator = ItemContainerGenerator;
18
19     // 获取第一个可视元素位置信息
20     GeneratorPosition position = generator.GeneratorPositionFromIndex(firstVisibleChildIndex);
21     // 根据元素位置信息计算子元素索引
22     int childIndex = position.Offset == 0 ? position.Index : position.Index + 1;
23
24     using (generator.StartAt(position, GeneratorDirection.Forward, true))
25     {
26         for (int itemIndex = firstVisibleChildIndex; itemIndex <= lastVisibleChildIndex; itemIndex++, childIndex++)
27         {
28             bool isNewlyRealized;   // 用以指示新生成的元素是否是新实体化的
29
30             // 生成下一个子元素
31             var child = (UIElement)generator.GenerateNext(out isNewlyRealized);
32
33             if (isNewlyRealized)
34             {
35                 if (childIndex >= children.Count)
36                 {
37                     AddInternalChild(child);
38                 }
39                 else
40                 {
41                     InsertInternalChild(childIndex, child);
42                 }
43                 generator.PrepareItemContainer(child);
44             }
45
46             // 测算子元素布局
47             child.Measure(availableSize);
48         }
49     }
50 }

 1 /// <summary>
 2 /// 清理不需要显示的子元素
 3 /// </summary>
 4 /// <param name="firstVisibleChildIndex">第一个显示的子元素索引</param>
 5 /// <param name="lastVisibleChildIndex">最后一个显示的子元素索引</param>
 6 private void CleanUpItems(int firstVisibleChildIndex, int lastVisibleChildIndex)
 7 {
 8     UIElementCollection children = this.InternalChildren;
 9     IItemContainerGenerator generator = this.ItemContainerGenerator;
10
11     // 清除不需要显示的子元素,注意从集合后向前操作,以免造成操作过程中元素索引发生改变
12     for (int i = children.Count - 1; i > -1; i--)
13     {
14         // 通过已显示的子元素的位置信息得出元素索引
15         var childGeneratorPos = new GeneratorPosition(i, 0);
16         int itemIndex = generator.IndexFromGeneratorPosition(childGeneratorPos);
17
18         // 移除不再显示的元素
19         if (itemIndex < firstVisibleChildIndex || itemIndex > lastVisibleChildIndex)
20         {
21             generator.Remove(childGeneratorPos, 1);
22             RemoveInternalChildRange(i, 1);
23         }
24     }
25 }
源码链接: http://pan.baidu.com/s/1kUmXWgf 密码: bjyf
本文章转自: http://www.cnblogs.com/talywy/archive/2012/09/07/CustomVirtualizingPanel.html 感谢博主
【转】WPF中实现自定义虚拟容器(实现VirtualizingPanel)
标签:
原文地址:http://www.cnblogs.com/bill-q/p/5122161.html