标签:
1、对于LinkedBlockingQueue需要掌握以下几点
2、创建
Node节点内部类与LinkedBlockingQueue的一些属性

    static class Node<E> {
        E item;//节点封装的数据
        /**
         * One of:
         * - the real successor Node
         * - this Node, meaning the successor is head.next
         * - null, meaning there is no successor (this is the last node)
         */

        Node<E> next;//下一个节点
        Node(E x) { item = x; }
    }

    /** 指定链表容量  */
    private final int capacity;

    /** 当前的元素个数 */
    private final AtomicInteger count = new AtomicInteger(0);

    /** 链表头节点 */
    private transient Node<E> head;

    /** 链表尾节点 */
    private transient Node<E> last;

    /** 出队锁 */
    private final ReentrantLock takeLock = new ReentrantLock();

    /** 出队等待条件 */
    private final Condition notEmpty = takeLock.newCondition();

    /** 入队锁 */
    private final ReentrantLock putLock = new ReentrantLock();

    /** 入队等待条件 */
    private final Condition notFull = putLock.newCondition();
2.1、public LinkedBlockingQueue(int capacity)
使用方法:
Queue<String> abq = new LinkedBlockingQueue<String>(1000);
源代码:

    /**
     * 创建一个 LinkedBlockingQueue,容量为指定容量
     */
    public LinkedBlockingQueue(int capacity) {
        if (capacity <= 0) throw new IllegalArgumentException();
        this.capacity = capacity;
        last = head = new Node<E>(null);//初始化头节点和尾节点,均为封装了null数据的节点
    }
注意点:
2.2、public LinkedBlockingQueue()
使用方法:
Queue<String> abq = new LinkedBlockingQueue<String>();
源代码:

    /**
     * 创建一个LinkedBlockingQueue,容量为整数最大值
     */
    public LinkedBlockingQueue() {
        this(Integer.MAX_VALUE);
    }
注意点:默认容量为整数最大值,可以看做没有容量限制
3、入队:
3.1、public boolean offer(E e)
原理:
使用方法:
源代码:

    /**
     * 在队尾插入一个元素,
     * 容量没满,可以立即插入,返回true;
     * 队列满了,直接返回false
     * 注:如果使用了限制了容量的队列,这个方法比add()好,因为add()插入失败就会抛出异常
     */
    public boolean offer(E e) {
        if (e == null) throw new NullPointerException();
        final AtomicInteger count = this.count;//获取队列中的元素个数
        if (count.get() == capacity)//队列满了
            return false;
        int c = -1;
        final ReentrantLock putLock = this.putLock;
        putLock.lock();//获取入队锁
        try {
            if (count.get() < capacity) {//容量没满
                enqueue(e);//入队
                c = count.getAndIncrement();//容量+1
                if (c + 1 < capacity)//如果上边+1后的容量再加1,还小于指定容量(说明在插入当前元素后,至少还可以再插一个元素)
                    notFull.signal();//唤醒等待notFull条件的其中一个线程
            }
        } finally {
            putLock.unlock();//释放入队锁
        }
        if (c == 0)//如果c==0,这是什么情况?
            signalNotEmpty();
        return c >= 0;
    }

    /**
     * 创建一个节点,并加入链表尾部
     * @param x
     */
    private void enqueue(E x) {
        /*
         * 封装新节点,并赋给当前的最后一个节点的下一个节点,然后在将这个节点设为最后一个节点
         */
        last = last.next = new Node<E>(x);
    }

    private void signalNotEmpty() {
        final ReentrantLock takeLock = this.takeLock;
        takeLock.lock();//获取出队锁
        try {
            notEmpty.signal();//唤醒等待notEmpty条件的线程中的一个
        } finally {
            takeLock.unlock();//释放出队锁
        }
    }
如果,入队逻辑不懂,查看最后总结部分入队逻辑的图,代码非常简单,流程看注释即可,只有一点注意点:
3.2、public boolean offer(E e, long timeout, TimeUnit unit) throws InterruptedException
原理:
使用方法:

        try {
            abq.offer("hello2",1000,TimeUnit.MILLISECONDS);
        } catch (InterruptedException e) {
            e.printStackTrace();
        }
源代码:

    /**
     * 在队尾插入一个元素,,如果队列已满,则进入等待,直到出现以下三种情况:
     * 1、被唤醒
     * 2、等待时间超时
     * 3、当前线程被中断
     */
    public boolean offer(E e, long timeout, TimeUnit unit)
            throws InterruptedException {

        if (e == null)
            throw new NullPointerException();
        long nanos = unit.toNanos(timeout);// 转换为纳秒
        int c = -1;
        final ReentrantLock putLock = this.putLock;// 入队锁
        final AtomicInteger count = this.count;// 总数量
        putLock.lockInterruptibly();
        try {
            while (count.get() == capacity) {// 容量已满
                if (nanos <= 0)// 已经超时
                    return false;
                /*
                 * 进行等待: 在这个过程中可能发生三件事:
                 * 1、被唤醒-->继续当前这个while循环
                 * 2、超时-->继续当前这个while循环
                 * 3、被中断-->抛出中断异常InterruptedException
                 */
                nanos = notFull.awaitNanos(nanos);
            }
            enqueue(e);// 入队
            c = count.getAndIncrement();// 入队元素数量+1
            if (c + 1 < capacity)
                notFull.signal();
        } finally {
            putLock.unlock();
        }
        if (c == 0)
            signalNotEmpty();
        return true;
    }
注意:
3.3、public void put(E e) throws InterruptedException
原理:
使用方法:

        try {
            abq.put("hello1");
        } catch (InterruptedException e) {
            e.printStackTrace();
        }
源代码:

    /**
     * 在队尾插一个元素
     * 如果队列满了,一直阻塞,直到队列不满了或者线程被中断
     */
    public void put(E e) throws InterruptedException {
        if (e == null) throw new NullPointerException();
        int c = -1;
        final ReentrantLock putLock = this.putLock;//入队锁
        final AtomicInteger count = this.count;//当前队列中的元素个数
        putLock.lockInterruptibly();//加锁
        try {
            while (count.get() == capacity) {//如果队列满了
                /*
                 * 加入notFull等待队列,直到队列元素不满了,
                 * 被其他线程使用notFull.signal()唤醒
                 */
                notFull.await();
            }
            enqueue(e);//入队
            c = count.getAndIncrement();//入队数量+1
            if (c + 1 < capacity)
                notFull.signal();
        } finally {
            putLock.unlock();
        }
        if (c == 0)
            signalNotEmpty();
    }
4、出队
4.1、public E poll()
原理:
使用方法:
abq.poll();
源代码:

    /**
     * 出队:
     * 1、如果没有元素,直接返回null
     * 2、如果有元素,出队
     */
    public E poll() {
        final AtomicInteger count = this.count;//获取元素数量
        if (count.get() == 0)//没有元素
            return null;
        E x = null;
        int c = -1;
        final ReentrantLock takeLock = this.takeLock;
        takeLock.lock();//获取出队锁
        try {
            if (count.get() > 0) {//有元素
                x = dequeue();//出队
                //元素个数-1(注意:该方法是一个无限循环,直到减1成功为止)
                c = count.getAndDecrement();
                if (c > 1)//还有元素
                    notEmpty.signal();//唤醒等待在notEmpty队列中的其中一条线程
            }
        } finally {
            takeLock.unlock();//释放出队锁
        }
        if (c == capacity)//c == capacity是怎么发生的
            signalNotFull();
        return x;
    }

    /**
     * 从队列头部移除一个节点
     */
    private E dequeue() {
        Node<E> h = head;//获取头节点:x==null
        Node<E> first = h.next;//将头节点的下一个节点赋值给first
        h.next = h; // 将当前将要出队的节点置null(为了使其做head节点做准备)
        head = first;//将当前将要出队的节点作为了头节点
        E x = first.item;//获取出队节点的值
        first.item = null;//将出队节点的值置空
        return x;
    }

    private void signalNotFull() {
        final ReentrantLock putLock = this.putLock;
        putLock.lock();
        try {
            notFull.signal();
        } finally {
            putLock.unlock();
        }
    }
注意:出队逻辑如果不懂,查看最后总结部分的图
4.2、public E poll(long timeout, TimeUnit unit) throws InterruptedException
原理:
使用方法:

        try {
            abq.poll(1000, TimeUnit.MILLISECONDS);
        } catch (InterruptedException e) {
            e.printStackTrace();
        }
源代码:

    /**
     * 从队列头部删除一个元素,
     * 如果队列不空,出队;
     * 如果队列已空,判断时间是否超时,如果已经超时,返回null
     * 如果队列已空且时间未超时,则进入等待,直到出现以下三种情况:
     * 1、被唤醒
     * 2、等待时间超时
     * 3、当前线程被中断
     */
    public E poll(long timeout, TimeUnit unit) throws InterruptedException {
        E x = null;
        int c = -1;
        long nanos = unit.toNanos(timeout);
        final AtomicInteger count = this.count;
        final ReentrantLock takeLock = this.takeLock;
        takeLock.lockInterruptibly();
        try {
            while (count.get() == 0) {//如果队列没有元素
                if (nanos <= 0)//已经超时
                    return null;
                /*
                 * 进行等待:
                 * 在这个过程中可能发生三件事:
                 * 1、被唤醒-->继续当前这个while循环
                 * 2、超时-->继续当前这个while循环
                 * 3、被中断-->抛出异常
                 */
                nanos = notEmpty.awaitNanos(nanos);
            }
            x = dequeue();//出队
            c = count.getAndDecrement();
            if (c > 1)
                notEmpty.signal();
        } finally {
            takeLock.unlock();
        }
        if (c == capacity)
            signalNotFull();
        return x;
    }
4.3、public E take() throws InterruptedException
原理:
使用方法:

        try {
            abq.take();
        } catch (InterruptedException e) {
            e.printStackTrace();
        }
源代码:

    /**
     * 出队:
     * 如果队列空了,一直阻塞,直到队列不为空或者线程被中断
     */
    public E take() throws InterruptedException {
        E x;
        int c = -1;
        final AtomicInteger count = this.count;//获取队列中的元素总量
        final ReentrantLock takeLock = this.takeLock;
        takeLock.lockInterruptibly();//获取出队锁
        try {
            while (count.get() == 0) {//如果没有元素,一直阻塞
                /*
                 * 加入等待队列, 一直等待条件notEmpty(即被其他线程唤醒)
                 * (唤醒其实就是,有线程将一个元素入队了,然后调用notEmpty.signal()唤醒其他等待这个条件的线程,同时队列也不空了)
                 */
                notEmpty.await();
            }
            x = dequeue();//出队
            c = count.getAndDecrement();//元素数量-1
            if (c > 1)
                notEmpty.signal();
        } finally {
            takeLock.unlock();
        }
        if (c == capacity)
            signalNotFull();
        return x;
    }
总结:
1、具体入队与出队的原理图:
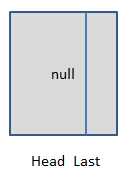
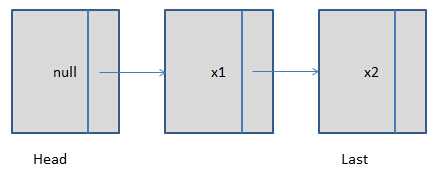
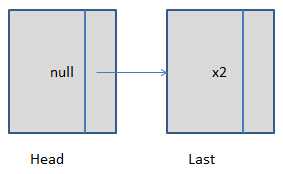
图中每一个节点前半部分表示封装的数据x,后边的表示指向的下一个引用。
1.1、初始化

初始化之后,初始化一个数据为null,且head和last节点都是这个节点。
1.2、入队两个元素过后

这个可以根据入队方法enqueue(E x)来看,源代码再贴一遍:

    /**
     * 创建一个节点,并加入链表尾部
     *
     * @param x
     */
    private void enqueue(E x) {
        /*
         * 封装新节点,并赋给当前的最后一个节点的下一个节点,然后在将这个节点设为最后一个节点
         */
        last = last.next = new Node<E>(x);
    }
其实这我们就可以发现其实真正意义上出队的头节点是Head节点的下一个节点。(这也就是Node这个内部类中对next的注释,我没有翻译)
1.3、出队一个元素后

表面上看,只是将头节点的next指针指向了要删除的x1.next,事实上这样我觉的就完全可以,但是jdk实际上是将原来的head节点删除了,而上边看到的这个head节点,正是刚刚出队的x1节点,只是其值被置空了。
这一块对应着源代码来看:dequeue()

    /**
     * 从队列头部移除一个节点
     */
    private E dequeue() {
        Node<E> h = head;// 获取头节点:x==null
        Node<E> first = h.next;// 将头节点的下一个节点赋值给first
        h.next = h; // 将当前将要出队的节点置null(为了使其做head节点做准备)
        head = first;// 将当前将要出队的节点作为了头节点
        E x = first.item;// 获取出队节点的值
        first.item = null;// 将出队节点的值置空
        return x;
    }
2、三种入队对比:
3、三种出队对比:
4、ArrayBlockingQueue与LinkedBlockingQueue对比
两个疑问:(望大神指点)
标签:
原文地址:http://www.cnblogs.com/java-zhao/p/5135958.html