标签:
先到Jenkins官网的Meet Jekins中看一下Installation部分,原文如下
You have several options for downloading and installing Jenkins:

*Use one of the platform-specific package/installer links on the Jenkins site to install Jenkins on your system.
*You can download jenkins.war directly and launch it by executing java -jar jenkins.war. This is basically the same set up as the test drive, except that the output will go to console, not to a window. On Windows, you can even choose to install Jenkins as a service afterwards.
*If you have a servlet container that supports Servlet 2.4/JSP 2.0 or later, such as Tomcat 5, you can deploy jenkins.war as you would any WAR file. See this document for more about container-specific installation instruction.
大概的看一下,意思就是说有好几种方法下载和安装Jenkins,针对windows操作系统可以选择的方法是,下载Jenkins提供的exe直接安装,以服务的方式运行,还有一种是下载Jenkins提供的war,war文件需要通过tomcat安装,还有许多的配置项需要设置,简单起见,本文采用exe的方式进行安装,下载完成之后解压出来,运行setup.exe,安装完成之后进入控制面板->管理工具->服务就可以看到jenkins。通过http://localhost:8080/就可以进入到jenkins的web页面了,如果需要配置jenkins的工作目录,先停止jenkins服务,然后再增加环境变量JENKINS_HOME即可。
还有几个插件要安装一下,进入到系统管理->管理插件->可选插件,安装一下Email Extension Plugin(用于邮件通知)和Gradle plugin(用于gradle编译)这两个插件。安装完成之后,再配置一些信息
Jenkins Location标签中
系统管理员邮件地址:sender@163.com
Extended E-mail Notification标签中
SMTP server : smtp.163.com
Default user E-mail suffix :sender@163.com
Default Content Type :Plain Text(text/plain)
Default Recipients :receiver1@163.com,receiver2@163.x,...,receivern@163.com
Reply To List : sender@163.com
Default Subject :构建通知:$PROJECT_NAME - Build # $BUILD_NUMBER - $BUILD_STATUS!
Default Content :
(本邮件是程序自动下发的,请勿回复!)<br/>
项目名称:$PROJECT_NAME<br/>
构建编号:$BUILD_NUMBER<br/>
svn版本号:${SVN_REVISION}<br/>
构建状态:$BUILD_STATUS<br/>
触发原因:${CAUSE}<br/>
构建日志地址:<a href="${BUILD_URL}console">${BUILD_URL}console</a><br/>
构建地址:<a href="$BUILD_URL">$BUILD_URL</a><br/>
变更集:${JELLY_SCRIPT,template="html"}<br/>
邮件通知标签中
SMTP服务器:smtp.163.com
用户名:sender
密码:xxxxxx
SMTP端口:选中SSL填465,没选中填25
Reply-To Address:sender@163.com
字符集:UTF-8
  高级项目选项标签中
    使用自定义的工作空间:可以配置自定义的工作空间

  源码管理标签中Subversion
    Repository URL: svn地址,注意这里都要填写小写的字母,否则如果真是svn路径中有大写字母的话,会导致svn版本号获取不到以及变更集获取不到
    Local modle directory(optional):.
    Repository depth:infinity
    Check out Strategy:use ‘svn update‘ as much as possible

  构建标签中
    Gradle Version:选中最新版本吧,我选的是2.9
    Tasks:clean buildAll,这个是build.gradle中的任务,后面会把测试工程的build.gradle放出来

  构建后操作步骤中加入Archive the artifacts,Email Notificatioin,Editable Email Notification
     Archive the artifacts标签中
      用于存档的文件:app/build/release/*.zip
     Email Notificatioin标签中
      Recipients:收件人的名字,这里是配置发送编译错误以及编译恢复邮件的收件人
    Editable Email Notification标签中
      Project Recipient List:receiver1@163.com,receiver2@163.com,...,receivern@163.com
      Project Reply-To List:$REPLAY_TO
      Content Type:HTML(text/html)
      Default Subject:$DEFAULT_SUBJECT
      Default Content:$DEFAULT_CONTENT

  这里是分割线,服务器的配置都ok了,Android Studio的工程当然也是要做一些配合才可以完成的,下面把Android Studio工程中app的build.gradle贴出来
import org.tmatesoft.svn.core.wc.*
import org.tmatesoft.svn.core.wc2.*
import org.tmatesoft.svn.core.*

apply plugin: ‘com.android.application‘

android {
    compileSdkVersion 22
    buildToolsVersion "22.0.1"

    defaultConfig {
        // 包名
        applicationId "com.zhb.studiotest"
        minSdkVersion 19
        targetSdkVersion 22
        versionCode 1
        versionName "1.0.0.1"
        manifestPlaceholders = [ CHANNEL_NAME:"Unspecified",APPLICATION_LABLE:"StudioTest"]
    }

    sourceSets.main.jni.srcDirs = []
    sourceSets.main.jniLibs.srcDir ‘src/main/libs‘

    def versionPropsFile = file(‘version.properties‘)
    if (versionPropsFile.canRead()) {
        def Properties versionProps = new Properties()
        versionProps.load(new FileInputStream(versionPropsFile))
        def prename = versionProps[‘VERSION_NAME_MAJOR‘]
        def name = versionProps[‘VERSION_NAME_BUILD‘].toInteger()
        def runTasks = gradle.startParameter.taskNames
        if (‘buildAll‘ in runTasks) {
            name++
        }
        versionProps[‘VERSION_NAME_BUILD‘]=name.toString()
        versionProps.store(versionPropsFile.newWriter(), null)
        defaultConfig {
            versionName prename + name
        }
    }

    signingConfigs {
        releaseConfig {
            // 写死签名密码
            keyAlias ‘haibo.zhou‘
            keyPassword ‘hbzhou0622‘
            storeFile file("keystore.jks")
            storePassword ‘hbzhou0622‘
            // 要求输入签名密码
//            storeFile file("keystore.jks")
//            keyAlias System.console().readLine("\nkeyAlias: ")
//            storePassword System.console().readLine("\nKeystore password: ")
//            keyPassword System.console().readLine("\nKey password: ")
        }
    }

    /*productFlavors {
        xiaomi {
            applicationId = "com.zhb.xiaomi"
            manifestPlaceholders = [UMENG_CHANNEL_VALUE: name,APPLICATION_LABLE:name]
        }
        baidu {
            applicationId = "com.zhb.baidu"
            manifestPlaceholders = [UMENG_CHANNEL_VALUE: name,APPLICATION_LABLE:name]
        }
        wandoujia {
            applicationId = "com.zhb.wandoujia"
            manifestPlaceholders = [UMENG_CHANNEL_VALUE: name,APPLICATION_LABLE:name]
        }
    }*/
    productFlavors {
        wandoujia {}
        baidu {}
        //c360 {}
        //uc {}
        productFlavors.all { flavor ->
            applicationId = "com.zhb."+name
            flavor.manifestPlaceholders = [UMENG_CHANNEL_VALUE: name,APPLICATION_LABLE:name]
        }

    }

    buildTypes {
        debug {
            buildConfigField "boolean", "LOG_DEBUG", "true"
            versionNameSuffix "-debug"
            // 混淆开关
            minifyEnabled false
            // 在Android中,每个应用程序中储存的数据文件都会被多个进程访问:
            // 安装程序会读取应用程序的manifest文件来处理与之相关的权限问题;
            // Home应用程序会读取资源文件来获取应用程序的名和图标;
            // 系统服务会因为很多种原因读取资源(例如,显示应用程序的Notification);
            // 此外,就是应用程序自身用到资源文件。
            // 当资源文件通过内存映射对齐到4字节边界时,访问资源文件的代码才是有效率的。
            zipAlignEnabled false
            // 删除没用的资源文件
            shrinkResources false
        }
        release {
            buildConfigField "boolean", "LOG_DEBUG", "false"
            minifyEnabled true
            zipAlignEnabled true
            shrinkResources true
            // 混淆文件
            proguardFiles getDefaultProguardFile(‘proguard-android.txt‘), ‘proguard-rules.pro‘
            // 签名
            signingConfig signingConfigs.releaseConfig

            applicationVariants.all { variant ->
                // 修改APK名称
                variant.outputs.each { output ->
                    def file = output.outputFile
                    def fileName = file.name
                    fileName = fileName.replace(".apk", "-V${defaultConfig.versionName}.apk")
                    fileName = fileName.replace("app", "StudioTest")
                    fileName = fileName.replace("debug-unaligned", "debug")
                    output.outputFile = new File(file.parent, fileName)
                }
                // 修改values.xml
                variant.mergeResources.doLast(){
                    File valuesFile = file("${buildDir}/intermediates/res/merged/${variant.dirName}/values/values.xml")
                    String content = valuesFile.getText(‘UTF-8‘)
                    content = content.replaceAll("CHANNEL_NAME","${variant.productFlavors[0].name}")
                    valuesFile.write(content,‘UTF-8‘)
                }
            }
        }
    }
}

def getSvnRevision(){
    ISVNOptions options = SVNWCUtil.createDefaultOptions(true);
    SVNClientManager clientManager = SVNClientManager.newInstance(options);
    SVNStatusClient statusClient = clientManager.getStatusClient();
    SVNStatus status = statusClient.doStatus(project.rootDir, false);
    SVNRevision revision = status.getRevision();
    return revision.getNumber();
}

task svnCommitVersionFile(){
    description = "Commits a single file to an SVN repository"
    doLast{
        if (!project.hasProperty("commitMsg")){
            ext.commitMsg = "//change version"
        }
        SvnOperationFactory svnOperationFactory = new SvnOperationFactory()
        def authentication = SVNWCUtil.createDefaultAuthenticationManager("haibo.zhou", "hbzhou0622")
        svnOperationFactory.setAuthenticationManager(authentication)
        try {
            SvnCommit commit = svnOperationFactory.createCommit()
            commit.setSingleTarget(SvnTarget.fromFile(new File(‘app/version.properties‘)))
            commit.setCommitMessage(commitMsg)
            SVNCommitInfo commitInfo = commit.run()
            println "Commit info: " + commitInfo
            println "Commit message: " + commitMsg
        } finally{
            svnOperationFactory.dispose()
        }
    }
}

task generateZip(type: Zip){
    def versionPropsFile = file(‘version.properties‘)
    def Properties versionProps = new Properties()
    versionProps.load(new FileInputStream(versionPropsFile))
    def prename = versionProps[‘VERSION_NAME_MAJOR‘]
    def name = versionProps[‘VERSION_NAME_BUILD‘].toInteger()
    def version = "V" + prename + name + "_(" + getSvnRevision() + ")"

    from ‘build/outputs‘
    archiveName "StudioTest_" + version + ".zip"
    destinationDir file("build/release")

    doLast(){
        copy{
            from ("build/release/"+archiveName)
            into ("release")
        }

        if (!project.hasProperty("commitMsg")){
            ext.commitMsg = "//upload compile result"
        }
        SvnOperationFactory svnOperationFactory = new SvnOperationFactory()
        def authentication = SVNWCUtil.createDefaultAuthenticationManager("haibo.zhou", "hbzhou0622")
        svnOperationFactory.setAuthenticationManager(authentication)
        try {
            SvnScheduleForAddition add = svnOperationFactory.createScheduleForAddition();
            SvnTarget target = SvnTarget.fromFile(new  File("app/release/"+archiveName));
            add.addTarget(target);
            add.setAddParents(true);
            add.setForce(true);
            add.run();

            SvnCommit commit = svnOperationFactory.createCommit()
            commit.setSingleTarget(SvnTarget.fromFile(new File("app/release/"+archiveName)))
            commit.setCommitMessage(commitMsg)
            SVNCommitInfo commitInfo = commit.run()
            println "Commit info: " + commitInfo
            println "Commit message: " + commitMsg
        } finally{
            svnOperationFactory.dispose()
        }
    }
}

// build script for jenkins only
task buildAll(){
    println ‘start build‘
}

svnCommitVersionFile.dependsOn build
generateZip.dependsOn svnCommitVersionFile
buildAll.dependsOn generateZip

tasks.withType(JavaCompile) {
    compileTask -> compileTask.dependsOn ndkBuild
}

task ndkBuild(type: Exec) {
    workingDir file(‘src/main/jni‘)
    commandLine getNdkBuildCmd()
}

task cleanNative(type: Exec){
    workingDir file(‘src/main/jni‘)
    commandLine getNdkBuildCmd(), ‘clean‘
}

clean.dependsOn cleanNative

def getNdkDir() {
    if (System.env.ANDROID_NDK_ROOT != null)
        return System.env.ANDROID_NDK_ROOT
    Properties properties = new Properties()
    properties.load(project.rootProject.file(‘local.properties‘).newDataInputStream())
    def ndkdir = properties.getProperty(‘ndk.dir‘, null)
    if (ndkdir == null)
        throw new GradleException("NDK location not found. Define location with ndk.dir in the local.properties file or with an ANDROID_NDK_ROOT environment variable.")
    return ndkdir
}

def getNdkBuildCmd() {
    def ndkbuild = getNdkDir() + "/ndk-build"
    ndkbuild += ".cmd"
    return ndkbuild
}


dependencies {
    // 工程目录里面的libs文件夹下所有的jar包
    compile fileTree(dir: ‘libs‘, include: [‘*.jar‘])
    // 网络仓库里面的工程
    //compile ‘com.github.chrisbanes.photoview:library:1.2.4‘
    // 本地的工程
    compile project(‘:PhotoView-master‘)
}
大概描述一下脚本,在控制台运行gradle buildAll,将会把build/output目录打成压缩生成到build/release目录,并自动修改版本号文件version.property提交到svn,同时将编译结果提交到svn。
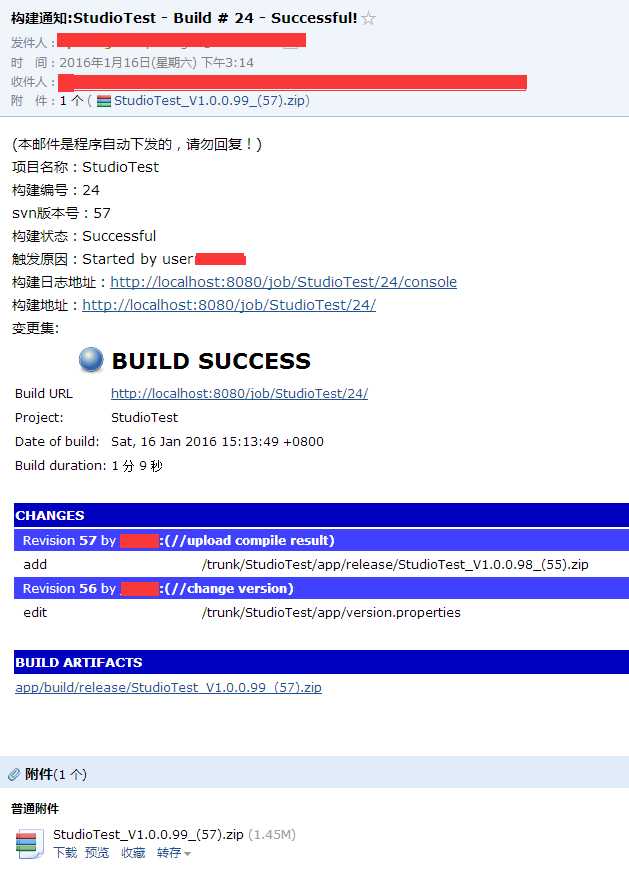
ok,在到我们的jenkins里面,编译一下,结果生成了,看一下我们收到的邮件

编译日志,编译结果,上一次构建到这次构建的svn提交记录都可以看到了,作为一个简单的持续集成环境还是可以的。
2016.01.16
------End------
jenkins+svn+android studio自动化构建(持续集成)
标签:
原文地址:http://www.cnblogs.com/zhouhaibo/p/5135620.html