标签:des winform datagridview 分页控件 style blog
转载至http://xuzhihong1987.blog.163.com/blog/static/267315872011315114240140/
以前都是做web开发,最近接触了下WinForm,发现WinForm分页控件好像都没有,网上搜索了一下,发现有很多网友写的分页控件,分页效果应该都能实现吧,只是其风格都不是很符合我想要的。做web的时候,我习惯了Extjs的Grid分页效果,所以也想在WinForm中做个类似的效果,所以咬咬牙,做个山寨版本的吧,虽然自己写费时费力,在项目进度考虑中不是很可取,但是还是特别想山寨一回,做自己喜欢的风格。
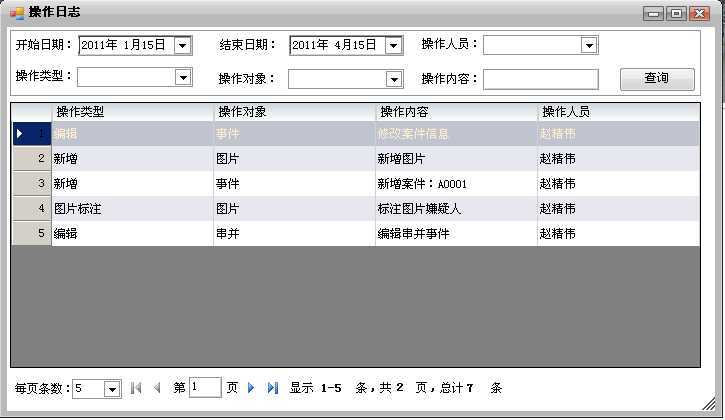
按照惯例,还是先看看实现效果图吧(有图有真像,才好继续下文呀)

应用效果:(效果有点难看,因为我是刚装的
xp系统,还是经典主题,如果换成Win7系统或其他主题,效果还是会很不错的)

我们要做的就是上图显示的一个自定义控件,这个效果参考自我做
web开发使用的Extjs之Grid的分页效果(如下图)

Extjs的动画效果我们暂时就不实现了,这里只做个外观看起来想像即可,完全一样就脱离“山寨”概念了,总要比人家差点吧,谁让咱是模仿呢!
言归正传,我们现在就看看具体怎么实现吧:
第一步:先布局
注:我们创建的是用户自定义控件,而不是WinForm窗体

就是先做出个显示效果,这个布局很简单,在这就不多说,重点就是“首页、前一页、后一页、末页”图标,每个图标分两种,一是能点击的高亮效果,一个是灰色不不能点击。以下是套图:(大家如果不喜欢,可以去做成自己喜欢的风格图片)

第二步:编写分页代码
布局好了,那么第二步我们就要代码实现正确显示文字信息,分页事件,每页条数选择事件,公开属性和事件。以下是完整代码:

  1   /// <summary>
  2
  3     /// 声明委托
  4
  5     /// </summary>
  6
  7     /// <param name="e"></param>
  8
  9     public delegate void EventPagingHandler(EventArgs e);
 10
 11
 12
 13     public partial class Paging : UserControl
 14
 15     {
 16
 17
 18
 19
 20
 21         public Paging()
 22
 23         {
 24
 25             InitializeComponent();
 26
 27         }
 28
 29
 30
 31         public event EventPagingHandler EventPaging;
 32
 33
 34
 35         #region 公开属性
 36
 37
 38
 39
 40
 41         private int _pageSize = 50;
 42
 43         /// <summary>
 44
 45         /// 每页显示记录数(默认50)
 46
 47         /// </summary>
 48
 49         public int PageSize
 50
 51         {
 52
 53             get
 54
 55             {
 56
 57                 return _pageSize;
 58
 59             }
 60
 61             set
 62
 63             {
 64
 65                 if (value > 0)
 66
 67                 {
 68
 69                     _pageSize = value;
 70
 71                 }
 72
 73                 else
 74
 75                 {
 76
 77                     _pageSize = 50;
 78
 79                 }
 80
 81                 this.comboPageSize.Text = _pageSize.ToString();
 82
 83             }
 84
 85         }
 86
 87         private int _currentPage = 1;
 88
 89         /// <summary>
 90
 91         /// 当前页
 92
 93         /// </summary>
 94
 95         public int CurrentPage
 96
 97         {
 98
 99             get
100
101             {
102
103                 return _currentPage;
104
105             }
106
107             set
108
109             {
110
111                 if (value > 0)
112
113                 {
114
115                     _currentPage = value;
116
117                 }
118
119                 else
120
121                 {
122
123                     _currentPage = 1;
124
125                 }
126
127
128
129             }
130
131         }
132
133         private int _totalCount = 0;
134
135         /// <summary>
136
137         /// 总记录数
138
139         /// </summary>
140
141         public int TotalCount
142
143         {
144
145             get
146
147             {
148
149                 return _totalCount;
150
151             }
152
153             set
154
155             {
156
157                 if (value>=0)
158
159                 {
160
161                     _totalCount = value;
162
163                 }
164
165                 else
166
167                 {
168
169                     _totalCount = 0;
170
171                 }
172
173                 this.lblTotalCount.Text = this._totalCount.ToString();
174
175                 CalculatePageCount();
176
177                 this.lblRecordRegion.Text = GetRecordRegion();
178
179             }
180
181         }
182
183
184
185         private int _pageCount = 0;
186
187         /// <summary>
188
189         /// 页数
190
191         /// </summary>
192
193         public int PageCount
194
195         {
196
197             get
198
199             {
200
201                 return _pageCount;
202
203             }
204
205             set
206
207             {
208
209                 if (value>=0)
210
211                 {
212
213                     _pageCount = value;
214
215                 }
216
217                 else
218
219                 {
220
221                     _pageCount = 0;
222
223                 }
224
225                 this.lblPageCount.Text = _pageCount + "";
226
227             }
228
229         }
230
231
232
233        #endregion
234
235
236
237         /// <summary>
238
239         /// 计算页数
240
241         /// </summary>
242
243         private void CalculatePageCount()
244
245         {
246
247             if (this.TotalCount>0)
248
249             {
250
251                 this.PageCount = Convert.ToInt32(Math.Ceiling(Convert.ToDouble(this.TotalCount) / Convert.ToDouble(this.PageSize)));
252
253             }
254
255             else
256
257             {
258
259                 this.PageCount = 0;
260
261             }
262
263         }
264
265
266
267         /// <summary>
268
269         /// 获取显示记录区间(格式如:1-50)
270
271         /// </summary>
272
273         /// <returns></returns>
274
275         private string GetRecordRegion()
276
277         {
278
279             if (this.PageCount == 1) //只有一页
280
281             {
282
283                 return "1-" + this.TotalCount.ToString();
284
285             }
286
287             else  //有多页
288
289             {
290
291                 if(this.CurrentPage==1) //当前显示为第一页
292
293                 {
294
295                     return "1-"+this.PageSize;
296
297                 }
298
299                 else if(this.CurrentPage==this.PageCount) //当前显示为最后一页
300
301                 {
302
303                     return ((this.CurrentPage-1)*this.PageSize+1) +"-"+this.TotalCount;
304
305                 }
306
307                 else //中间页
308
309                 {
310
311                     return ((this.CurrentPage-1) * this.PageSize+1)   + "-" + this.CurrentPage  * this.PageSize;
312
313                 }
314
315
316             }
317
318         }
319
320
321
322
323
324         /// <summary>
325
326         /// 数据绑定
327
328         /// </summary>
329
330         public void Bind()
331
332         {
333
334             if (this.EventPaging != null)
335
336             {
337
338                 this.EventPaging(new EventArgs());
339
340             }
341
342             if (this.CurrentPage>this.PageCount)
343
344             {
345
346                 this.CurrentPage = this.PageCount;
347
348             }
349
350             this.txtBoxCurPage.Text = this.CurrentPage+"";
351
352             this.lblTotalCount.Text = this.TotalCount+"";
353
354             this.lblPageCount.Text = this.PageCount+"";
355
356             this.lblRecordRegion.Text = GetRecordRegion();
357
358             if (this.CurrentPage==1)
359
360             {
361
362                 this.btnFirst.Enabled = false;
363
364                 this.btnPrev.Enabled = false;
365
366                 this.btnFirst.Image = global::CHVM.Properties.Resources.page_first_disabled;
367
368                 this.btnPrev.Image = global::CHVM.Properties.Resources.page_prev_disabled;
369
370             }
371
372             else
373
374             {
375
376                 this.btnFirst.Enabled = true;
377
378                 this.btnPrev.Enabled = true;
379
380                 this.btnFirst.Image = global::CHVM.Properties.Resources.page_first;
381
382                 this.btnPrev.Image = global::CHVM.Properties.Resources.page_prev;
383
384             }
385
386             if (this.CurrentPage == this.PageCount)
387
388             {
389
390                 this.btnNext.Enabled = false;
391
392                 this.btnLast.Enabled = false;
393
394                 this.btnNext.Image = global::CHVM.Properties.Resources.page_next_disabled;
395
396                 this.btnLast.Image = global::CHVM.Properties.Resources.page_last_disabled;
397
398             }
399
400             else
401
402             {
403
404                 this.btnNext.Enabled = true;
405
406                 this.btnLast.Enabled = true;
407
408                 this.btnNext.Image = global::CHVM.Properties.Resources.page_next;
409
410                 this.btnLast.Image = global::CHVM.Properties.Resources.page_last;
411
412             }
413
414             if (this.TotalCount==0)
415
416             {
417
418                 this.btnFirst.Enabled = false;
419
420                 this.btnPrev.Enabled = false;
421
422                 this.btnNext.Enabled = false;
423
424                 this.btnLast.Enabled = false;
425
426                 this.btnFirst.Image = global::CHVM.Properties.Resources.page_first_disabled;
427
428                 this.btnPrev.Image = global::CHVM.Properties.Resources.page_prev_disabled;
429
430                 this.btnNext.Image = global::CHVM.Properties.Resources.page_next_disabled;
431
432                 this.btnLast.Image = global::CHVM.Properties.Resources.page_last_disabled;
433
434             }
435
436
437
438         }
439
440
441
442         private void btnFirst_Click(object sender, EventArgs e)
443
444         {
445
446             this.CurrentPage = 1;
447
448             this.Bind();
449
450         }
451
452
453
454         private void btnPrev_Click(object sender, EventArgs e)
455
456         {
457
458             this.CurrentPage -= 1;
459
460             this.Bind();
461
462         }
463
464
465
466         private void btnNext_Click(object sender, EventArgs e)
467
468         {
469
470             this.CurrentPage += 1;
471
472             this.Bind();
473
474         }
475
476
477
478         private void btnLast_Click(object sender, EventArgs e)
479
480         {
481
482             this.CurrentPage = this.PageCount;
483
484             this.Bind();
485
486         }
487
488
489
490         /// <summary>
491
492         ///  改变每页条数
493
494         /// </summary>
495
496         /// <param name="sender"></param>
497
498         /// <param name="e"></param>
499
500         private void comboPageSize_SelectedIndexChanged(object sender, EventArgs e)
501
502         {
503
504             this.PageSize = Convert.ToInt32(comboPageSize.Text);
505
506             this.Bind();
507
508         }
509
510
511
512 }
513
514
515
516 这里重点提两点:一是图片切换:
517
518 this.btnFirst.Image = global::CHVM.Properties.Resources.page_first_disabled;
519
520 Image对象是在Properties.Resource.resx中自动生成的,代码如下:
521
522         internal static System.Drawing.Bitmap page_first {
523
524             get {
525
526                 object obj = ResourceManager.GetObject("page-first", resourceCulture);
527
528                 return ((System.Drawing.Bitmap)(obj));
529
530             }
531
532         }
533
534
535
536         internal static System.Drawing.Bitmap page_first_disabled {
537
538             get {
539
540                 object obj = ResourceManager.GetObject("page_first_disabled", resourceCulture);
541
542                 return ((System.Drawing.Bitmap)(obj));
543
544             }
545
546     }
547
548 二是应用了委托事件:我们在这定义了一个分页事件
549
550 public event EventPagingHandler EventPaging;
551
552 在数据绑定方法中实现它:
553
554 /// <summary>
555
556         /// 数据绑定
557
558         /// </summary>
559
560         public void Bind()
561
562         {
563
564             if (this.EventPaging != null)
565
566             {
567
568                 this.EventPaging(new EventArgs());
569
570             }
571
572             //… 以下省略
573
574 }
575
576 这里需要大家对C#的委托和事件有一定的了解,不清楚的可以直接使用,或者先去查阅相关参考资料,这里我们就不谈委托机制了。
577
578
579
580 第三步:应用
581
582 值得一提的是,WinForm并不能直接把用户自定控件往Windows窗体中拖拽,而自动生成实例(ASP.NET是可以直接拖拽的)。那么如果我们需要在应用中使用,只能自己修改Desginer.cs代码了。
583
584 先声明:
585
586 private CHVM.PagingControl.Paging paging1;
587
588 然后在InitializeComponent()方法中实例化:
589
590 this.paging1 = new CHVM.PagingControl.Paging();
591
592     //
593
594     // paging1
595
596     //
597
598     this.paging1.CurrentPage = 1;
599
600     this.paging1.Location = new System.Drawing.Point(3, 347);
601
602     this.paging1.Name = "paging1";
603
604     this.paging1.PageCount = 0;
605
606     this.paging1.PageSize = 50;
607
608     this.paging1.Size = new System.Drawing.Size(512, 30);
609
610     this.paging1.TabIndex = 8;
611
612  this.paging1.TotalCount = 0;
613
614 //在这里注册事件
615
616 this.paging1.EventPaging += new CHVM.PagingControl.EventPagingHandler(this.paging1_EventPaging);
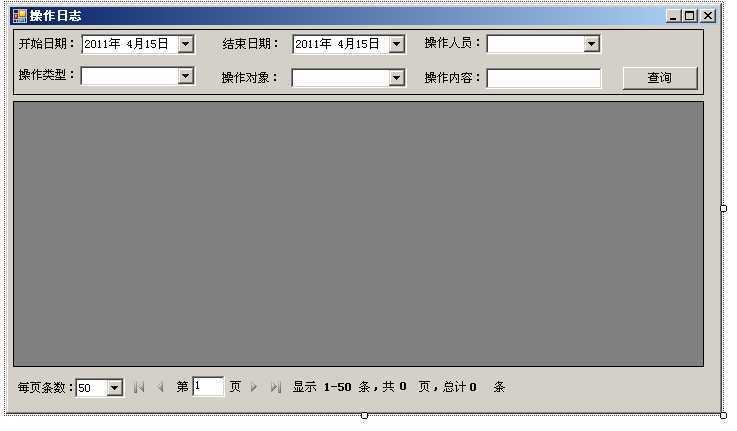
加完后就能看到效果了,相当于托了一个分页控件的效果:(如下图所示)

最后在事件中加入分页事件需要执行的代码:

  1  /// <summary>
  2
  3         /// 分页事件
  4
  5         /// </summary>
  6
  7         /// <param name="e"></param>
  8
  9         private void paging1_EventPaging(EventArgs e)
 10
 11         {
 12
 13             GvDataBind();   //DataGridView数据绑定
 14
 15         }
 16
 17         /// <summary>
 18
 19         /// 查询
 20
 21         /// </summary>
 22
 23         /// <param name="sender"></param>
 24
 25         /// <param name="e"></param>
 26
 27         private void btnQuery_Click(object sender, EventArgs e)
 28
 29         {
 30
 31             paging1_EventPaging(e);
 32
 33         }
 34
 35         /// <summary>
 36
 37         /// gvOperateLogList 数据邦定
 38
 39         /// </summary>
 40
 41         private void GvDataBind()
 42
 43         {
 44
 45             PagingCondition paging = new PagingCondition()
 46
 47             {
 48
 49                 startIndex=paging1.CurrentPage,
 50
 51                 pageSize = paging1.PageSize
 52
 53             };
 54
 55             MultiCondition condition = new MultiCondition();
 56
 57             condition.DateSign="FOperateTime";
 58
 59             condition.BeginDate = dtBegin.Value;
 60
 61             condition.EndDate = dtEnd.Value;
 62
 63             if (comboOperator.Text != "")
 64
 65             {
 66
 67                 condition.Dict.Add("FOperator", comboOperator.Text);
 68
 69             }
 70
 71             if (comboType.Text != "")
 72
 73             {
 74
 75                 condition.Dict.Add("FType", comboType.Text);
 76
 77             }
 78
 79             if (comboObject.Text != "")
 80
 81             {
 82
 83                 condition.Dict.Add("FOptObject", comboObject.Text);
 84
 85             }
 86
 87             if (txtBoxContent.Text != "")
 88
 89             {
 90
 91                 condition.Dict.Add("FContent", txtBoxContent.Text);
 92
 93             }
 94
 95             DataTable dt = GetByCondition(paging, condition);
 96
 97             paging1.TotalCount = Convert.ToInt32(dt.TableName);
 98
 99             gvOperateLogList.DataSource = dt;
100
101             gvOperateLogList.Columns.Clear();
102
103             var dict = GetGvColumnsDict();
104
105             DataGridViewHelp.DisplayColList(gvOperateLogList, dict);
106
107         }
注:MultiCondition、PagingCondition是我专门针对分页综合查询定义的两个类,兴趣的话可以去了解一下:
查询条件就统一定义在MultiCondition中(详见:http://xuzhihong1987.blog.163.com/blog/static/267315872011294150763 ),
PagingCondition是分页条件(详见: http://xuzhihong1987.blog.163.com/blog/static/2673158720112941950801 ),
Extjs+LINQ轻松实现高级综合查询:
http://xuzhihong1987.blog.163.com/blog/static/2673158720112943356111/
其他:

 1  /// <summary>
 2
 3         /// gv显示列设置
 4
 5         /// </summary>
 6
 7         /// <returns></returns>
 8
 9         public Dictionary<string, string> GetGvColumnsDict()
10
11         {
12
13             Dictionary<string, string> dict = new Dictionary<string, string>();
14
15             dict.Add("FTYPE", "操作类型");
16
17             dict.Add("FOPTOBJECT", "操作对象");
18
19             dict.Add("FCONTENT", "操作内容");
20
21             dict.Add("FOperator", "操作人员");
22
23             return dict;
24
25         }
26
27
28
29 DataGridViewHelp.DisplayColList是一个静态方法,为一个辅助类:
30
31         /// <summary>
32
33         /// 替换列表
34
35         /// </summary>
36
37         /// <param name="dgv">类表名称</param>
38
39         /// <param name="dic">数据</param>
40
41         /// <param name="isRM">是否显示序列号</param>
42
43         public static void DisplayColList(DataGridView dgv, Dictionary<string, string> dic)//, bool isRM
44
45         {
46
47             _dgv = dgv;
48
49             dgv.RowsDefaultCellStyle.BackColor = Color.FromArgb(255, 255, 255);//第一行
50
51             dgv.AlternatingRowsDefaultCellStyle.BackColor = Color.FromArgb(231, 232, 239);//第二行
52
53             dgv.GridColor = Color.FromArgb(207, 208, 216);//
54
55             dgv.RowTemplate.Height = 25;//列宽
56
57             dgv.AllowUserToAddRows=false;//无空行
58
59             dgv.CellBorderStyle = DataGridViewCellBorderStyle.SingleVertical;
60
61             dgv.AutoSizeColumnsMode = DataGridViewAutoSizeColumnsMode.Fill;
62
63             dgv.AllowUserToOrderColumns = true;
64
65             dgv.RowPostPaint += new DataGridViewRowPostPaintEventHandler(dgv_RowPostPaint);
66
67             dgv.CellPainting += new DataGridViewCellPaintingEventHandler(dgv_CellPainting);//列头样式
68
69             dgv.CellFormatting += new DataGridViewCellFormattingEventHandler(dgv_CellFormatting);//选中行样式
70
71
72
73             foreach (KeyValuePair<string, string> cl in dic)
74
75             {
76
77                 dgv.AutoGenerateColumns = false;
78
79                 DataGridViewTextBoxColumn obj = new DataGridViewTextBoxColumn();
80
81                 obj.DataPropertyName = cl.Key;
82
83                 obj.HeaderText = cl.Value;
84
85                 obj.Name = cl.Key;
86
87                 obj.Width = 100;
88
89                 //obj.DefaultCellStyle.Padding.All = 10;
90
91                 obj.Resizable = DataGridViewTriState.True;
92
93                 dgv.Columns.AddRange(new DataGridViewColumn[] { obj });
94
95             }
96
97         }
98
99
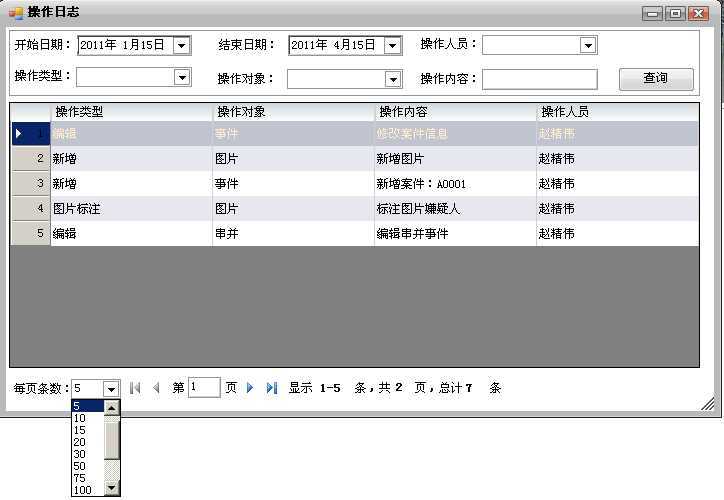
到此实现就全部完成了,运行效果后就是前面所示的效果!也可以动态修改每页条数。

说在最后,改功能简单是简单,但是涉及到很多知识点,委托、事件、
DataGridView数据动态绑定,综合查询,我这里用的是Oracle数据库,如果用LINQ语法的话查询数据会比较方便,写起代码也会显得很优雅。

1 /// <summary> /// 获取条件查询数据 /// </summary> /// <param name="paging"></param> /// <param name="conditon"></param> /// <returns></returns> private DataTable GetByCondition(PagingCondition paging, MultiCondition conditon) { string strSql = "select * from TOperateLog "; string strSqlGetCount = "select count(1) from TOperateLog "; string strWhere = " where 1=1 "; if (conditon != null) { if (conditon.DateSign == "FOperateTime") //操作日期 { if (conditon.BeginDate != DateTime.MinValue) { strWhere += string.Format(" and FOperateTime>=‘{0}‘", conditon.BeginDate.ToString("yyyy-MM-dd HH:mm:ss")); } if (conditon.EndDate != DateTime.MaxValue) { strWhere += string.Format(" and FOperateTime<=‘{0}‘", conditon.EndDate.AddDays(1).ToString("yyyy-MM-dd HH:mm:ss")); } } var dict = conditon.Dict; if (dict != null) { foreach (var key in dict.Keys) { if (key.Equals("FType")) //操作类型 { strWhere += string.Format(" and FType=‘{0}‘", dict[key]); } if (key.Equals("FOperator")) //操作人员 { strWhere += string.Format(" and FOperator=‘{0}‘", dict[key]); } else if (key.Equals("FOptObject")) //操作对象 { strWhere += string.Format(" and FOptObject=‘{0}‘", dict[key]); } else if (key.Equals("FContent")) //操作内容 { strWhere += string.Format(" and FContent like ‘%{0}%‘", dict[key]); } } } } strWhere += " order by FOperateTime "; strSql += strWhere; strSqlGetCount += strWhere; if (paging != null) { if (paging.needPaging) { //strSql = string.Format("select * from ( {0} ) where ROWNUM>={1} and ROWNUM<={2}", strSql, paging.startIndex, paging.startIndex + paging.pageSize-1); strSql = string.Format("select * from (select T.*,RowNum RN from ({0})T where ROWNUM <={1}) where RN>={2} ",strSql, paging.startIndex + paging.pageSize - 1,paging.startIndex); } } DataTable dt = DataCon.Query(strSql).Tables[0]; dt.TableName = DataCon.GetSingle(strSqlGetCount)+""; return dt; }
WinForm轻松实现自定义分页 (转载),布布扣,bubuko.com
标签:des winform datagridview 分页控件 style blog
原文地址:http://www.cnblogs.com/markli/p/3863173.html