标签:
相对布局要比前面讲的线性布局和表格布局要灵活一些,所以平常用得也是比较多的。相对布局控件的位置是与其周围控件的位置相关的,从名字可以看出来,这些位置都是相对的,确定出了其中一个控件的位置就可以确定另一个控件的位置了。
本次实验就是显示如下的activity:
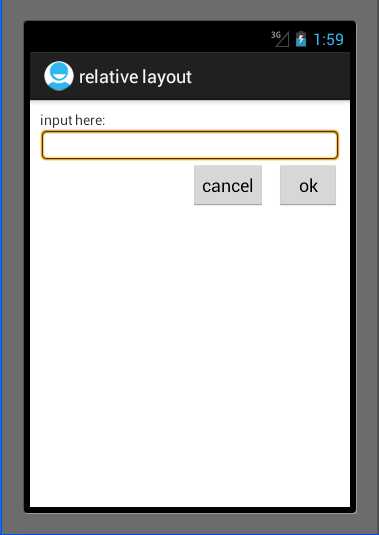
其中只有2个button,1个textview,1个edittext。
在相对布局中,一般用到的控件属性解释如下:
在相对布局中有如下属性,解释如下:
android:layout_above 为将该控件的底部放在指定id控件的上方
android:layout_below 同理类似,将该控件的顶部放在指定id控件的下方
android:layout_toLeftOf 将该控件的右端紧挨着放在指定id控件的左端。
android:layout_toRightOf 将该控件的左端紧挨着放在指定id控件的右端
android:layout_alignParentRight 为true时将该控件右端与父控件右端对齐
android:layout_alignParentLeft 为true时将该控件左端与父控件左端对齐
android:layout_alignParentTop 为true时将该控件顶端与父控件顶端对齐
android:layout_alignParentBottom 为true时将该控件底端与父控件底端对齐
android:layout_alignBottom 将该控件底部与指定id控件底部控件对齐
android:layout_alignLeft 将该控件左边与指定id控件左边对齐
android:layout_alignRight 将该控件右边与指定id控件右边对齐
android:layout_alignTop 将该控件顶端与指定id控件顶端对齐
实现上面activity比较简单,其xml代码如下:

<RelativeLayout xmlns:android="http://schemas.android.com/apk/res/android"
    xmlns:tools="http://schemas.android.com/tools"
    android:layout_width="match_parent"
    android:layout_height="match_parent"
    android:padding="10px" >

    <TextView
        android:id="@+id/input"
        android:layout_width="fill_parent"
        android:layout_height="wrap_content"
        android:text="@string/input_dis"
        tools:context=".MainActivity" />

       <EditText
           android:id="@+id/edit"
           android:layout_width="fill_parent"
           android:layout_height="wrap_content"
        android:layout_below="@id/input"
        android:background="@android:drawable/editbox_background"
        />

       <Button
           android:id="@+id/ok"
           android:layout_height="wrap_content"
           android:layout_width="wrap_content"
           android:layout_below="@id/edit"
           android:layout_alignParentRight="true"
           android:layout_marginLeft="10px"
           android:text="@string/ok"
           />

       <Button
           android:id="@+id/cancel"
           android:layout_height="wrap_content"
           android:layout_width="wrap_content"
           android:layout_below="@id/edit"
           android:layout_toLeftOf="@id/ok"
           android:text="@string/cancel"

           />

</RelativeLayout>
总结:activity的相对布局比较灵活,一些常见的属性也比较多,用得多自然就会了。
标签:
原文地址:http://www.cnblogs.com/shirui/p/5156308.html