标签:
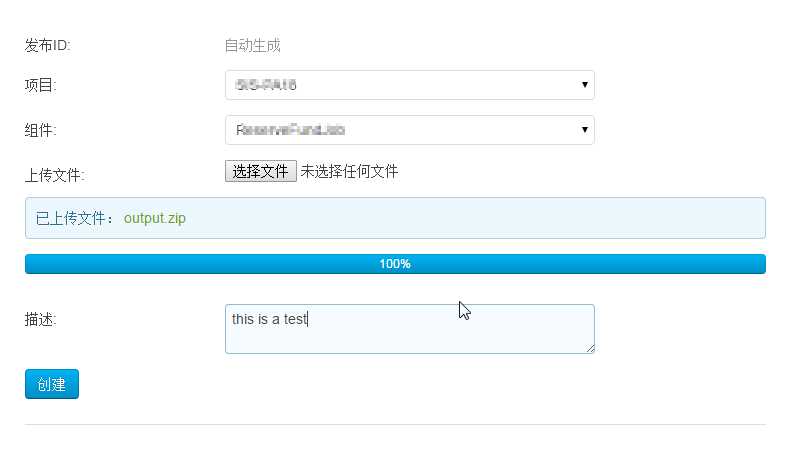
以前作的上传,在糙了,所以在用户体验上改进一下。
同时,结合DJANGO作定位上传。
这其中分两步进行,第一次上传到TMP目录下,
第二次,将TMP下的文件转移到标准目录下。
form.py
file_path = forms.CharField(
        required=True,
        label=u"上传文件",
        widget=forms.TextInput(
            attrs={
                ‘rows‘: 2,
                ‘class‘: ‘uk-width-1-2‘,
            }
        ),
    )
upload.html
{# file_path #}
                            <div class="uk-form-row">
                                <div class="uk-form-label">
                                    {{ form.file_path.label_tag }}
                                    {% for error in form.file_path.errors %}
                                        <span class="uk-badge uk-badge-danger">{{ error }}</span>
                                    {% endfor %}
                                </div>
                                <div id="upload-drop" >
                                    {# <i class="uk-icon-cloud-upload uk-icon-medium "></i> 将文件拖拽至此或者 #}
                                    <input id="upload-select" name="upload-select" type="file">
                                    <input type="text" id="file_path" name="file_path"  value="" hidden/>

                                </div>
                                <div id="progressbar" class="uk-progress uk-hidden">
                                    <div class="uk-progress-bar" style="width: 0%;">0%</div>
                                </div>
                            </div>

<script>

     $(function(){

        var progressbar = $("#progressbar"),
            bar         = progressbar.find(‘.uk-progress-bar‘),
            settings    = {
            single: false,
            filelimit: 1,

            action: ‘/version/file_upload/‘, // upload url

            allow : ‘*.(war|zip)‘, // allow war and zip

            loadstart: function() {
                bar.css("width", "0%").text("0%");
                progressbar.removeClass("uk-hidden");
            },

            progress: function(percent) {
                percent = Math.ceil(percent);
                bar.css("width", percent+"%").text(percent+"%");
            },

            allcomplete: function(response) {
                uploadfilename = response.replace(/\"/g,"")
                bar.css("width", "100%").text("100%");
                $("#upload-select").after("<div class=‘uk-alert‘ data-uk-alert> 已上传文件: <span class=‘uk-text-success‘>" + uploadfilename + "</span></div>");
                $("#file_path").attr("value", uploadfilename);
            }
        };

        var select = UIkit.uploadSelect($("#upload-select"), settings),
            drop   = UIkit.uploadDrop($("#upload-drop"), settings);
    });
</script>
views.py
def fileupload(request):

    files = request.FILES.getlist(‘files[]‘)
    file_name_list = []
    for f in files:
        destination = ‘d:/temp/‘  # windows
        # destination = ‘/tmp/‘  # linux
        if not os.path.exists(destination):
            os.makedirs(destination)
        with open(destination+f.name, ‘wb+‘) as destination:
            for chunk in f.chunks():
                destination.write(chunk)
        file_name_list.append(f.name)

    return render_to_json_response(‘,‘.join(file_name_list))
然后,在作总体提交时,就可以用file_path = form.cleaned_data[‘file_path‘]取出第二次送到后端的文件名称了。
看:

DJANGO和UIKIT结合,作一个有进度条的无刷新上传功能
标签:
原文地址:http://www.cnblogs.com/aguncn/p/5157281.html