标签:
CSS(Cascading Style Sheet,层叠样式表),可以将网页制作的更加绚丽多彩。它可以有效的对页面的布局、字体、颜色、背景和其它效果实现更加精确的控制。
制作网页方便
精确控制网页的内容形式
样式丰富
定义样式灵活多样
1 2 3 4 5 | 选择符{ 样式属性:取值; 样式属性:取值; ……} |
举例:
1 2 3 | body { backgroud-color: red;} |
共有四种方法:连接外部样式表、内部样式表、导入外部样式表和内嵌样式。
用<link>调用定义好的样式css文件
1 2 3 4 5 | <head>……<link rel=stylesheet type=text/css href=slstyle.css>……</head> |
调用在<head>内部定义好的样式,并且以<style></style>方式定义。
1 2 3 4 5 6 7 8 | <head><style type="text/css">.style{ color: red; font-size: 13px;}</style></head> |
将外部样式表文件导入内部样式表<style>里,用@import导入。
1 2 3 4 5 6 7 8 9 | <head><style type="text/css">.style{ color: red; font-size: 13px;}@import slstyle.css</style></head> |
直接混合在html标记里添加style参数,主要在body内实现。
1 2 3 4 | <body><table style="color:red;margin-right:220px;">这是个表格</body> |
1 | font-family: "字体1","字体2",…… |
浏览器会按自己支持的字体从左往右识别,如果都不识别,就用系统默认字体。
1 | font-size: 大小的取值 |
1 | font-style:样式的取值 |
取值有三种:
normal--正常字体(默认)
italic--斜体显示文字
oblique--偏斜体(上两个的中间状态)
相当于html里的<b>
1 | font-weight:字体粗细值 |
取值范围:(细-->粗)
normal-->bold-->bolder-->lighter-->number
用数值:100~900
1 | font-variant:取值 |
多个属性写在一起
1 | .h{font: bold italic "宋体"} |
1 | .cl{color: #9900ff;} |
颜色取值参考RGB规范
1 | .bgc{background-color: #ff99ff;} |
1 | .bgi{background-image: url(image/ber.gif);} |
设置背景图像是否平铺,或如何平铺。
1 2 3 | background-repeat:no-repeat; #不平铺background-repeat: repeat-x #横向重复background-repeat: repeat-y #纵向重复 |
设置背景图随对象滚动还是不动
1 2 3 4 5 6 | .g{ background-image: url(der.png) background-attachment: scroll; #默认跟随滚动 or background-attachment: fixed #固定不动} |
设置背景图像的位置
1 2 3 | background-position: 位置取值(数字或关键字)例如:background-position: left top; |
1 2 | background:取值background: url(img/ber.jpg) no-repeat left top; |
1 | word-spacing: 3px; |
1 | letter-spacing: 3px; |
共5种修饰方式
1 2 3 4 5 | text-decoration: none; #默认值,不修饰。text-decoration: underline; #下划线text-decoration: overline; #上划线text-decoration: line-through; #删除线text-decoration: blink; #文字闪烁 |
共7中对齐方式:
1 2 3 4 5 6 7 | vertical-align: baseline; #浏览器的默认对齐方式vertical-align: sub; #按文字的下标对齐vertical-align: super; #按文字的上标对齐vertical-align: top; #垂直靠上对齐vertical-align: text-top; #使元素和上级元素的字体向上对齐vertical-align: middle; #垂直居中对齐vertical-align: text-bottom; #使元素和上级元素的字体向下对齐 |
转换英文字母的大小写
1 2 3 4 | text-transform: none; #使用原始值text-transform: capitalize; #每单词第一个字母大写text-transform: uppercase; #所有字母大写text-transform: lowercase; #所有字母小写 |
1 2 3 4 | text-align: left; #左对齐text-align: right; #右对齐text-align: cengter; #居中对齐text-align: justify; #两端对齐 |
html中只能控制整体缩进,css能控制首行缩进及缩进的距离。
1 | text-indent: 25px; #数值或百分比 |
行间距,行高值可以为长度、 倍数或百分比。
1 | text-height: 25px; |
页面空白的处理方式
1 2 3 | white-space: normal; #默认值,将连续的多个空格合并。white-space: pre; #源代码中的空格和换行符被保留,ie6有效。white-space: nowrap; #强制在同一行内显示所有文本,直至结束或<br> |
两个属性一起使用,设置对象的阅读顺序。
1 2 3 | unicode-bidi: bidi-override; #安装direction属性的值进行重排序unicode-bidi: normal; #默认值unicode-bidi: embed; #对象打开附加的嵌入层,direction属性的值指定嵌入层,在对象内部进行隐式重排序 |
1 2 3 | direction: ltr; #文字从左到右的顺序阅读direction: rtl; #文字从右到左的顺序阅读direction: inherit; #文本流的值不可继承 |
1 2 3 4 5 | .k{ font-size: 10pt; direction: rtl; unicode-bidi: bidi-override;} |
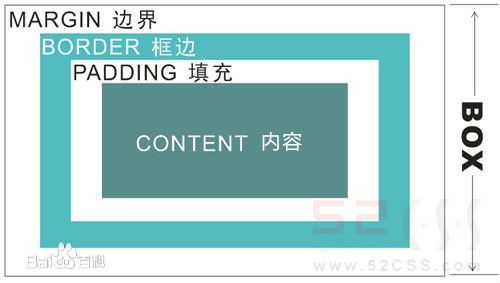
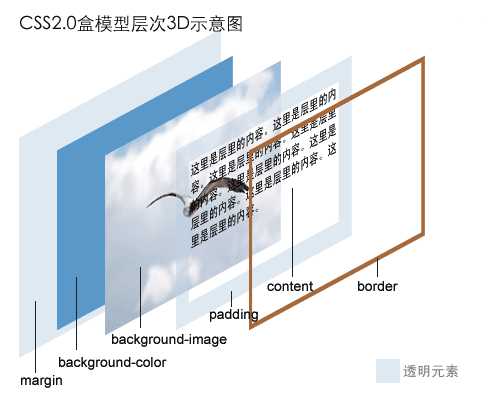
盒子模型由Content(内容)、padding(内边距)、border(边框)和margin(外边框)4部分组成:
1 2 | margin-top: auto; #默认值margin-top: 30pt; #数值或百分比 |
1 2 3 4 5 6 7 8 | <style img { margin-top:20pt; margin-right:50px; margin-bottom:10px; margin-left:50px;}</style> |
1 2 3 4 5 | <style type="text/css">img { margin: 20pt 50px 10px 50px; #上、右、下、左}</style> |
1 | padding-top: 间隔值; #长度值或百分比 |
1 2 3 | padding-bottom: 数值或百分比;padding-right: 数值或百分比;padding-left: 数值或百分比; |
1 2 3 4 5 6 | <style type="text/css"> body{ padding: 50px 20% 30px 20%; /*上、右、下、左*/ }</style> |
边框有3个属性:边框的样式、边框的宽度和边框的颜色。
1 2 3 4 5 | border-style: 样式值;border-top-style: 样式值;border-right-style: 样式值;border-bottom-style: 样式值;border-left-style: 样式值; |
边框样式取值:
| none | 默认值,无边框 |
| dotted | 点线边框 |
| dashed | 虚线边框 |
| solid | 实线边框 |
| double | 双实线边框 |
| groove | 边框具有立体感的沟槽 |
| rigde | 边框成脊形 |
| inset | 使整个边框凹陷,即在边框内嵌入一个立体边框 |
| outset | 使整个边框凸起,即在边框外嵌入一个立体边框 |
1 2 3 4 5 | border-width: 宽度值;border-top-width: 宽度值;border-right-width: 宽度值;border-bottom-width: 宽度值;border-left-width: 宽度值; |
取值范围:
medium--默认宽度
thin--小于默认宽度
thick--大于默认宽度
1 2 3 4 | border-top-color: 颜色值border-right-color: 颜色值border-bottom-color: 颜色值border-left-color: 颜色值 |
1 2 3 4 5 | border: 边框宽度 样式 颜色值;border-top: 上边框宽度 样式 颜色值;border-right: 右边框宽度 样式 颜色值;border-bottom: 下边框宽度 样式 颜色值;border-left: 下边框宽度 样式 颜色值; |
控制元素的位置,包括相对定位和绝对定位:
相对定位:允许元素在相对于文档布局的原始位置上进行偏移;
绝对定位:允许元素与原始文档布局分离且任意定位。
1 2 3 4 | position: static; #默认值position: absolute; #绝对定位,需要同时使用left、right、top和bottom属性。position: fixed; #当页面滚动时,元素不随着滚动。position: relative; #相对定位,对象不可层叠。 |
1 2 3 4 | top: auto|长度值|百分比right: auto|长度值|百分比bottom: auto|长度值|百分比left: auto|长度值|百分比 |
auto是默认值,长度值包含数字和单位,也可使用百分比来设置。
设置层的先后顺序和覆盖关系。默认z-index=1,表示在最底层。
1 | z-index: auto|数字 |
设置文字在某个元素的周围,它能应用于所有的元素。
1 2 3 | float: none #默认值float: left #元素浮动在文字的左边float: right #元素浮动在文字的右边 |
指定元素周围是否可以有其它元素浮动
1 2 3 4 | clear: none; #默认值,两边都可以有clear: left; #左边不能有clear: right; #右边不能有clear: both; #左、右两边都不能有 |
只显示元素裁切出的区域。
1 2 | clip: auto #默认值,不裁切clip: rect (数字) #需要四个值(上 右 下 左),依据左上角坐标(0,0)计算的便宜数值,任意数值都可用auto替换,即此边不裁切。 |
1 2 | width: 450px;height: 50px; |
设置层内的内容超出层所容纳的范围时的显示方式
1 2 3 4 | overflow: visible; #总是显示出来overflow: auto; #超出时才显示滚动条overflow: hidden; #隐藏超出的内容overflow: scroll; #总是显示滚动条 |
针对前套层的设置
1 2 3 | visibility: inherit #默认值,继承父对象的可见性visibility: visible #子层总是可见visibility: hidden #子层总是隐藏 |
1 | list-style-type: 值 |
列表项目符号:
| disc | 默认值,实心圆 |
| circle | 空心圆 |
| square | 实心方块 |
| decimal | 阿拉伯数字 |
| lower-roman | 小写罗马数字 |
| upper-roman | 大写罗马数字 |
| lower-alpha | 小写字母 |
| upper-alpha | 大写字母 |
| none | 不适用任何项目符号或编号 |
1 2 | list-style-image: none; #不指定图像地址list-style-image: url; #指定图像地址 |
1 2 | list-style-position: outside; #列表项目标记放置在文本之外,且环绕文本不根据标记对齐list-style-position: inside; #列表项目标记放置在文本之内,且环绕文本根据标记对齐 |
ps:如果一个列表项目的左边距被设置为0,那么项目符号不会被显示,左边距最小设置为30。
1 | list-style: list-style-image | list-style-position | list-style-type |
举例:
1 2 3 4 5 6 | <style type="text/css">ol{ list-style: url(te.png) list-style: outside}</style> |
注意:当list-style-image和list-style-type都设定时,image优先,除非url指定的图片不能显示。
在对象上移动鼠标指针采用的光标形状
1 | cursor: auto | 形状取值 | url(图像地址) |
光标取值:
| default | 平台默认光标,通常是一个箭头 |
| hand | 竖起一只手指的手型光标 |
| crosshair | 简单的十字线光标 |
| text | 大写字母I的形状 |
| help | 带有问好标记的箭头 |
| wait | 等待 |
| e-resize | 向东的箭头 |
| s-resize | 向南的箭头 |
| w-resize | 向西的箭头 |
| n-resize | 向北的箭头 |
| ne-resize | 向东北的箭头 |
| nw-resize | 向西北的箭头 |
| sw-resize | 向西南的箭头 |
| se-resize | 向东南的箭头 |
| auto | 默认值,根据浏览器而定 |
特效处理
alpha属性用于设置对象内容的透明度,使图片产生透明渐变效果。
1 | filter: alpha (参数1=值,参数2=值,……) |
alpha属性参数:
| opacity | 开始时的透明度,取值范围0~100,默认是0完全透明,100为不透明 |
| finishopacity | 结束时的透明度,取值范围0~100 |
| style | 设置渐变,0表示无渐变,1为直线渐变,2为圆形渐变,3为矩形渐变 |
| startx | 设置透明渐变开始点的水平坐标,默认值是0 |
| starty | 设置透明渐变开始点的垂直坐标 |
| finishx | 设置透明渐变结束点的水平坐标 |
| finishy | 设置透明渐变结束点的垂直坐标 |
举例:
1 2 3 4 5 | <style type="text/css">.g{ filter:Alpha(opacity=70): #不透明度为70}</style> |
设置对象的动态模糊效果
1 | filter:blur(add=参数值,direction=参数值,strength=参数值) |
add:是否显示原始图片
direction:动态模糊的方向,按顺时针方向,以45度为单位进行累计
strength:动态模糊的强度,整数,默认是5个
1 2 3 4 5 6 | .g{ filter: blur(add=true,direction=100,strength=8);}.g1{ filter: blur(direction=450,strength=150);} |
将图片中的某种颜色转换为透明色,产生透明效果。
1 | filter:chroma(color=颜色) |
1 2 3 | .y{filter:chroma(color=red);}……<image class="y" src="ima.gif" width="247" height="100" /> |
指定的方向和位置上产生阴影效果
1 2 3 4 | filter:dropShadow(color=阴影色,offX=参数值,offY=参数值,positive=参数值)/*color控制阴影的颜色offX和offY分别设置阴影相对于原始图像移动的水平距离和垂直距离positive设置阴影是否透明*/ |
1 2 3 | .y{ filter: dropShadow(color=#3366ff,offX=2,offY=1,positive=1)} |
1 2 | filter: FlipH; #水平翻转对象filter: FlipV; #垂直翻转对象 |
1 | filter: Glow(color=颜色,strength=强度) #强度取值范围1~255,默认是5 |
彩色变成黑白
1 | filter: gray; |
将图片的颜色、饱和度以及亮度完全反转过来。
1 | filter: invert; |
1 | filter: xray; |
像印章一样的效果?
1 | filter:Mask(color=颜色); #外围遮盖的颜色 |
波纹扭曲效果
1 2 3 4 5 6 7 8 | filter: wave(add=参数值,freq=参数值,lightstrength=参数值,phase=参数值,strength=参数值);/*add 用于设置是否把对象按照波形样式打乱;freq 图片上的波浪数目;lightstrength 波浪的光照强度,0~100phase 波浪的起始位置strength 波浪强度大小*/ |
举例:?
1 2 3 | .p{ filter: Wave(add=true,freq=2,lightstrength=20,phase=50,strength=40);} |
标签:
原文地址:http://www.cnblogs.com/daliangtou/p/5169169.html