标签:
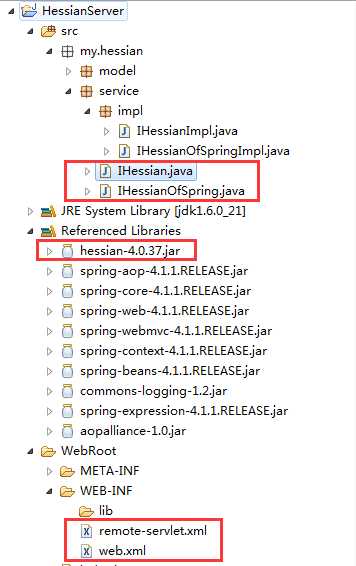
Hessian-JAVA服务器端必须具备以下几点:
* 1.包含Hessian的jar包(hessian-4.0.37.jar)
* 2.设计一个接口,用来给客户端调用(IHessian.java)
* 3.实现该接口的功能(IHessianImpl.java)
* 4.配置web.xml,配好相应的Servlet(web.xml)
* 5.对象必须实现Serializable接口(Foo.java)
Hessian-JAVA服务端代码预览图:

1.包含Hessian的jar包(hessian-4.0.37.jar)
re: 可到Hessian官网:http://hessian.caucho.com/下载最新的Hessian包或见文章附件。
2.设计一个接口,用来给客户端调用(IHessian.java)

 1 package my.hessian.service;
 2
 3 import my.hessian.model.Foo;
 4
 5 /**
 6  * 定义对外提供服务的接口(Hessian简单入门)[纯Hessian]
 7  *
 8  * Hessian是一个简单的连接Web服务的二进制协议
 9  *
10  * Hessian-JAVA服务器端必须具备以下几点:
11  * 1.包含Hessian的jar包
12  * 2.设计一个接口,用来给客户端调用
13  * 3.实现该接口的功能
14  * 4.配置web.xml,配好相应的Servlet
15  * 5.对象必须实现Serializable接口
16  *
17  * @author  WChao
18  * @version  [My-1.0, 2016-2-21]
19  */
20 public interface IHessian
21 {
22     public Foo getFoo();
23 }
3.实现该接口的功能(IHessianImpl.java)

 1 package my.hessian.service.impl;
 2
 3 import my.hessian.model.Foo;
 4 import my.hessian.service.IHessian;
 5
 6 /**
 7  * 接口的具体实现类[纯Hessian]
 8  *
 9  * @author  WChao
10  * @version  [My-1.0, 2016-2-21]
11  */
12 public class IHessianImpl implements IHessian
13 {
14     public Foo getFoo()
15     {
16         System.out.println("call getFoo method ~");
17         Foo foo = new Foo();
18         foo.setParam("Hi, This is my first Hessian demo.");
19         return foo;
20     }
21 }
4.配置web.xml,配好相应的Servlet(web.xml)

 1 <?xml version="1.0" encoding="UTF-8"?>
 2 <web-app version="2.5" xmlns="http://java.sun.com/xml/ns/javaee"
 3     xmlns:xsi="http://www.w3.org/2001/XMLSchema-instance"
 4     xsi:schemaLocation="http://java.sun.com/xml/ns/javaee
 5     http://java.sun.com/xml/ns/javaee/web-app_2_5.xsd">
 6     <welcome-file-list>
 7         <welcome-file>index.jsp</welcome-file>
 8     </welcome-file-list>
 9
10     <servlet>
11         <!-- 配置HessianServlet, 此处ServiceServlet名字可以自定义-->
12         <servlet-name>ServiceServlet</servlet-name>
13         <servlet-class>com.caucho.hessian.server.HessianServlet</servlet-class>
14
15         <!-- 配置接口的具体实现类 -->
16         <init-param>
17             <param-name>service-class</param-name>
18             <param-value>my.hessian.service.impl.IHessianImpl</param-value>
19         </init-param>
20     </servlet>
21     <!-- 映射HessianServlet的访问URL地址-->
22     <servlet-mapping>
23         <servlet-name>ServiceServlet</servlet-name>
24         <url-pattern>/HessianFoo</url-pattern>
25     </servlet-mapping>
26
27     <!--
28         Tips: Hessian与Spring集成的重要文件为什么叫remote-servlet.xml ?
29         因为在web.xml中有配置:<servlet-name>remote</servlet-name>
30         所以remote-servlet.xml的文件名必须以<servlet-name>中配置的servlet-name作为文件名的开头,
31         且文件名的格式必须是[servlet-name]-servlet.xml格式,否则检测不到。
32
33         即:
34         <param-value>remote-servlet</param-value>所以文件名为remote-servlet.xml
35      -->
36     <servlet>
37         <servlet-name>remote</servlet-name>
38         <!-- 使用Spring的代理Servlet -->
39         <servlet-class>org.springframework.web.servlet.DispatcherServlet</servlet-class>
40         <!-- init-param的配置可选,remote-servlet.xml文件默认放置WEB-INF/下面 -->
41         <!-- 如果想自定义remote-servlet.xml名字,修改namespace对应param-value即可 -->
42         <!--
43         <init-param>
44             <param-name>namespace</param-name>
45             <param-value>remote-servlet</param-value>
46         </init-param>
47         -->
48         <load-on-startup>1</load-on-startup>
49     </servlet>
50
51     <servlet-mapping>
52         <servlet-name>remote</servlet-name>
53         <url-pattern>/remoting/*</url-pattern>
54     </servlet-mapping>
55
56 </web-app>
5.对象必须实现Serializable接口(Foo.java)

 1 package my.hessian.model;
 2
 3 import java.io.Serializable;
 4
 5 /**
 6  * 创建一个Foo类,同时实现序列化接口,
 7  * Description: Foo实现了序列化接口后就可以进行序列化,然后就可以通过网络将序列化后的Foo传输到另一台计算机上
 8  *
 9  * @author  WChao
10  * @version  [My-1.0, 2016-2-21]
11  */
12 public class Foo implements Serializable
13 {
14     private static final long serialVersionUID = 1L;
15
16     private String param = "";
17
18     public String getParam()
19     {
20         return param;
21     }
22
23     public void setParam(String param)
24     {
25         this.param = param;
26     }
27
28     public String toString()
29     {
30         return this.param;
31     }
32 }
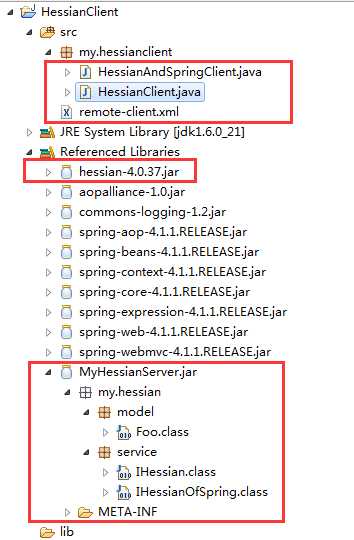
客户端必须具备以下几点:
* 1.java客户端包含hessian.jar的包(hessian-4.0.37.jar)
* 2.具有和服务器端结构一样的接口及涉及Bean对象(MyHessianServer.jar-Foo.class)
* 3.利用HessianProxyFactory调用远程接口(HessianClient.java)
Hessian-JAVA客户端端代码预览图:

1.java客户端包含hessian.jar的包(hessian-4.0.37.jar)
re: 可到Hessian官网:http://hessian.caucho.com/下载最新的Hessian包或见文章附件。
2.具有和服务器端结构一样的接口及涉及Bean对象(MyHessianServer.jar-Foo.class)
re: 见文件附件中的MyHessianServer.jar。
3.利用HessianProxyFactory调用远程接口(HessianClient.java)

 1 package my.hessianclient;
 2
 3 import java.net.MalformedURLException;
 4
 5 import my.hessian.model.Foo;
 6 import my.hessian.service.IHessian;
 7 import my.hessian.service.IHessianOfSpring;
 8
 9 import com.caucho.hessian.client.HessianProxyFactory;
10
11 /**
12  * 调用纯Hessian的客户端
13  *
14  * 客户端必须具备以下几点:
15  * 1.java客户端包含hessian.jar的包
16  * 2.具有和服务器端结构一样的接口及涉及Bean对象
17  * 3.利用HessianProxyFactory调用远程接口
18  *
19  * @author  WChao
20  * @version  [My-1.0, 2016-2-21]
21  */
22 public class HessianClient
23 {
24
25     public static void main(String[] args) throws MalformedURLException
26     {
27         /*
28         <servlet>
29             <!-- 配置HessianServlet, 此处ServiceServlet名字可以自定义-->
30             <servlet-name>ServiceServlet</servlet-name>
31             <servlet-class>com.caucho.hessian.server.HessianServlet</servlet-class>
32
33             <!-- 配置接口的具体实现类 -->
34             <init-param>
35                 <param-name>service-class</param-name>
36                 <param-value>my.hessian.service.impl.IHessianImpl</param-value>
37             </init-param>
38         </servlet>
39         <!-- 映射HessianServlet的访问URL地址-->
40         <servlet-mapping>
41             <servlet-name>ServiceServlet</servlet-name>
42             <url-pattern>/HessianFoo</url-pattern>
43         </servlet-mapping>
44          */
45
46         // 使用HessianProxyFactory Hessian代理工厂直接调用
47         HessianProxyFactory factory = new HessianProxyFactory();
48
49         // 在服务器端的web.xml文件中配置的HessianServlet映射的访问URL地址
50         // 纯Hessian接口
51         String url = "http://localhost:8080/HessianServer/HessianFoo";
52         // 创建IHessian接口的实例对象
53         IHessian iHessian = (IHessian) factory.create(IHessian.class, url);
54
55         Foo myFoo = iHessian.getFoo();
56         System.out.println(myFoo);
57
58         System.out.println("------------------------------------------------------");
59
60         // HessianServiceExporter only supports POST requests
61         // Hessian与Spring集成接口
62         url = "http://localhost:8080/HessianServer/remoting/IHessianOfSpring";
63         IHessianOfSpring iHessianOfSpring = (IHessianOfSpring) factory.create(IHessianOfSpring.class, url);
64
65         myFoo = iHessianOfSpring.getFoo();
66         System.out.println(myFoo);
67
68         // 打印结果:
69         // Hi, This is my first Hessian demo.
70         // ------------------------------------------------------
71         // Hi, This is my first Hessian + Spring demo.
72     }
73 }
Hessian+Spring服务端开发步骤与纯Hessian接口区别:
1、web.xml配置不同

 1     <!--
 2         Tips: Hessian与Spring集成的重要文件为什么叫remote-servlet.xml ?
 3         因为在web.xml中有配置:<servlet-name>remote</servlet-name>
 4         所以remote-servlet.xml的文件名必须以<servlet-name>中配置的servlet-name作为文件名的开头,
 5         且文件名的格式必须是[servlet-name]-servlet.xml格式,否则检测不到。
 6
 7         即:
 8         <param-value>remote-servlet</param-value>所以文件名为remote-servlet.xml
 9      -->
10     <servlet>
11         <servlet-name>remote</servlet-name>
12         <!-- 使用Spring的代理Servlet -->
13         <servlet-class>org.springframework.web.servlet.DispatcherServlet</servlet-class>
14         <!-- init-param的配置可选,remote-servlet.xml文件默认放置WEB-INF/下面 -->
15         <!-- 如果想自定义remote-servlet.xml名字,修改namespace对应param-value即可 -->
16         <!--
17         <init-param>
18             <param-name>namespace</param-name>
19             <param-value>remote-servlet</param-value>
20         </init-param>
21         -->
22         <load-on-startup>1</load-on-startup>
23     </servlet>
24
25     <servlet-mapping>
26         <servlet-name>remote</servlet-name>
27         <url-pattern>/remoting/*</url-pattern>
28     </servlet-mapping>
2、多了remote-servlet.xml文件及配置

 1 <!DOCTYPE beans PUBLIC "-//SPRING//DTD BEAN//EN" "http://www.springframework.org/dtd/spring-beans.dtd">
 2 <beans>
 3     <!-- 接口的具体实现类 -->
 4     <bean id="iHessianOfSpringImpl" class="my.hessian.service.impl.IHessianOfSpringImpl" />
 5
 6     <!-- 使用Spring的HessianServie做代理 -->
 7     <bean name="/IHessianOfSpring"
 8         class="org.springframework.remoting.caucho.HessianServiceExporter">
 9         <!-- service引用具体的实现实体Bean-->
10         <property name="service" ref="iHessianOfSpringImpl" />
11         <property name="serviceInterface" value="my.hessian.service.IHessianOfSpring" />
12     </bean>
13
14     <!-- 可以配置多个HessianServiceExporter代理Bean -->
15 </beans>
Hessian+Spring客户端开发步骤与纯Hessian接口区别:
1、除了可以使用HessianProxyFactory Hessian代理工厂直接调用,还可以使用HessianProxyFactoryBean Hessian代理工厂Bean来完成接口调用

 1 package my.hessianclient;
 2
 3 import my.hessian.model.Foo;
 4 import my.hessian.service.IHessianOfSpring;
 5
 6 import org.springframework.context.ApplicationContext;
 7 import org.springframework.context.support.ClassPathXmlApplicationContext;
 8
 9 /**
10  * 调用Hessian与Spring集成接口的客户端
11  * Description: 使用HessianProxyFactoryBean Hessian代理工厂Bean来完成接口调用
12  *
13  * @author  WChao
14  * @version  [My-1.0, 2016-2-21]
15  */
16 public class HessianAndSpringClient
17 {
18     public static void main(String[] args)
19     {
20         ApplicationContext contex = new ClassPathXmlApplicationContext("remote-client.xml");
21
22         // 获得客户端的Hessian代理工厂bean
23         IHessianOfSpring i = (IHessianOfSpring) contex.getBean("myClient");
24         Foo myFoo = i.getFoo();
25         System.out.println(myFoo);
26
27         // 打印结果:
28         // Hi, This is my first Hessian + Spring demo.
29     }
30 }
2、多了remote-client.xml的Spring文件配置

 1 <!DOCTYPE beans PUBLIC "-//SPRING//DTD BEAN//EN" "http://www.springframework.org/dtd/spring-beans.dtd">
 2 <beans>
 3     <!-- 客户端Hessian代理工厂Bean -->
 4     <bean id="myClient" class="org.springframework.remoting.caucho.HessianProxyFactoryBean">
 5         <!-- 请求代理Servlet路径 -->
 6         <property name="serviceUrl">
 7             <value>http://localhost:8080/HessianServer/remoting/IHessianOfSpring</value>
 8         </property>
 9         <!-- 接口定义 -->
10         <property name="serviceInterface">
11             <value>my.hessian.service.IHessianOfSpring</value>
12         </property>
13     </bean>
14 </beans>
Hessian服务端:HessianServer, Hessian客户端:HessianClient
标签:
原文地址:http://www.cnblogs.com/maven-chao/p/5205735.html