标签:
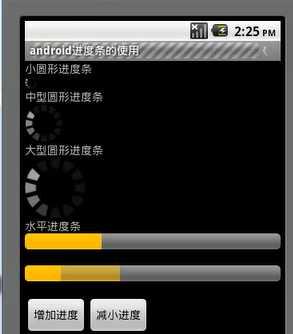
· progressBarStyleSmall 小型圆形
<TextViewandroid:layout_width="match_parent"android:layout_height="wrap_content"android:textSize="24sp"android:text="小型圆形进度条"/><ProgressBarandroid:id="@+id/small"android:layout_width="match_parent"android:layout_height="wrap_content"style="?android:attr/progressBarStyleSmall"/><TextView- android:layout_width="match_parent"
android:layout_height="wrap_content"android:textSize="24sp"android:text="中型圆形进度条"/><ProgressBarandroid:id="@+id/mid"android:layout_width="match_parent"android:layout_height="wrap_content"/><TextViewandroid:layout_width="match_parent"android:layout_height="wrap_content"android:textSize="24sp"android:text="大型圆形进度条"/><ProgressBarandroid:id="@+id/large"android:layout_width="match_parent"android:layout_height="wrap_content"style="?android:attr/progressBarStyleLarge"/>
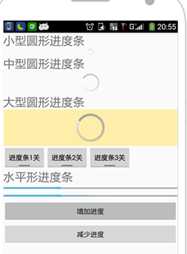
<LinearLayoutandroid:id="@+id/mylaytout1"xmlns:android="http://schemas.android.com/apk/res/android"android:orientation="horizontal"android:layout_width="wrap_content"android:layout_height="wrap_content"><ToggleButtonandroid:id="@+id/tog1"android:layout_width="wrap_content"android:layout_height="wrap_content"android:textOn="进度条1开"android:textOff="进度条1关"/><ToggleButtonandroid:id="@+id/tog2"android:layout_width="wrap_content"android:layout_height="wrap_content"android:textOn="进度条2开"android:textOff="进度条2关"/><ToggleButtonandroid:id="@+id/tog3"android:layout_width="wrap_content"android:layout_height="wrap_content"android:textOn="进度条3开"android:textOff="进度条3关"/></LinearLayout>
<TextViewandroid:layout_width="match_parent"android:layout_height="wrap_content"android:textSize="24sp"android:text="水平形进度条"/><ProgressBarandroid:id="@+id/pbar"android:layout_width="match_parent"android:layout_height="wrap_content"style="?android:attr/progressBarStyleHorizontal"android:max="100"android:progress="10"/><ProgressBarandroid:id="@+id/pbar2"android:layout_width="match_parent"android:layout_height="wrap_content"style="?android:attr/progressBarStyleHorizontal"android:max="100"android:progress="10"android:secondaryProgress="20"/><Buttonandroid:id="@+id/btn1"android:layout_width="match_parent"android:layout_height="wrap_content"android:text="增加进度"/><Buttonandroid:id="@+id/btn2"android:layout_width="match_parent"android:layout_height="wrap_content"android:text="减少进度"/>
public class MainActivity extends AppCompatActivity implements CompoundButton.OnCheckedChangeListener, View.OnClickListener {private ProgressBar small,mid,large,pbar,pbar2;private ToggleButton one,two,three;private Button btn1,btn2;
small = (ProgressBar)findViewById(R.id.small);mid = (ProgressBar)findViewById(R.id.mid);large = (ProgressBar)findViewById(R.id.large);pbar = (ProgressBar)findViewById(R.id.pbar);pbar2 = (ProgressBar)findViewById(R.id.pbar2);one = (ToggleButton)findViewById(R.id.tog1);two = (ToggleButton)findViewById(R.id.tog2);three = (ToggleButton)findViewById(R.id.tog3);btn1 = (Button)findViewById(R.id.btn1);btn2 = (Button)findViewById(R.id.btn2);one.setOnCheckedChangeListener(this);two.setOnCheckedChangeListener(this);three.setOnCheckedChangeListener(this);btn1.setOnClickListener(this);btn2.setOnClickListener(this);
这里我们用到两个方法,一个是开关方法
public void onCheckedChanged(CompoundButton buttonView, boolean isChecked) {if(one.isChecked()) small.setVisibility(View.VISIBLE); //开进度条1else small.setVisibility(View.GONE);if(two.isChecked()) mid.setVisibility(View.VISIBLE); //开进度条2else mid.setVisibility(View.GONE);if(three.isChecked()) large.setVisibility(View.VISIBLE); //开进度条3else large.setVisibility(View.GONE);}
public void onClick(View v) {int progress = 0;switch (v.getId()){case R.id.btn1:pbar.setProgress((int)(pbar.getProgress()*1.5));pbar2.setProgress((int)(pbar2.getProgress()*1.5));pbar2.setSecondaryProgress((int) (pbar2.getProgress()*1.5));break;case R.id.btn2:progress = pbar.getProgress();if(progress <=2) progress = 2; //不能小于1,不然pbar.getProgress()*1.5)就没意义了else progress *= 0.9;pbar.setProgress(progress);pbar2.setProgress(progress);pbar2.setSecondaryProgress(progress);break;}}
标签:
原文地址:http://www.cnblogs.com/shaorui/p/5206543.html