标签:
Learn from:http://www.cnblogs.com/fangjins/archive/2012/05/06/2485459.html,感谢楼主的分享,才有下面的这篇学习小结
一、环境准备
(1)装有Maven插件的eclipse,http://www.cnblogs.com/lmei/p/4782882.html
maven的setting.xml配置说明 http://www.cnblogs.com/lmei/p/4788377.html
之前在配置过程中遇到了几个问题:
问题一:
error: Cannot change version of project facet Dynamic Web Module to 2.5.
error: One or more constraints have not been satisfied.
解决方案可以参考:http://www.cnblogs.com/lmei/p/4780298.html
问题二:“Could not calculate build plan”问题
二、新建项目
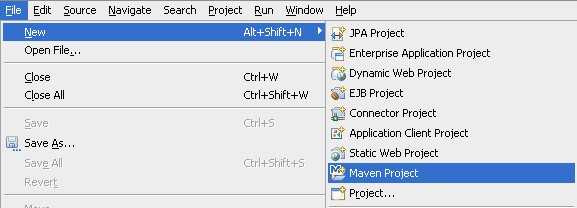
(1)新建项目,File->New->Maven Project
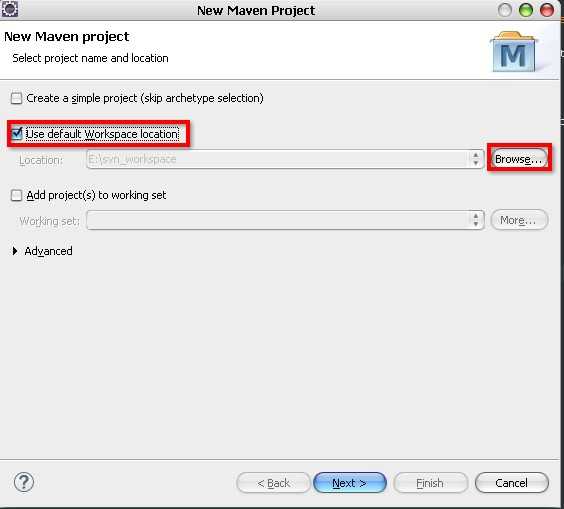
(2)选择项目存放的工作空间
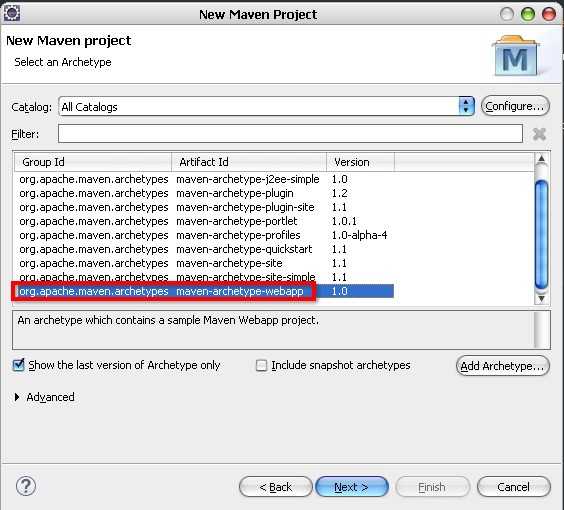
(3)下一步,选择Artiface Id为maven-archetype-webapp的那项
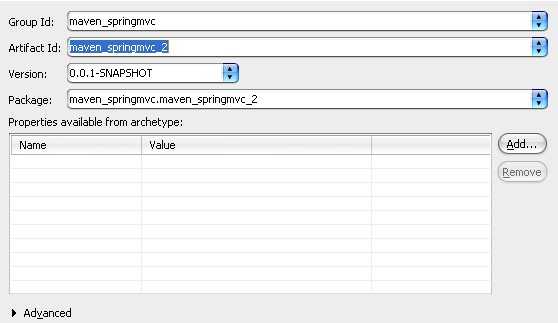
(4)下一步,填写Group Id 和 Artiface Id,然后Finish
二、配置
(1)新建后,可以看到项目的结构如下,将jdk改为本地jdk版本,项目编码改为UTF-8,项目可能有报错,先不管
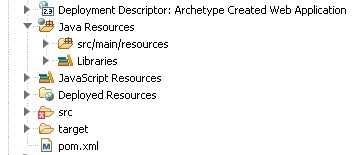
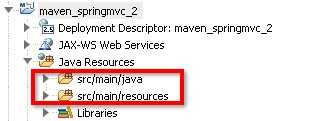
(2)查看Java Resources中是否已经有下面两个Sources Folder(可能会自动生成),没有的话新建 Sources Folder  ,增加src/main/java和src/main/resources
(3)配置 pom.xml,如下

<project xmlns="http://maven.apache.org/POM/4.0.0" xmlns:xsi="http://www.w3.org/2001/XMLSchema-instance"
  xsi:schemaLocation="http://maven.apache.org/POM/4.0.0 http://maven.apache.org/maven-v4_0_0.xsd">
  <modelVersion>4.0.0</modelVersion>
  <groupId>exam</groupId>
  <artifactId>exam_3</artifactId>
  <packaging>war</packaging>
  <version>0.0.1-SNAPSHOT</version>
  <name>exam_3 Maven Webapp</name>
  <url>http://maven.apache.org</url>
  <dependencies>
    <dependency>
      <groupId>junit</groupId>
      <artifactId>junit</artifactId>
      <version>3.8.1</version>
      <scope>test</scope>
    </dependency>

    <dependency>
        <groupId>org.springframework</groupId>
        <artifactId>spring-web</artifactId>
        <version>3.0.5.RELEASE</version>
    </dependency>

    <dependency>
        <groupId>org.springframework</groupId>
        <artifactId>spring-webmvc</artifactId>
        <version>3.0.5.RELEASE</version>
    </dependency>

    <dependency>
        <groupId>org.apache.geronimo.specs</groupId>
        <artifactId>geronimo-servlet_2.5_spec</artifactId>
        <version>1.2</version>
    </dependency>

  </dependencies>
  <build>
    <finalName>maven_springmvc</finalName>
  </build>
</project>
将代码复制进去后,保存,发现新建项目是报错的红叉消失了。
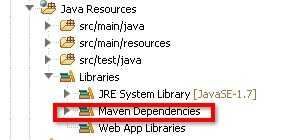
保存后,maven就会自动下载pom.xml的jar包。此时可以看到目录中Maven Dependencies下生成了jar包。
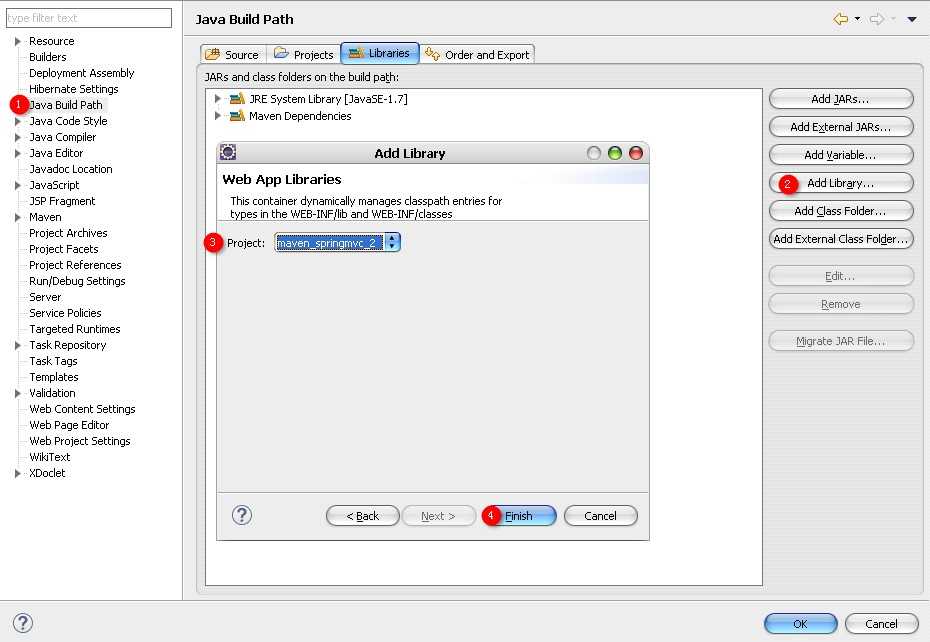
(4)项目名右键-> build path,导入web App Libraries
(5)项目名右键-> Properties,设置Project Facet
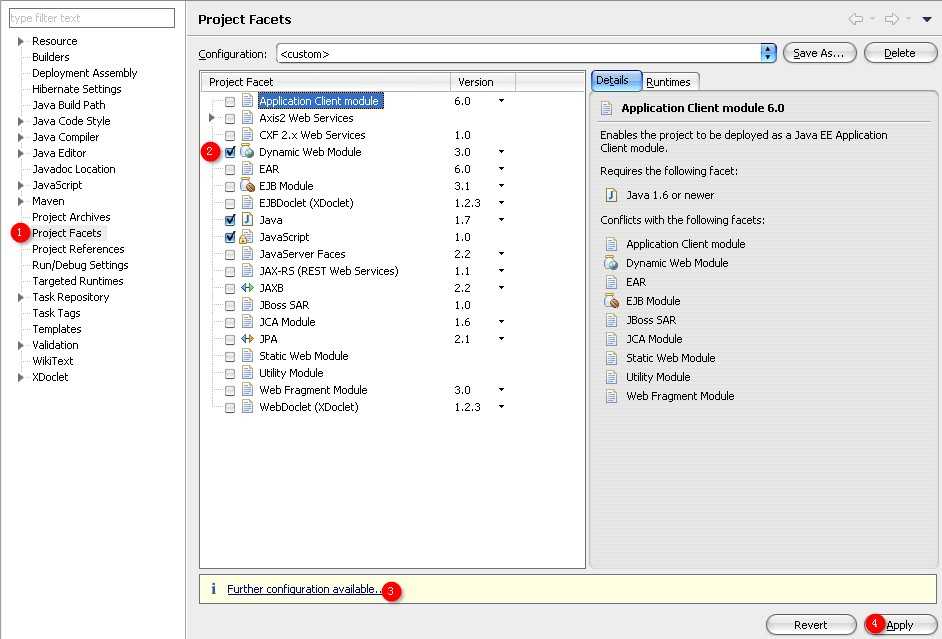
注意:顺便检查下java版本是否选择正确。
可能遇到问题:在配置过程中,由于之前建过别的项目,可能导致Dymanic web module版本无法更改成别的。
解决方法:将Dymanic web module前面的勾去掉,apply,然后再重新选择版本打勾,点击Further configuration available,然后apply就行了!
配置后,可以看到,项目出现了webContent

(6)项目名右键-> Properties,设置Deployment Assembly

(7)在src/main/java中新建两个包,分别为controller和entity,在controller中新建类LoginController,在entity中新建类LoginForm
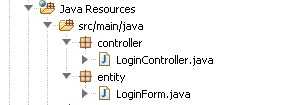
实现代码如下:

package controller;

import javax.servlet.http.HttpServletRequest;
import javax.servlet.http.HttpServletResponse;

import org.springframework.stereotype.Controller;
import org.springframework.web.bind.annotation.RequestMapping;
import org.springframework.web.servlet.ModelAndView;

import entity.LoginForm;

@Controller
public class LoginController {
    @RequestMapping(value="login")
    public ModelAndView login(HttpServletRequest request,HttpServletResponse response,LoginForm command ){
        String username = command.getUsername();
        ModelAndView mv = new ModelAndView("/index","command","LOGIN SUCCESS, " + username);
        return mv;
    }

    @RequestMapping(value="test")
    public ModelAndView test(HttpServletRequest request,HttpServletResponse response,LoginForm command ){
        String username = command.getUsername();
        ModelAndView mv = new ModelAndView("/index","command","TEST SUCCESS, " + username);
        return mv;
    }
}

package entity;

public class LoginForm {
    private String username;
    private String password;
    public String getUsername() {
        return username;
    }
    public void setUsername(String username) {
        this.username = username;
    }
    public String getPassword() {
        return password;
    }
    public void setPassword(String password) {
        this.password = password;
    }
}
(8)在WEB-INF新建三个XML,分别为applicationContext.xml,maven_springmvc-servlet.xml 和 web.xml
在WEB-INF新建文件夹jsp,然后在文件夹中新建两个jsp页面,分别为index.jsp 和 login.jsp
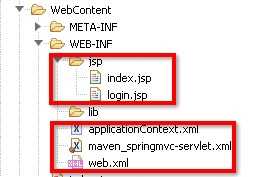
代码如下:

<?xml version="1.0" encoding="UTF-8"?>
<!DOCTYPE beans PUBLIC "-//SPRING//DTD BEAN//EN" "http://www.springframework.org/dtd/spring-beans.dtd">
<beans>
</beans>

<?xml version="1.0" encoding="UTF-8"?>
<!-- Bean头部 -->
<beans xmlns="http://www.springframework.org/schema/beans"
    xmlns:xsi="http://www.w3.org/2001/XMLSchema-instance" xmlns:p="http://www.springframework.org/schema/p"
    xmlns:mvc="http://www.springframework.org/schema/mvc" xmlns:context="http://www.springframework.org/schema/context"
    xmlns:util="http://www.springframework.org/schema/util"
    xsi:schemaLocation="http://www.springframework.org/schema/beans http://www.springframework.org/schema/beans/spring-beans-3.0.xsd
            http://www.springframework.org/schema/context http://www.springframework.org/schema/context/spring-context-3.0.xsd
            http://www.springframework.org/schema/mvc http://www.springframework.org/schema/mvc/spring-mvc-3.0.xsd
            http://www.springframework.org/schema/util http://www.springframework.org/schema/util/spring-util-3.0.xsd">

    <!-- 激活@Controller模式 -->
    <mvc:annotation-driven />
    <!-- 对包中的所有类进行扫描,以完成Bean创建和自动依赖注入的功能 需要更改 -->
    <context:component-scan base-package="controller" />

    <bean class="org.springframework.web.servlet.mvc.annotation.AnnotationMethodHandlerAdapter" />

    <bean id="viewResolver" class="org.springframework.web.servlet.view.InternalResourceViewResolver">
        <property name="prefix">
            <value>/WEB-INF/jsp/</value>
        </property>
        <property name="suffix">
            <value>.jsp</value>
        </property>
    </bean>
</beans>

<?xml version="1.0" encoding="UTF-8"?>
<web-app xmlns:xsi="http://www.w3.org/2001/XMLSchema-instance" xmlns="http://java.sun.com/xml/ns/j2ee" xmlns:web="http://xmlns.jcp.org/xml/ns/javaee" xsi:schemaLocation="http://java.sun.com/xml/ns/j2ee http://java.sun.com/xml/ns/j2ee/web-app_2_4.xsd" version="2.4">
  <listener>
    <listener-class>org.springframework.web.context.ContextLoaderListener</listener-class>
  </listener>
  <servlet>
    <servlet-name>maven_springmvc</servlet-name>
    <servlet-class>org.springframework.web.servlet.DispatcherServlet</servlet-class>
  </servlet>
  <servlet-mapping>
    <servlet-name>maven_springmvc</servlet-name>
    <url-pattern>/</url-pattern>
  </servlet-mapping>
  <welcome-file-list>
    <welcome-file>index.jsp</welcome-file>
  </welcome-file-list>
</web-app>

<%@ page language="java" contentType="text/html; charset=utf-8"
    pageEncoding="utf-8"%>
<!DOCTYPE html PUBLIC "-//W3C//DTD HTML 4.01 Transitional//EN" "http://www.w3.org/TR/html4/loose.dtd">
<html>
<head>
<meta http-equiv="Content-Type" content="text/html; charset=utf-8">
<title>Insert title here</title>
</head>
<body>
    ${command}
</body>
</html>

<%@ page language="java" contentType="text/html; charset=utf-8"
    pageEncoding="utf-8"%>
<!DOCTYPE html PUBLIC "-//W3C//DTD HTML 4.01 Transitional//EN" "http://www.w3.org/TR/html4/loose.dtd">
<html>
<head>
<meta http-equiv="Content-Type" content="text/html; charset=utf-8">
<title>登录</title>
</head>
<body>
    <div>
        <form action="login" method="get">
            <input type="text" name="username">
            <input type="submit" value="SUBMIT">
        </form>
    </div>
</body>
</html>
注:配置ContextLoaderListener表示,该工程要以spring的方式启动。启动时会默认在/WEB-INF目录下查找applicationContext.xml作为spring容器的配置文件
(9)在WebContent中新建一个test.jsp页面,主要是做跳转,WEB-INF目录就是为了保护里面内容不可见,别人无法通过网页的方式直接访问的jsp文件

代码如下:

<%@ page language="java" contentType="text/html; charset=utf-8"
    pageEncoding="utf-8"%>
<!DOCTYPE html PUBLIC "-//W3C//DTD HTML 4.01 Transitional//EN" "http://www.w3.org/TR/html4/loose.dtd">
<html>
<head>
<meta http-equiv="Content-Type" content="text/html; charset=utf-8">
<title>Insert title here</title>
</head>
<body>
<%
     request.getRequestDispatcher("/WEB-INF/jsp/login.jsp").forward(request,response);
%>
</body>
</html>
(9)右键项目名,run on server,在浏览器输入: http://localhost:8080/maven_springmvc_2/test.jsp
会显示login页面,如下:

输入,开发人员,点击提交
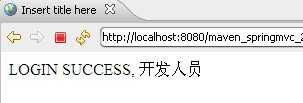
这样,一个简单的springmvc项目搭建完成~
(10)再测试一下,将上面login.jsp的代码进行修改
本来是 <form action="login" method="get">
改成, <form action="test" method="get">
然后访问, http://localhost:8080/maven_springmvc_2/test.jsp
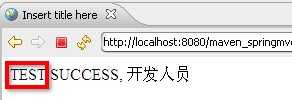
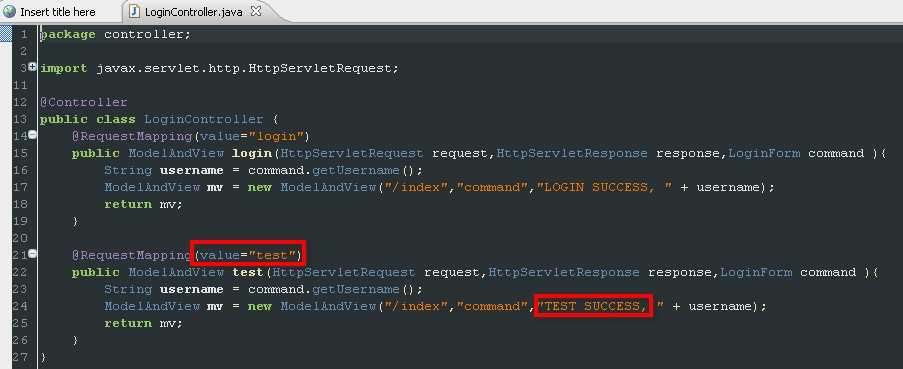
可以发现输出有变化,
可以看下 LoginController.java的代码
……(@_@)Y, 本篇到此结束~
maven -- 实现在Eclipse用maven搭建springmvc项目(附构建步骤和详细实现代码)
标签:
原文地址:http://www.cnblogs.com/lmei/p/5216440.html