标签:
主要目标:版本新特性界面,新浪授权界面(登录界面)的处理
任务基本完成了,基本的框架也就到这了,接下来的应该是首页获取微博了。
1.版本新特性,可以单独作为一个model,写完之加入到项目中。我们新建一个mvc方式的分组Newpart,主要应用的就是那个scrollview,有点类似于广告轮播,这个换成手动的切换图片。
2.在appdelegate中将window的根控制器换成newpartController,完成效果后在处理他们之间的逻辑。
3.添加UIScrollView来实现滚动,添加图片,设置scroll的滚动属性(代码:009)
 1 // 009
 2 // 新特性控制器的scroll设置
 3 - (void)viewDidLoad
 4 {
 5     [super viewDidLoad];
 6
 7     // 初始化scroll
 8     UIScrollView *scroll = [[UIScrollView alloc] initWithFrame:self.view.frame];
 9     // 设置scroll的代理
10     scroll.delegate = self;
11     // 添加到view上
12     [self.view addSubview:scroll];
13
14     // 添加图片
15     CGFloat imageW = self.view.frame.size.width;
16     CGFloat imageH = self.view.frame.size.height;
17     for (int index = 0; index < SVNewPAartImageCount; index++) {
18         UIImageView *imageView = [[UIImageView alloc] init];
19
20         NSString *imageName = [NSString stringWithFormat:@"new_feature_%d-568h@2x", index+1];
21         imageView.image = [UIImage imageNamed:imageName];
22
23         CGFloat imageX = index * imageW;
24         imageView.frame = CGRectMake(imageX, 0, imageW, imageH);
25
26         [scroll addSubview:imageView];
27
28     }
29
30     // 设置滚动的尺寸
31     scroll.contentSize = CGSizeMake(imageW * SVNewPAartImageCount, 0);
32     scroll.showsHorizontalScrollIndicator = NO;  // 滚动条
33     scroll.pagingEnabled = YES; // 分页
34     scroll.bounces = NO;
35 }
4.添加pagecontrol(代码:010),使用scroll的代理完成pagecotrol的变换(代码:011)
 1 // 010
 2 // 添加pagecontrol
 3 - (void)addPagecontrol
 4 {
 5     // 初始化page
 6     UIPageControl *pageControl = [[UIPageControl alloc] init];
 7     // 设置属性
 8     pageControl.numberOfPages = SVNewPAartImageCount;
 9     CGFloat centerX = self.view.frame.size.width * 0.5;
10     CGFloat centerY = self.view.frame.size.height * 0.95;
11     pageControl.center = CGPointMake(centerX, centerY);
12     pageControl.bounds = CGRectMake(0, 0, 150, 40);
13     pageControl.userInteractionEnabled = NO;
14     // 添加page
15     [self.view addSubview:pageControl];
16     self.pageControl = pageControl;
17
18     // 更改圆点的颜色
19     pageControl.currentPageIndicatorTintColor = SLColor(253, 98, 42);
20     pageControl.pageIndicatorTintColor = SLColor(189, 189, 189);
21 }
 1 // 011
 2 // 实现page的变换
 3 #pragma mark UIScrollView的代理方法
 4 - (void)scrollViewDidScroll:(UIScrollView *)scrollView
 5 {
 6     // 取出水平方向滚动的距离
 7     CGFloat offsetX = scrollView.contentOffset.x;
 8     // 计算页码
 9     double pageDouble = offsetX / scrollView.frame.size.width;
10     int pageInt = (int)(pageDouble + 0.5);
11     self.pageControl.currentPage = pageInt;
12 }
5.为最后一张图片添加分享复选框和开始微博按钮(代码:012),实现从新特性跳转到首页(代码:013)
 1 // 012
 2 - (void)setupLastImageView:(UIImageView *)imageView
 3 {
 4     // 让imageview可以和用户进行交互
 5     imageView.userInteractionEnabled = YES;
 6     // 添加开始微博按钮
 7     UIButton *startBtn = [[UIButton alloc] init];
 8     [startBtn setBackgroundImage:[UIImage imageNamed:@"new_feature_finish_button"] forState:UIControlStateNormal];
 9     [startBtn setBackgroundImage:[UIImage imageNamed:@"new_feature_finish_button_highlighted"] forState:UIControlStateHighlighted];
10     // 设置frame
11     CGFloat centerX = imageView.frame.size.width * 0.5;
12     CGFloat centerY = imageView.frame.size.height * 0.6;
13     startBtn.center = CGPointMake(centerX, centerY);
14     startBtn.bounds = (CGRect){CGPointZero, startBtn.currentBackgroundImage.size};
15     // 设置文字
16     [startBtn setTitle:@"开始微博" forState:UIControlStateNormal];
17     [startBtn setTitleColor:[UIColor whiteColor] forState:UIControlStateNormal];
18     // 绑定事件
19     [startBtn addTarget:self action:@selector(start) forControlEvents:UIControlEventTouchUpInside];
20     [imageView addSubview:startBtn];
21
22     // 添加选择框
23     UIButton *checkBox = [[UIButton alloc] init];
24     checkBox.selected = YES;
25     [checkBox setTitle:@"分享给大家" forState:UIControlStateNormal];
26     [checkBox setImage:[UIImage imageNamed:@"new_feature_share_false"] forState:UIControlStateNormal];
27     [checkBox setImage:[UIImage imageNamed:@"new_feature_share_true"] forState:UIControlStateSelected];
28     checkBox.bounds = CGRectMake(0, 0, 200, 50);
29     CGFloat checkboxcenterX = centerX;
30     CGFloat checkboxcenterY = imageView.frame.size.height * 0.5;
31     checkBox.center = CGPointMake(checkboxcenterX, checkboxcenterY);
32     [checkBox setTitleColor:[UIColor blackColor] forState:UIControlStateNormal];
33     checkBox.titleLabel.font = [UIFont systemFontOfSize:15];
34     [checkBox addTarget:self action:@selector(checkboxClick:) forControlEvents:UIControlEventTouchUpInside];
35     //    checkbox.titleEdgeInsets = UIEdgeInsetsMake(0, 10, 0, 0);
36     checkBox.imageEdgeInsets = UIEdgeInsetsMake(0, 0, 0, 10);
37     //    checkbox.contentEdgeInsets = UIEdgeInsetsMake(10, 10, 10, 10);
38     [imageView addSubview:checkBox];
39 }
 1 // 013
 2 - (void)start
 3 {
 4     // 显示状态栏
 5     [UIApplication sharedApplication].statusBarHidden = NO;
 6     // 切换窗口的根控制器
 7     self.view.window.rootViewController = [[SVTabbarController alloc] init];
 8 }
 9 - (void)checkboxClick:(UIButton *)checkbox
10 {
11     checkbox.selected = !checkbox.isSelected;
12 }
6.存储版本信息,当不是第一次安装本软件的时候不显示新特性界面,在appdelegate中完成存储和判断,(代码:014)
 1 // 014
 2 - (BOOL)application:(UIApplication *)application didFinishLaunchingWithOptions:(NSDictionary *)launchOptions {
 3     // Override point for customization after application launch.
 4
 5     // 设置窗口
 6     self.window = [[UIWindow alloc] initWithFrame:[UIScreen mainScreen].bounds];
 7
 8     // 版本信息的键值
 9     NSString *key = @"CFBundleVersion";
10     // 取出沙盒中是上次存储的软件版本信息
11     NSUserDefaults *defaults = [NSUserDefaults standardUserDefaults];
12     NSString *lastVersion = [defaults stringForKey:key];
13     // 获得但前版本
14     NSString *currentVersion = [NSBundle mainBundle].infoDictionary[key];
15
16     if ([currentVersion isEqualToString:lastVersion]) {
17         // 显示状态栏
18         [UIApplication sharedApplication].statusBarHidden = NO;
19         self.window.rootViewController = [[SVTabbarController alloc] init];
20     } else { // 新版本
21         self.window.rootViewController = [[SVNewpartController alloc] init];
22         // 存储新版本
23         [defaults setObject:currentVersion forKey:key];
24         [defaults synchronize];
25     }
26     // 显示窗口
27     [self.window makeKeyAndVisible];
28
29     return YES;
30 }
7.微博的Author授权,首先要成为新浪的开发者,这个很好申请的,我这个上次就已经弄好了,这次就直接用了。
8.这个授权也可以作为一个模块但度拿出来。想以后要是使用微博分享自己应用的一些动态就可以把这儿授权模块直接该一下就好,我们新建一个mvc组Author。
9.新浪的授权也是一个网页的形式,所以要用到webview,加载页面的时候iOS9也许会报错,是因为iOS要求使用更安全的https,需要在info.plist中加入一句话,(代码:特殊0)
1 <?xml version="1.0" encoding="UTF-8"?>
2 <!DOCTYPE plist PUBLIC "-//Apple//DTD PLIST 1.0//EN" "http://www.apple.com/DTDs/PropertyList-1.0.dtd">
3 <plist version="1.0">
4 <dict>
5 <key>NSAllowsArbitraryLoads</key>
6 <true/>
7 </dict>
8 </plist>
10.登陆后,通过webView的代理截取返回的code,并通过code换取accesstoken,在换取accesToken的方法中使用AFN发送请求
11.为了实现模型编程,新建一个用户账号模型SVAccount,为了优化账号的存取,添加一个AccountTool类,用来将用户归档保存。为后面的用户是否已经登录判断做基础
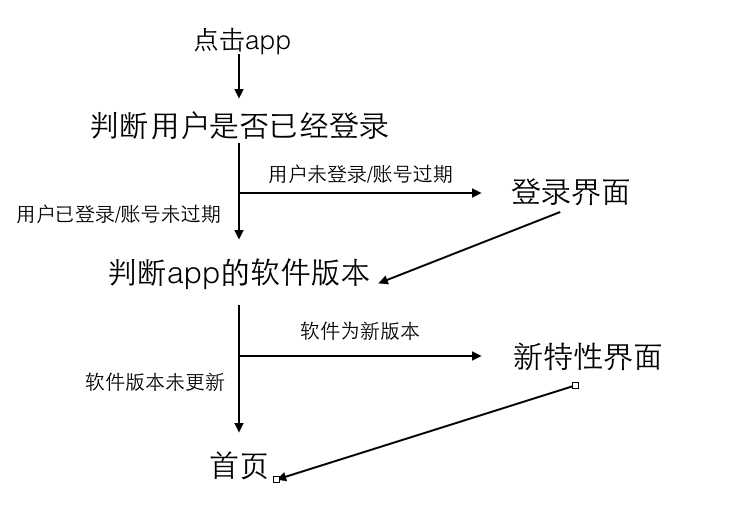
12.软件启动顺序:(图004),添加工具类weiboTool选择app的进入界面,在appdelegate中的判断就少了很多(代码015)

 1 // 015
 2 - (BOOL)application:(UIApplication *)application didFinishLaunchingWithOptions:(NSDictionary *)launchOptions {
 3     // Override point for customization after application launch.
 4     // 设置窗口
 5     self.window = [[UIWindow alloc] initWithFrame:[UIScreen mainScreen].bounds];
 6     // 显示窗口
 7     [self.window makeKeyAndVisible];
 8
 9     // 先判断有无存储账号信息
10     SVAccount *account = [SVAccountTool account];
11     if (account) { // 之前登录成功
12         [SLWeiboTool chooseRootController];
13     } else { // 之前没有登录成功
14         self.window.rootViewController = [[SVAuthorController alloc] init];
15     }
16     return YES;
17 }
标签:
原文地址:http://www.cnblogs.com/sleen/p/5232694.html