标签:
不精通多线程优化的程序员,不是好程序员,连码农都不是。
——并行计算时代掌握多线程的重要性
广义上线程分为用户线程和内核线程。
前者已经绝迹,它一般只存在于早期不支持多线程的系统中。
它用模拟的方式实现一个模拟的多线程系统,不支持异步。
即,一个线程被阻塞了,其它线程也会被阻塞。
当今的操作系统几乎都默认提供了内核线程API,底层由操作系统实现。
内核线程的好处在于,它们之间支持异步,是"真"多线程。
不过,内核线程也给线程的使用带来了操作系统捆绑性。
不同操作系统平台,其内核线程的实现与提供的API不同,给跨平台带来麻烦。
比如在Windows上,MFC就是封装了Windows内核线程。
在Linux上,广泛使用的pThread就是POSIX系列系统流传下来的内核线程。
有幸的是,历史上有许多跨平台的项目库。
我最早知道是Qt,GTK,这俩个比较特殊,因为它们是Application Framework。
是在90年代左右,C++为了对抗Java等后期开发之秀,而专门写成的跨平台C++库。
主要以GUI为作战武器,对抗Java。
Boost库同样提供了优秀了内核线程库,还是跨平台的。
所以Caffe移植到Windows,是不需要改动线程系统的。
生产者与消费者是一个经典的资源分配问题。
它的核心要点主要体现在两方面:
①阻塞
②临界
其中②不属于Caffe设计范畴,因为Caffe每一个生产者(DataReader),
对应一个消费者(DataLayer),不存在对临界资源区的访问与修改。
①是我们关注的重点。
为什么需要阻塞?因为生产者比较快,消费者比较慢。
一次消费过程,包括整个正向传播和反向传播,这需要不少的时间。
而一次生产过程,就是对一个Batch数据的预缓冲,这不需要很多时间。
生产者总不能一直生产下去,然后爆掉缓冲区吧?
所以,生产者在检测到缓冲区满了之后,就要进入阻塞状态。
那么问题来了,如果我们不用多线程,将阻塞代码放在主进程中执行,会怎么样?
读取,阻塞,前向传播失败,反向传播不可能,死锁。
这是为什么I/O代码需要多线程处理的根本原因。
多线程程序设计的核心原则就是:将非因果连续的代码,并行化。
也就是说,只要代码前后不是上下文相关的,都能够并行执行。
那么Caffe的I/O模型中,有哪几处不是上下文相关的?
答案有二:
①Datum和Blob(Batch)不是上下文相关的。
Blob包含着正向传播的shape信息,这些信息只有初始化网络在初始化时才能确定。
而Datum则只是与输入样本有关。
所以,Datum的读取工作可以在网络未初始化之前就开始,这就是DataReader采用线程设计的内涵。
②GPU之间不是上下文相关的。
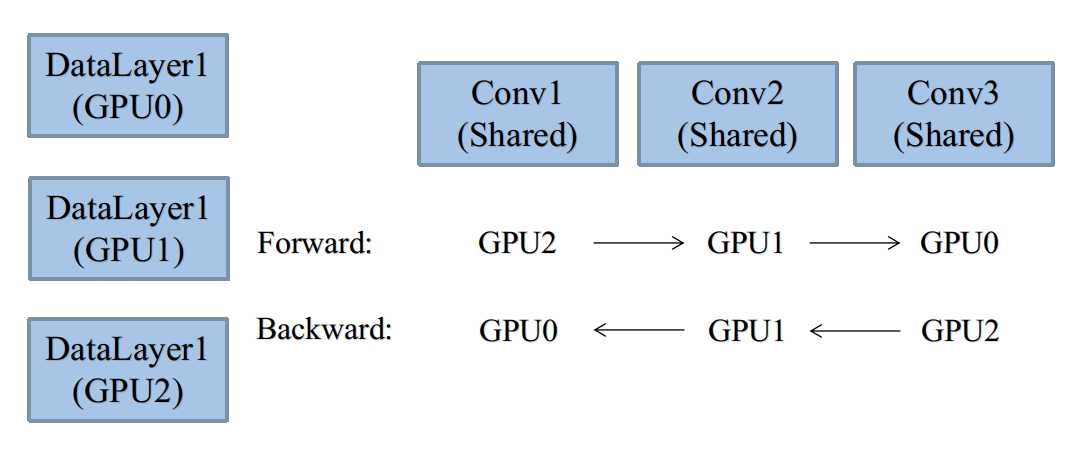
Caffe的多GPU方案,是让不同GPU覆盖不同段的数据,最后不在网络结构上做融合。
这点和AlexNet略有不同(AlexNet两个GPU的网络结构最后交叉了)
这样的多GPU方案,使得每个GPU至少存在一个DataLayer,覆盖不一样的数据段。
其它逻辑层,通过共享root网络即可,如图所示:

上图是一个经典的多GPU流水线编程方案。3个GPU拥有各自的DataLayer,但是共享其它逻辑Layer。
Caffe在主机端,也就是主进程代码,每个Layer的前向传播被一个Mutex锁住,而反向传播却没有。
这种行为会构造出一个人工的流水线,比如:
GPU0在Conv1时,GPU1、GPU2会被锁住。
GPU0在Conv3时,Conv1和Conv2是空闲的,会被其它GPU占用。
反向传播之所以不锁,是因为前向传播和反向传播是符合因果律的,前向传播成流水线,
反向传播自然也是流水线,非常优美的设计。
俗话说,一个好汉三个帮。
本篇所述的多线程,均指的是CPU多线程。
实际上,由于GPGPU的异构计算引入,CPU线程基本都在做一些后勤工作。
主要是数据的读取、与GPU显存的数据交换。
CPU主进程负责全程调度GPU执行计算代码,在这点上,CPU利用率并不高。
而从线程对数据的预缓冲任务也不是很艰难。
所以,相对于计算密集型CPU多线程设计而言,Caffe的多线程任务相对轻松。
我们很难将CPU的利用率榨到100%,在这点上,为深度学习Online应用系统埋下伏笔。
试想一下,在后台构建一个基于Socket的深度学习应用服务器,同时CPU并发线程可达几千,
我觉得只有这样,才能真正榨干CPU计算力。至于Caffe的训练,其实对CPU的要求不是很高。
使用boost::thread, 需要#include "boost/thread/thread.hpp"
与Qt、MFC等Application Framework提供的线程库不同,
boost::thread的封装性比较强,一般不建议继承和改写boost::thread类(没见过有人这么用)
为了线程能够执行自定义代码,需要在其构造时,传入执行函数的函数指针。
函数指针分为两类:
①普通函数指针
②类成员函数指针
boost::function结合bind函数提供了一个函数指针的载体。(style1)
也可以直接将函数指针的构造方式传入thread。(style2)
建议配合boost::shared_ptr使用。(style3)
若是普通函数指针,可用:
//    style 1
void helloworld(int a,string b);
boost::function<void()> f=bind(helloworld,1,"helloworld");
boost::thread(f);

//    style 2
boost::thread(helloworld,1,"helloworld")

//    style 3(Caffe style)
boost::shared_ptr<boost::thread> thread;
thread.reset(new boost::thread(helloworld,1,"helloworld"));
当然,为了系统的开发,我们显然需要一个封装类,如将boost::thread封装为DragonThread类。
即,将boost::shared_ptr<boost::thread> thread作为类成员。
基于类的函数指针绑定需要传入类this指针,写法做如下更改:
class DragonThread{
void helloworld(int a,string b);
};

//    style 1
 boost::function<void()> f=bind(&DragonThread::helloworld,this,1,"helloworld");
boost::thread(f);

//    style 2
boost::thread(&DragonThread::helloworld,this,1,"helloworld");

//    style 3(Caffe style)
boost::shared_ptr<boost::thread> thread;
thread.reset(new boost::thread(&DragonThread::helloworld,this,1,"helloworld"));
boost::thread一旦被构造后,就会立刻以异步的方式执行传入的函数。
在debug线程的过程中,注意boost::thread将晚于主进程的代码的执行。
如果不在main函数中循环等待,很有可能boost::thread还没有执行,main函数已经退出了。
想要立刻终结一个boost线程是不可能的,一些强大的Application Framework的线程库
通常会提供thread.terminate(),来立刻终结线程的执行(比如Qt),但是boost没有提供。
因为这种方式是相当不安全的,在Java设计模式中,更鼓励开发者让线程函数自动检测终结条件而退出。
这种检测函数在Caffe里是must_stop()函数,它使用了boost::thread提供的中断点检测功能。
bool DragonThread::must_stop(){
    return boost::this_thread::interruption_requested();
}
注意,中断请求的检测,只能在异步线程执行函数中执行,主进程从外部调用是无效的。
主进程可以从外部触发interrupt操作,通知正在异步执行的线程,该方法封装为stopThread函数:
void DragonThread::stopThread(){
    if (is_start()){
        thread->interrupt();
    }
    try{thread->join();}
    catch (boost::thread_interrupted&) {}
    catch (std::exception& e){ LOG(FATAL) << "Thread exception: " << e.what(); }
}
有时候,interrupt的线程可能处于阻塞睡眠状态,我们需要从外部立即唤醒它,让其检测中断请求。
所以在interrupt操作后,需要立即后接join操作。最后,还可以选择性地补上异常检测。
建立dragon_thread.hpp。
class DragonThread
{
public:
    DragonThread() {}
    virtual ~DragonThread();
    void initializeThread(int device, Dragon::Mode mode, int rand_seed, int solver_count, bool root_solver);
    void startThread();
    void stopThread();
    //the interface implements for specific working task
    virtual void interfaceKernel() {}
    bool is_start();
    bool must_stop();
    boost::shared_ptr<thread> thread;
};
在第叁章,我们提到了全局管理器是线程独立的,因此每一个dragon线程,
需要从主管理器转移一些参数,包括(GPU设备、计算模式、随机种子、root_solver&solver_count)
成员函数包括:
boost::thread的传入函数initializeThread,这个函数里最后又嵌套了interfaceKernel。
前者负责转移参数,后者默认是一个空函数,你也可以写成纯虚函数。
由于boost::thread没有继承的用法,所以Caffe二度封装以后,提供了这种用法。
所有继承DragonThread的类,只要重载interfaceKernel()这个虚函数就行了。
startThread应该最先被执行,它包括获取主进程管理器参数,以及构造thread。
由于thread构造结束,就会立刻执行,所以startThread不负其名,就是启动了线程。
stopThread的功能如上所述。
建立dragon_thread.cpp。
首先是thread的传入函数initializeThread:
void DragonThread::initializeThread(int device, Dragon::Mode mode, int rand_seed, int solver_count, bool root_solver){
#ifndef CPU_ONLY
    CUDA_CHECK(cudaSetDevice(device));
#endif
    Dragon::set_random_seed(rand_seed);
    Dragon::set_mode(mode);
    Dragon::set_solver_count(solver_count);
    Dragon::set_root_solver(root_solver);
    interfaceKernel();  //do nothing
}
然后是外部调用的startThread函数:
void DragonThread::startThread(){
    CHECK(!is_start());
    int device = 0;
#ifndef CPU_ONLY
    CUDA_CHECK(cudaGetDevice(&device));
#endif
    Dragon::Mode mode = Dragon::get_mode();
    unsigned int seed = Dragon::get_random_value();
    int solver_count = Dragon::get_root_solver();
    bool root_solver = Dragon::get_root_solver();
    try{
        thread.reset(new boost::thread(&DragonThread::initializeThread,
                            this, device, mode, seed, solver_count, root_solver));
    }
    catch (std::exception& e){ LOG(FATAL) << "Thread exception: " << e.what(); }
}
由于该函数是在主进程中执行,Dragon::get()与initializeThread里的Dragon::set()
操作的其实不是同一个全局管理器,所以需要这样麻烦的转移参数过程。
最后是线程控制与析构:
void DragonThread::stopThread(){
    if (is_start()){
        thread->interrupt();
    }

    try{thread->join();}
    catch (boost::thread_interrupted&) {}
    catch (std::exception& e){ LOG(FATAL) << "Thread exception: " << e.what(); }
}

bool DragonThread::is_start(){
    return thread&&thread->joinable();
}

bool DragonThread::must_stop(){
    return boost::this_thread::interruption_requested();
}

DragonThread::~DragonThread(){
    stopThread();
}

#ifndef DRAGON_THREAD_HPP
#define DRAGON_THREAD_HPP
#include "common.hpp"
class DragonThread
{
public:
    DragonThread() {}
    virtual ~DragonThread();
    void initializeThread(int device, Dragon::Mode mode, int rand_seed, int solver_count, bool root_solver);
    void startThread();
    void stopThread();
    //the interface implements for specific working task
    virtual void interfaceKernel() {}
    bool is_start();
    bool must_stop();
    boost::shared_ptr<thread> thread;
};
#endif

#include "dragon_thread.hpp"
#include "direct.h"
#include "iostream"
using namespace std;
//    parameters list tranfers from parent thread(main thread)
//    refer this function when create a boost::thread(child thread)
//    get-->set is not a repeated action, get_func called by parent thread
//    where set_func called by children thread, they sharing different Dragon Manager

void DragonThread::initializeThread(int device, Dragon::Mode mode, int rand_seed, int solver_count, bool root_solver){
#ifndef CPU_ONLY
    CUDA_CHECK(cudaSetDevice(device));
#endif
    Dragon::set_random_seed(rand_seed);
    Dragon::set_mode(mode);
    Dragon::set_solver_count(solver_count);
    Dragon::set_root_solver(root_solver);
    interfaceKernel();  //do nothing
}

//    called by main thread
//    using main thread‘s configurations
//    after that , following I/O works transfer to child threads
void DragonThread::startThread(){
    CHECK(!is_start());
    int device = 0;
#ifndef CPU_ONLY
    CUDA_CHECK(cudaGetDevice(&device));
#endif
    Dragon::Mode mode = Dragon::get_mode();
    unsigned int seed = Dragon::get_random_value();
    int solver_count = Dragon::get_root_solver();
    bool root_solver = Dragon::get_root_solver();
    try{
        thread.reset(new boost::thread(&DragonThread::initializeThread,
                            this, device, mode, seed, solver_count, root_solver));
    }
    catch (std::exception& e){ LOG(FATAL) << "Thread exception: " << e.what(); }

    //    <boost::thread> will start immediately
    //    if the main thread(main function) finished after that when debuging
    //    you will think that thread is not start , that‘s wrong because main thread is done
    //    and child thread doom to be destroyed
}

void DragonThread::stopThread(){
    if (is_start()){
        thread->interrupt();
    }

    try{thread->join();}
    catch (boost::thread_interrupted&) {}
    catch (std::exception& e){ LOG(FATAL) << "Thread exception: " << e.what(); }
}

bool DragonThread::is_start(){
    return thread&&thread->joinable();
}

bool DragonThread::must_stop(){

    //return true once call thread->interrupt()
    //break Reading-LOOP and complete the thread‘s working function
    return boost::this_thread::interruption_requested();
}

DragonThread::~DragonThread(){
    stopThread();
}
标签:
原文地址:http://www.cnblogs.com/neopenx/p/5200519.html