标签:
Spring Web MVC是一种基于Java的实现了Web MVC设计模式的请求驱动类型的轻量级Web框架,即使用了MVC架构模式的思想,将web层进行职责解耦,基于请求驱动指的就是使用请求-响应模型。
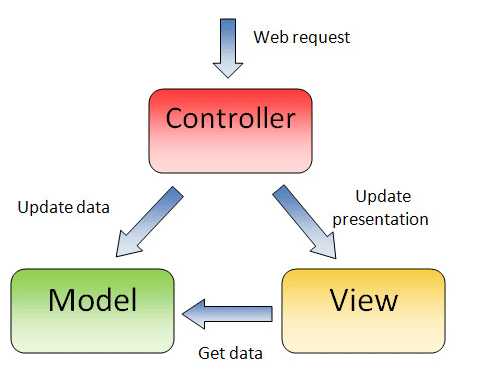
模型-视图-控制器(MVC)是一个以设计界面应用程序为基础的设计模式。它主要通过分离模型、视图及控制器在应用程序中的角色将业务逻辑从界 面中解耦。通常,模型负责封装应用程序数据在视图层展示。视图仅仅只是展示这些数据,不包含任何业务逻辑。控制器负责接收来自用户的请求,并调用后台服务 来处理业务逻辑。处理后,后台业务层可能会返回了一些数据在视图层展示。控制器收集这些数据及准备模型在视图层展示。MVC模式的核心思想是将业务逻辑从 界面中分离出来,允许它们单独改变而不会相互影响。

在Spring MVC中,模型通常由POJO对象组成,它在业务层中被处理,在持久层被持久化,视图通常是用JSP标准标签库(JSTL)编写的JSP模板,控制器部分是由dispatcher servlet负责。
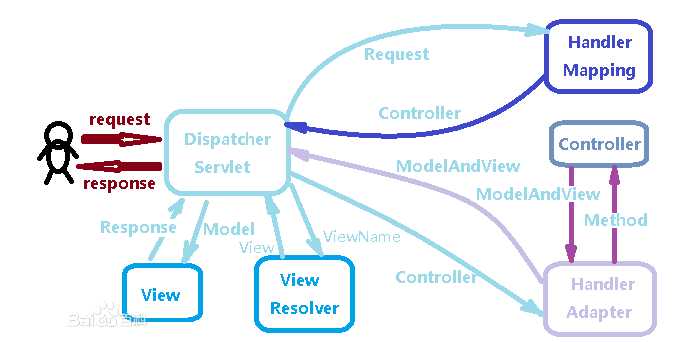
SpringMVC是一个基于请求驱动的Web框架,使用前端控制器模式来进行设计,在根据映射规则分发给相应的页面控制器进行处理。其请求处理流程如下图所示:

具体执行步骤如下:
1、客户端发出一个HTTP请求,Web应用服务器接收到这个请求,如果匹配DispatcherServlet的请求映射路径(web.xml中指定),Wen容器就会将该请求转交给DispatcherServlet处理。
2、DispatcherServlet接收到这个请求后,将根据请求的信息和HandlerMapping的配置找到处理请求的处理器(Handler)。
3、得到Handler后,通过HandlerAdapter对Handler进行封装,再以统一的适配器接口调用Handler。
4、处理器完成业务逻辑的处理后返回一个ModelAndView给DispatcherServlet,ModelAndView包含了视图逻辑名和模型数据信息。
5、DispatcherServlet借由ViewResolver完成逻辑视图名到真实视图对象的解析工作。
6、当得到真实的视图对象view后,DispatcherServlet就使用这个View对象对ModelAndView中模型数据进行渲染。
7、客户端最终得到的响应消息可能是一个普通的HTML页面,也可能是一个XML或者是JSON串。

在web.xml中配置前端控制器:
<?xml version="1.0" encoding="UTF-8"?>
<web-app xmlns:xsi="http://www.w3.org/2001/XMLSchema-instance" xmlns="http://java.sun.com/xml/ns/javaee" xsi:schemaLocation="http://java.sun.com/xml/ns/javaee http://java.sun.com/xml/ns/javaee/web-app_2_5.xsd" id="WebApp_ID" version="2.5">
  <display-name>day_0301_springMVC</display-name>
  <welcome-file-list>
    <welcome-file>index.html</welcome-file>
    <welcome-file>index.htm</welcome-file>
    <welcome-file>index.jsp</welcome-file>
    <welcome-file>default.html</welcome-file>
    <welcome-file>default.htm</welcome-file>
    <welcome-file>default.jsp</welcome-file>
  </welcome-file-list>
  <!-- 前端控制器 -->
  <servlet>
      <servlet-name>springmvc</servlet-name>
      <servlet-class>org.springframework.web.servlet.DispatcherServlet</servlet-class>
     <!-- contextConfigLocation配置springmvc加载的配置文件(配置处理器映射器、适配器等等)
         如果不配置contextConfigLocation,默认加载的是/WEB-INF/servlet名称-servlet.xml
     -->
     <init-param>
         <param-name>contextConfigLocation</param-name>
         <param-value>classpath:springmvc.xml</param-value>
     </init-param>
  </servlet>
  <servlet-mapping>
      <servlet-name>springmvc</servlet-name>
      <!--
          第一种:*.action,访问以.action结尾由DispatcherServlet进行解析
          第二种:/, 所有访问的地址都由DispatcherServlet进行解析,对于静态文件的解析需要配置不让DispatcherServlet进行解析
       -->
      <url-pattern>*.action</url-pattern>
  </servlet-mapping>
</web-app>
在classpath下的springmvc.xml中配置处理器映射器

<!-- 处理器映射器  ,将bean的name作为URL进行查找,需要在配置Handler时指定beanName(就是URL)-->
    <bean class="org.springframework.web.servlet.handler.BeanNameUrlHandlerMapping"></bean>
<!-- 处理器适配器,所有的处理器适配器都实现HandlerAdapter接口 -->
    <bean class="org.springframework.web.servlet.mvc.SimpleControllerHandlerAdapter">
    </bean>
<!-- 配置视图解析器
     解析jsp视图,默认使用jstl标签
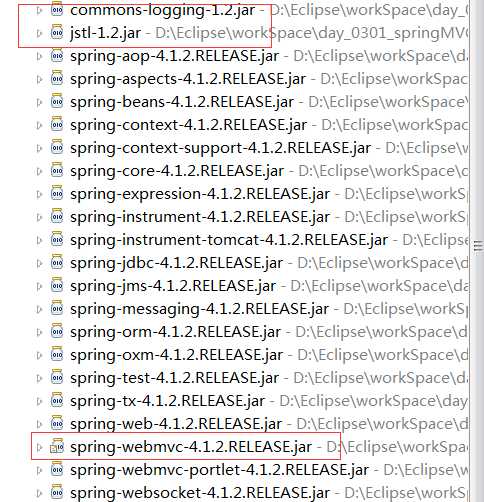
     CLASSPATH下面要有jstl jar包
-->
    <bean class="org.springframework.web.servlet.view.InternalResourceViewResolver"></bean>
需要实现Controller接口,才能由SimpleControllerHandlerAdapter适配器执行。
先要创建POJO对象:
public class Items
{
    private String name;
    private int price;
    public String getName()
    {
        return name;
    }
    public void setName(String name)
    {
        this.name = name;
    }
    public int getPrice()
    {
        return price;
    }
    public void setPrice(int price)
    {
        this.price = price;
    }
}
创建Handler:
public class TestController implements Controller
{
    @Override
    public ModelAndView handleRequest(HttpServletRequest request,HttpServletResponse response) throws Exception
    {
        List<Items> itemsList=new ArrayList<Items>();
        Items items1=new Items();
        items1.setName("联想笔记本");
        items1.setPrice(2500);
        Items items2=new Items();
        items2.setName("三星笔记本");
        items2.setPrice(5000);
        itemsList.add(items1);
        itemsList.add(items2);
        ModelAndView modelAndView=new ModelAndView();
        modelAndView.addObject("itemsList", itemsList);
        modelAndView.setViewName("/WEB-INF/jsp/items/itemsList.jsp");
        return modelAndView;
    }
}
<!DOCTYPE HTML PUBLIC "-//W3C//DTD HTML 4.01 Transitional//EN">
<html>
    <head>
        <%@ page language="java" contentType="text/html; charset=utf-8" pageEncoding="utf-8"%>
        <%@taglib uri="http://java.sun.com/jsp/jstl/core" prefix="c" %>
        <%@taglib uri="http://java.sun.com/jsp/jstl/fmt" prefix="fmt" %>
        <meta http-equiv="Content-Type" content="text/html; charset=utf-8">
        <title>查询商品列表</title>
    </head>
    <body>
        <form action="${pageContext.request.contentLength}/item/queryItem.action" method="post">
            查询条件:
            <table width="100%" border="1">
            <tr>
            <td><input type="submit" value="查询"/></td>
            </tr>
            </table>
            商品列表:
            <table width="100%" border="1">
                <tr>
                <td>商品名称</td>
                <td>商品价格</td>
                <td>操作</td>
                </tr>
            <c:forEach items="${itemsList}" var="item">
                <tr>
                    <td>${item.name }</td>
                    <td>${item.price }</td>
                    <td><a href="${pageContext.request.contextPath}/item/editItem.action?name=${item.name}">修改</a></td>
                </tr>
            </c:forEach>
            </table>
        </form>
    </body>
</html>
<bean name="/queryItems.action" class="com.demo.ssm.controller.TestController"></bean>
到此,springmvc.xml的配置全部完成,其具体配置文件如下:
<?xml version="1.0" encoding="UTF-8"?>
<beans xmlns="http://www.springframework.org/schema/beans"
    xmlns:xsi="http://www.w3.org/2001/XMLSchema-instance"
    xmlns:context="http://www.springframework.org/schema/context"
    xmlns:mvc="http://www.springframework.org/schema/mvc"
    xmlns:aop="http://www.springframework.org/schema/aop"
    xmlns:tx="http://www.springframework.org/schema/tx"
    xsi:schemaLocation="http://www.springframework.org/schema/mvc http://www.springframework.org/schema/mvc/spring-mvc-4.1.xsd
        http://www.springframework.org/schema/beans http://www.springframework.org/schema/beans/spring-beans.xsd
        http://www.springframework.org/schema/context http://www.springframework.org/schema/context/spring-context-4.1.xsd
        http://www.springframework.org/schema/aop http://www.springframework.org/schema/aop/spring-aop-4.1.xsd
        http://www.springframework.org/schema/tx http://www.springframework.org/schema/tx/spring-tx-4.1.xsd">

    <bean name="/queryItems.action" class="com.demo.ssm.controller.TestController"></bean>

    <!-- 处理器适配器,所有的处理器适配器都实现HandlerAdapter接口 -->
    <bean class="org.springframework.web.servlet.mvc.SimpleControllerHandlerAdapter">
    </bean>

    <!-- 处理器映射器  ,将bean的name作为URL进行查找,需要在配置Handler时指定beanName(就是URL)-->
    <bean class="org.springframework.web.servlet.handler.BeanNameUrlHandlerMapping"></bean>

    <!-- 配置视图解析器
        解析jsp视图,默认使用jstl标签
        CLASSPATH下面要有jstl jar包
    -->
    <bean class="org.springframework.web.servlet.view.InternalResourceViewResolver"></bean>
</beans>
访问的地址:http://localhost:8080/day_0301_springMVC/queryItems.action
结果如下图所示:

再基于注解的映射器和适配器配置中,注解Handler的编写如下:
@Controller
public class TestController2
{
    @RequestMapping("/queryItemsTest")
    public ModelAndView queryItems()
    {
        List<Items> itemsList=new ArrayList<Items>();
        Items items1=new Items();
        items1.setName("联想笔记本");
        items1.setPrice(2500);
        Items items2=new Items();
        items2.setName("apple");
        items2.setPrice(5000);
        itemsList.add(items1);
        itemsList.add(items2);
        ModelAndView modelAndView=new ModelAndView();
        modelAndView.addObject("itemsList", itemsList);
        modelAndView.setViewName("/WEB-INF/jsp/items/itemsList.jsp");
        return modelAndView;
    }
}
springmv.xml的配置如下:
<?xml version="1.0" encoding="UTF-8"?>
<beans xmlns="http://www.springframework.org/schema/beans"
    xmlns:xsi="http://www.w3.org/2001/XMLSchema-instance"
    xmlns:context="http://www.springframework.org/schema/context"
    xmlns:mvc="http://www.springframework.org/schema/mvc"
    xmlns:aop="http://www.springframework.org/schema/aop"
    xmlns:tx="http://www.springframework.org/schema/tx"
    xsi:schemaLocation="http://www.springframework.org/schema/mvc http://www.springframework.org/schema/mvc/spring-mvc-4.1.xsd
        http://www.springframework.org/schema/beans http://www.springframework.org/schema/beans/spring-beans.xsd
        http://www.springframework.org/schema/context http://www.springframework.org/schema/context/spring-context-4.1.xsd
        http://www.springframework.org/schema/aop http://www.springframework.org/schema/aop/spring-aop-4.1.xsd
        http://www.springframework.org/schema/tx http://www.springframework.org/schema/tx/spring-tx-4.1.xsd">
    <bean class="com.demo.ssm.controller.TestController2"></bean>
    <!-- 注解映射器 -->
    <bean class="org.springframework.web.servlet.mvc.method.annotation.RequestMappingHandlerMapping"/>
    <!-- 注解适配器 -->
    <bean class="org.springframework.web.servlet.mvc.method.annotation.RequestMappingHandlerAdapter"/>
    <!--使用下面的mvc:annotation-driven可以代替上面的注解映射器和注解适配器-->
    <mvc:annotation-driven></mvc:annotation-driven>
    <!-- <context:component-scan base-package="com.demo.ssm.controller"></context:component-scan> -->
    <!-- 配置视图解析器 -->
    <bean class="org.springframework.web.servlet.view.InternalResourceViewResolver"></bean>
</beans>
部署后,访问地址:http://localhost:8080/day_0301_springMVC/queryItemsTest.action,运行结果同上。
标签:
原文地址:http://www.cnblogs.com/justuntil/p/5235833.html